
Help Center


Single Touch Payroll (STP) sends tax and super information from your STP-enabled payroll or accounting software to the ATO from your payroll.
STP Phase 2 won’t change the payments you report through STP, but it changes how those amounts are reported.
To learn more about STP 2, visit the ATO website.
Collect additional employee details and income types before starting with STP phase 2, such as:
Employee details:
1. Commencement date
2. Employment basic code
The basis of payment indicates the type of arrangement between the employer and employee (Full Time, Part Time, Casual, Labour hire etc…)
3. Tax Category & Options
Choose employee’s tax category and option to declare the tax code. (Regular, Actors, Foreign Resident, No TFN etc…)
4. Select Income Type
Add income types based on tax category selected: salary & wages, closely held, foreign employment etc…
Before commencing STP Phase, you'll be prompted to collect more details of the employees to meet the ATO's new requirements.
We release STP phase 2 simultaneously with STP phase 1 earlier than the official starting date of January 2022 to give more time for you to transition and adjust with the changes. If & when you are ready to switch to STP V2, the process is irreversible!
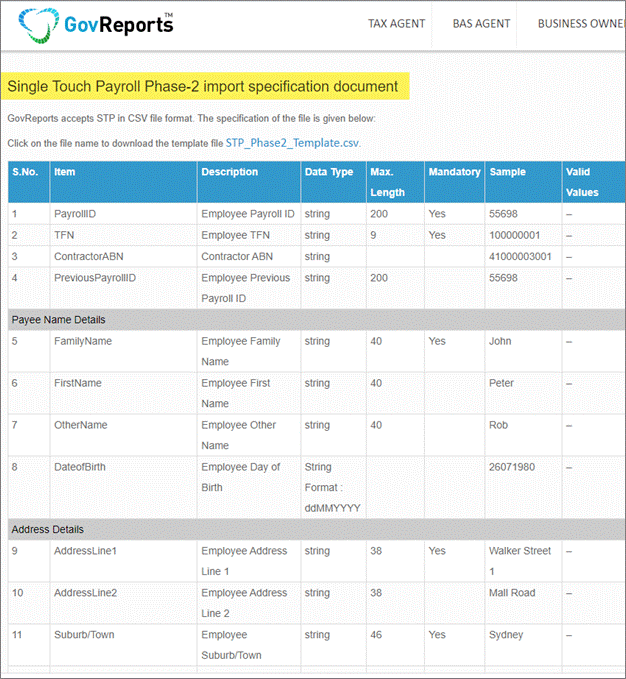
For those uploading payroll in CSV for STP phase 2 lodgements, the STP phase 2 CSV file import specification can be downloaded here whilst earlier version will still work with some additional manual inputs required.
ATO Employer Guide:
STP phase 2 key changes:
Preparing STP phase 2 in GovReports:
Download latest CSV file Specification
Before proceeding to STP V2, you must clear any draft records from the previous version.
Once you activate STP V2, you will not be able to complete any draft pay runs in STP V1. A draft pay run in STP V1 will not convert to STP V2, therefore you need to clear any drafts from STP V1.
If a draft pay run exists in the STP V1, you must delete it or lodge it to clear all draft records.
Once there are no more drafts in STP V1, you can proceed to activating STP V2. If required, you can then recreate pay runs from STP V1 in STP V2.
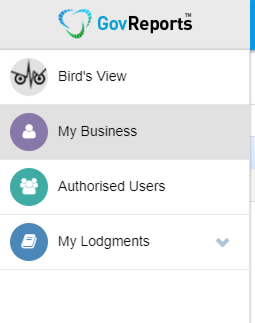
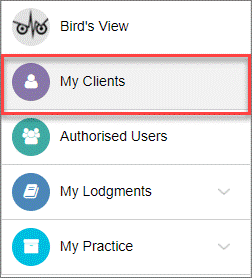
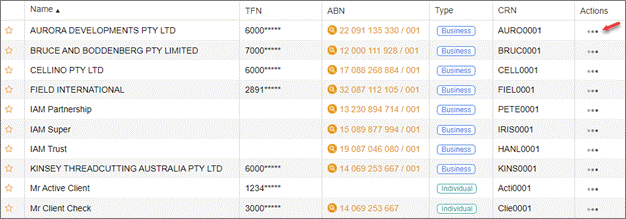
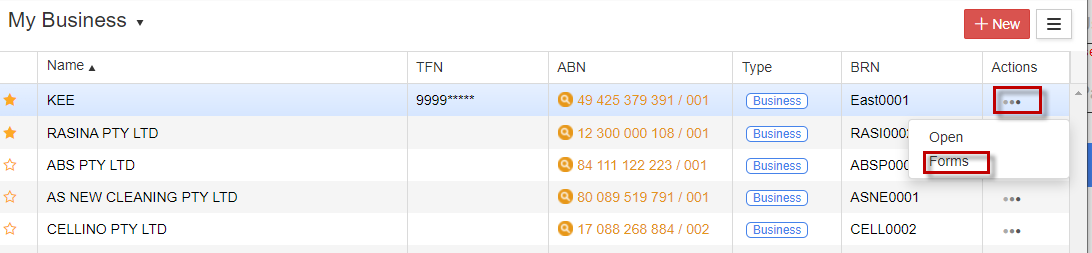
To convert a client to STP V2, go to My Clients > select client.
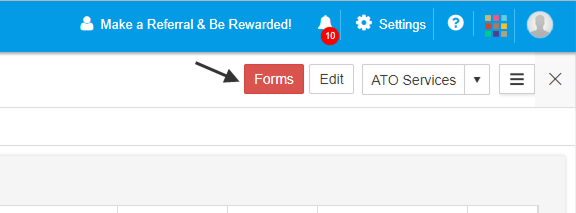
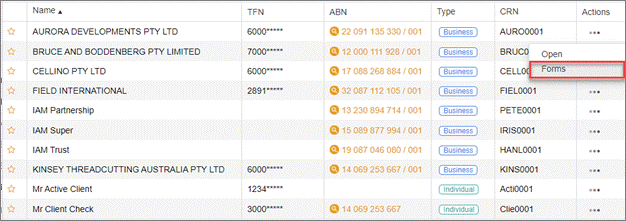
Select Forms from the Actions menu.

Select Confirm to upgrade to V2.
The process is irreversible once you have completed lodgments using STP V2 for the selected client.
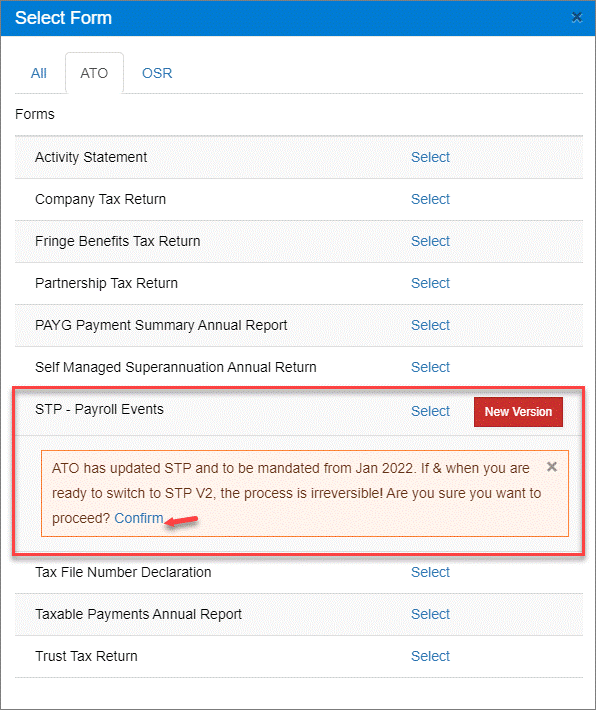
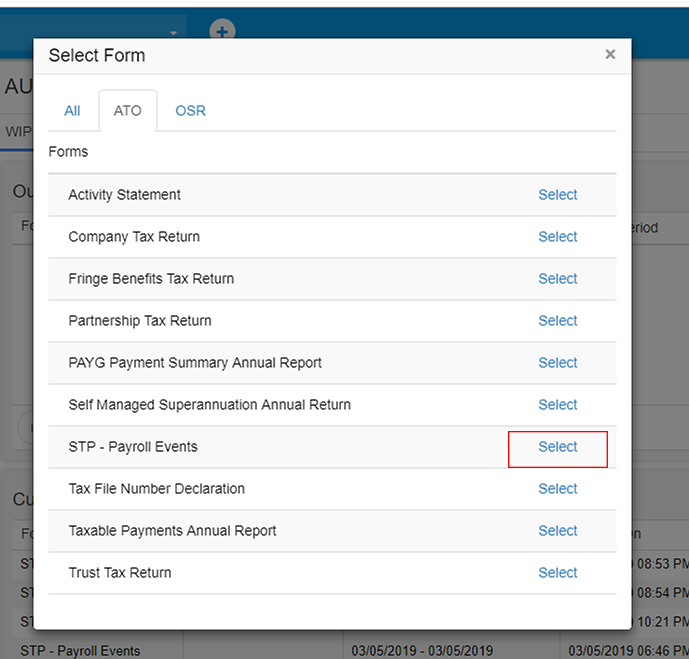
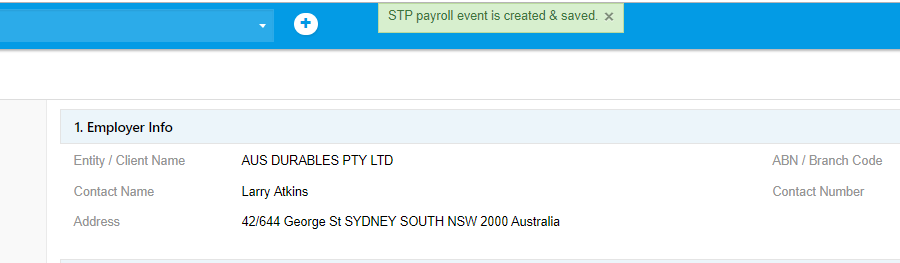
This confirms STP V2 for the selected client. To start entering a Payroll Event, select the relevant client from My Clients. Go to Forms > STP – Payroll Events > New Version. If any client details are missing, these must be completed before being able to proceed with a Payroll Event.
If all client details are complete, STP – Payroll Events will load.
To prepare the STP report manually in GovReports, go to My Clients > select client.
Select Forms from the Actions menu.

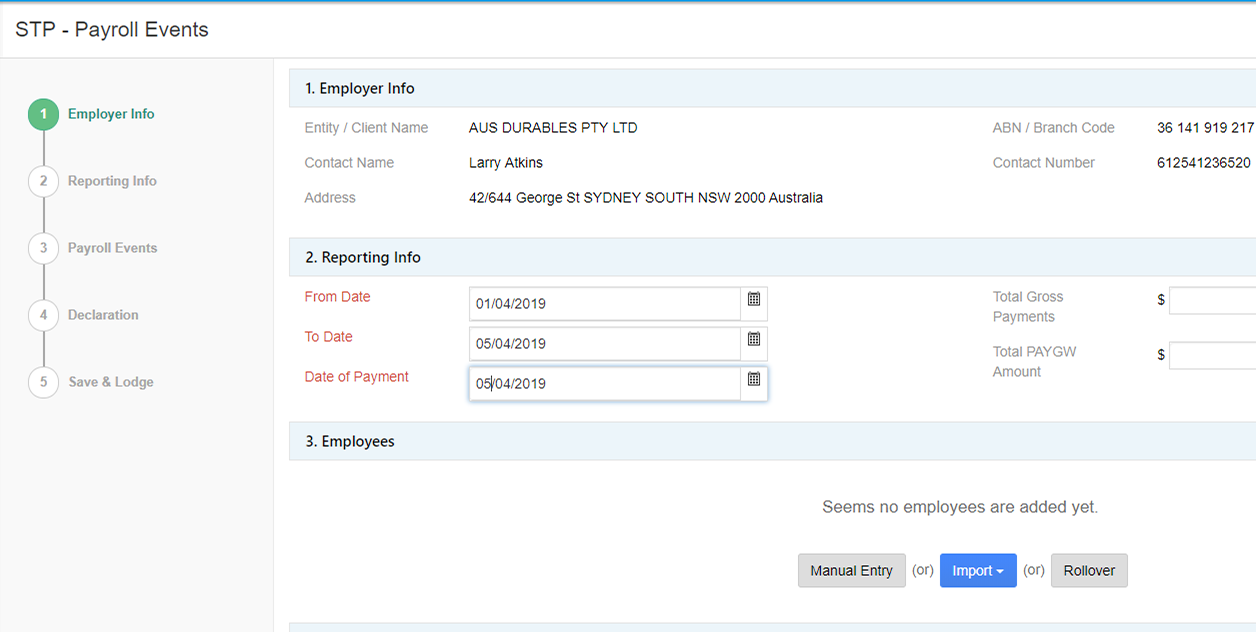
The STP - Payroll Events screen will load.
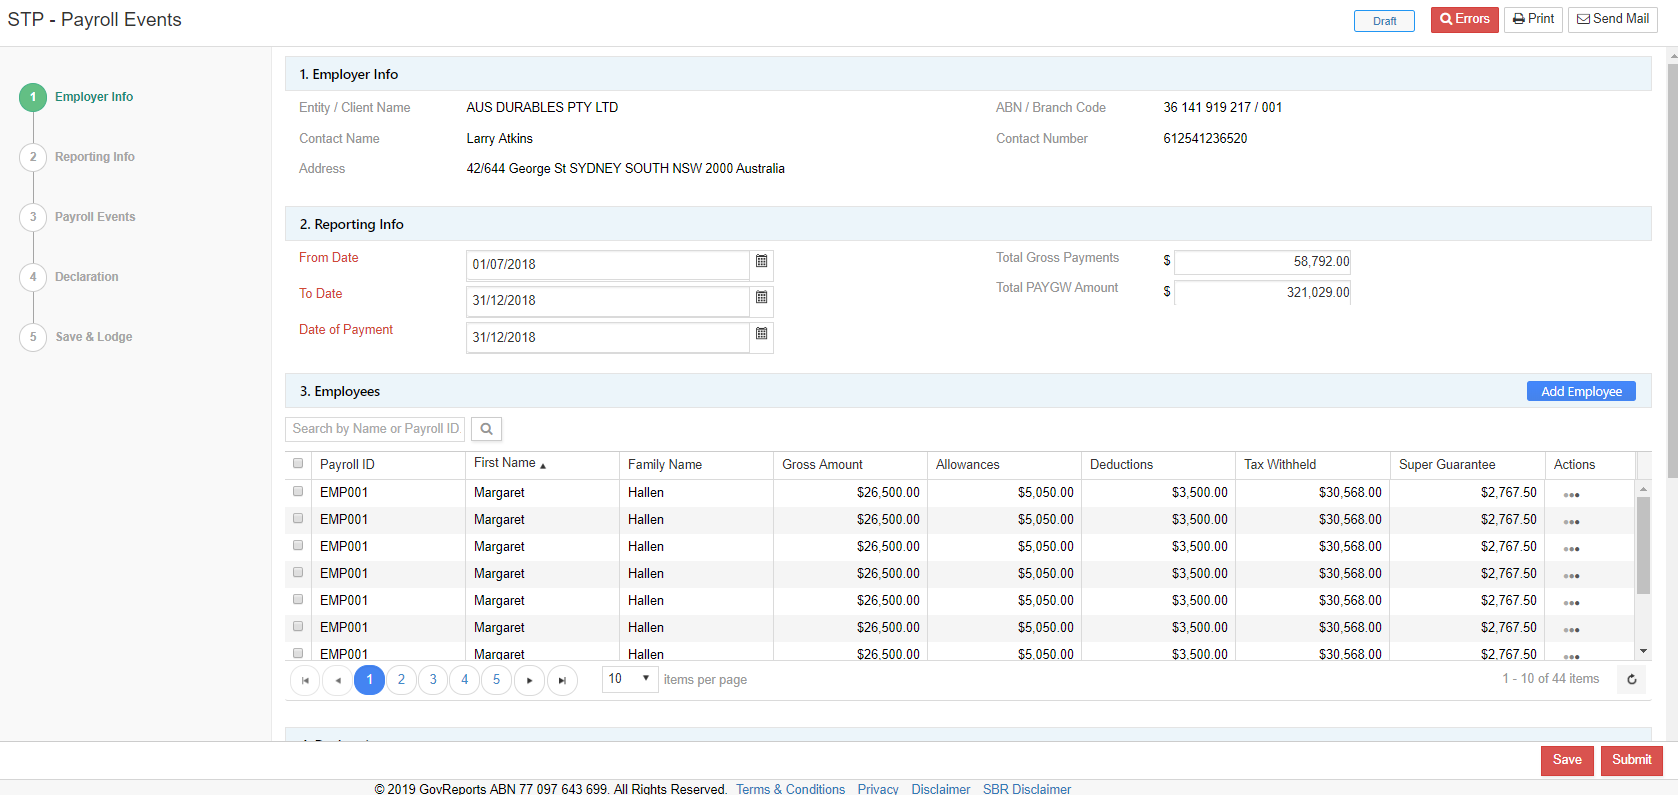
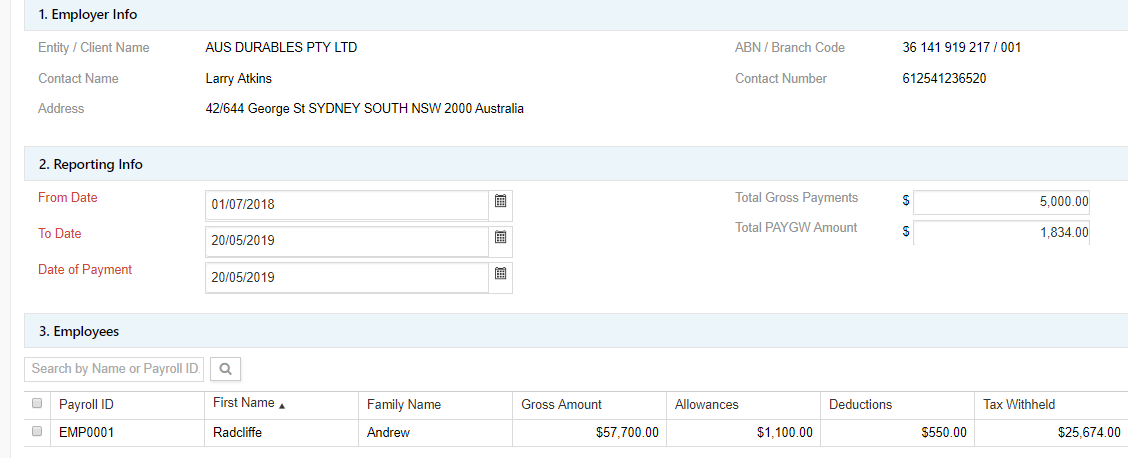
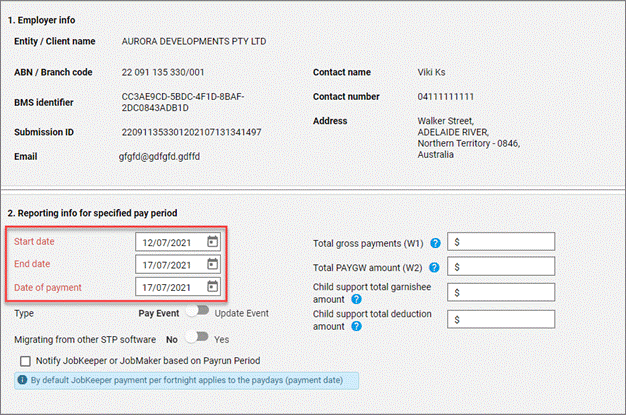
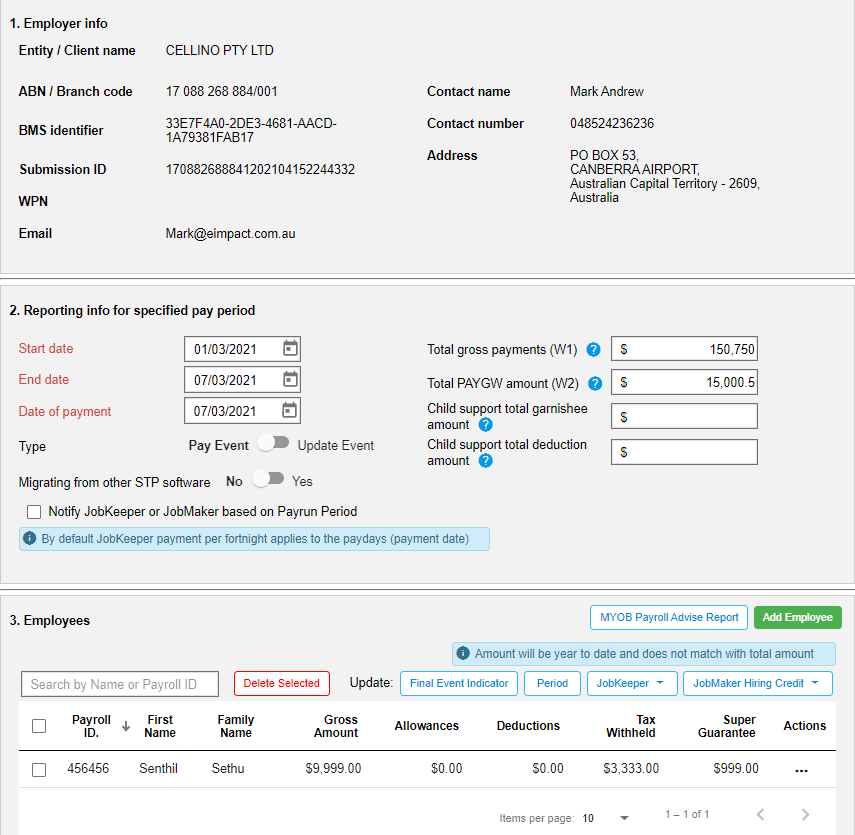
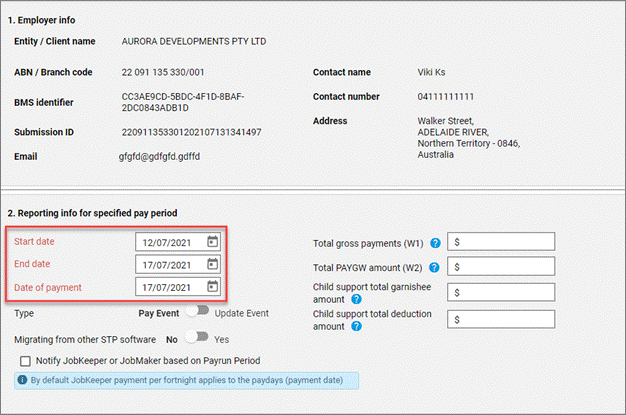
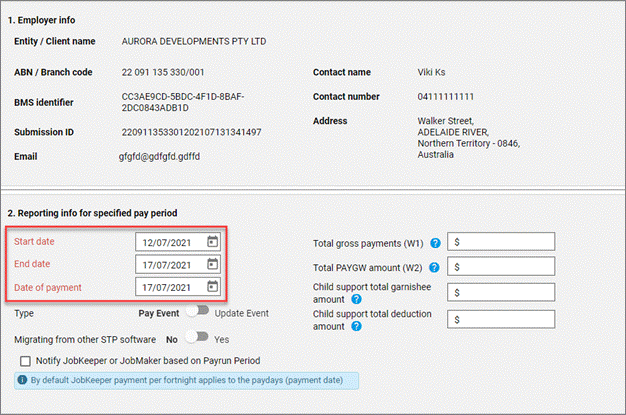
Check that the prefilled employer information is correct.
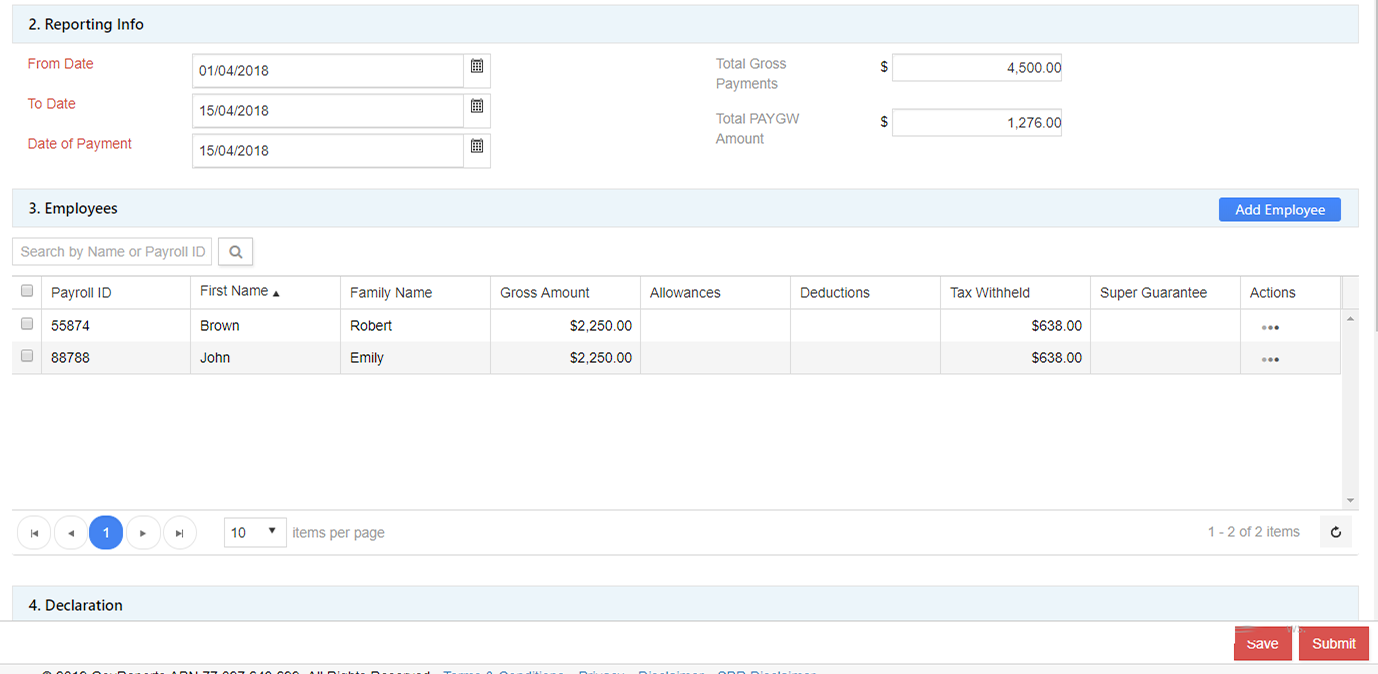
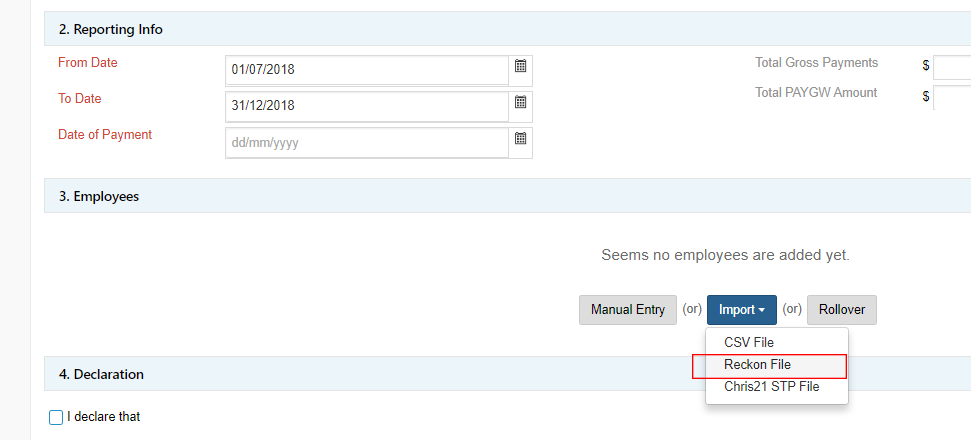
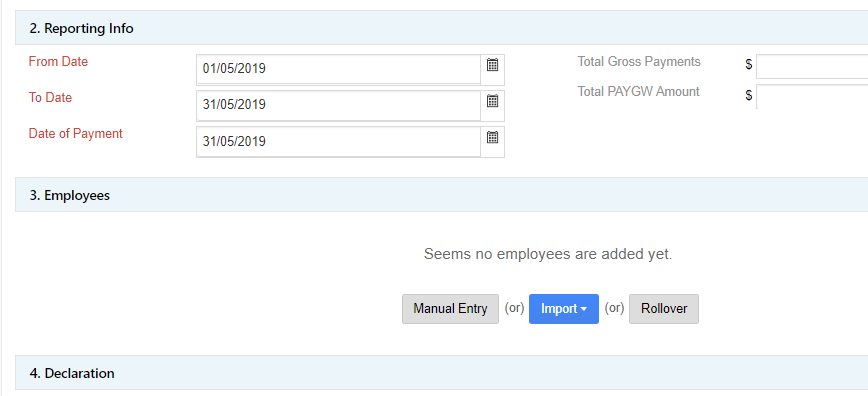
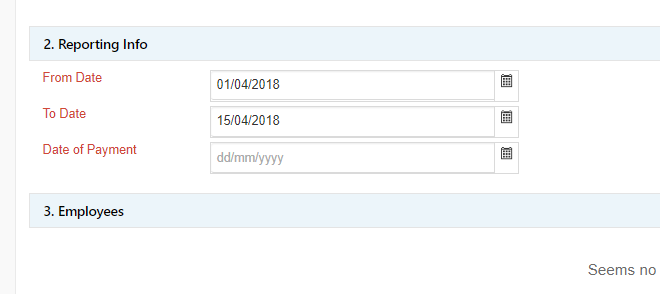
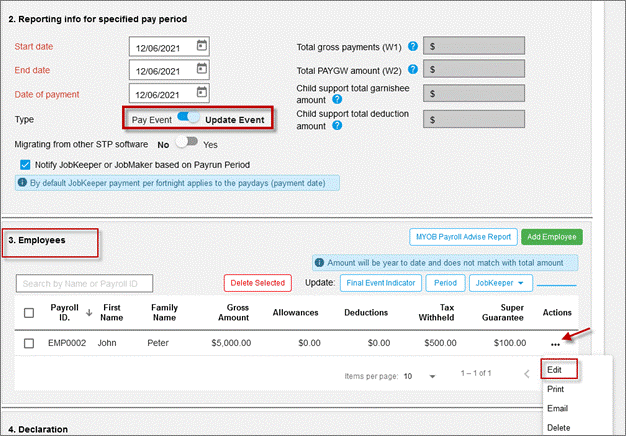
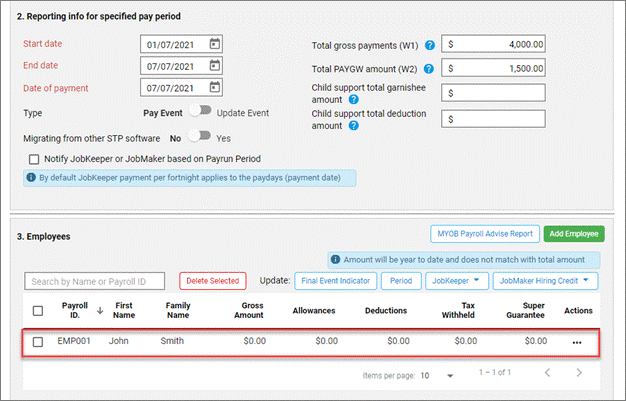
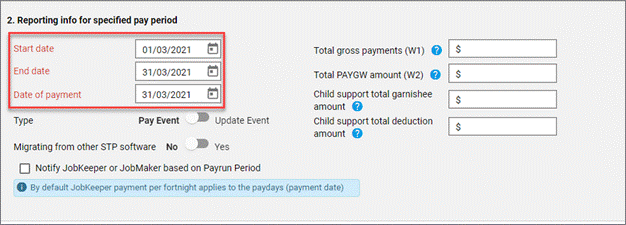
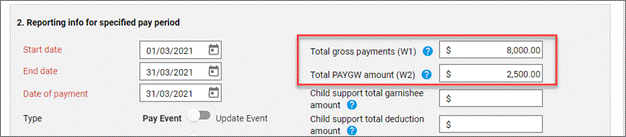
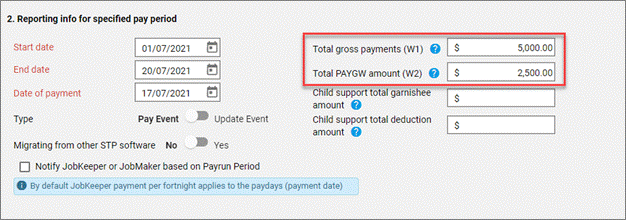
In Reporting info for specified pay period, enter pay run start date, end date and date of payment.
Make sure these details are correct before proceeding.
Once the employees are added and any details saved, it is not possible to edit this section and you will need to delete the Payroll Event and start again.
Reporting information may be edited before the form is saved.
Note that using the Enter key will automatically save the form. To proceed through the fields, use the tab key or mouse.
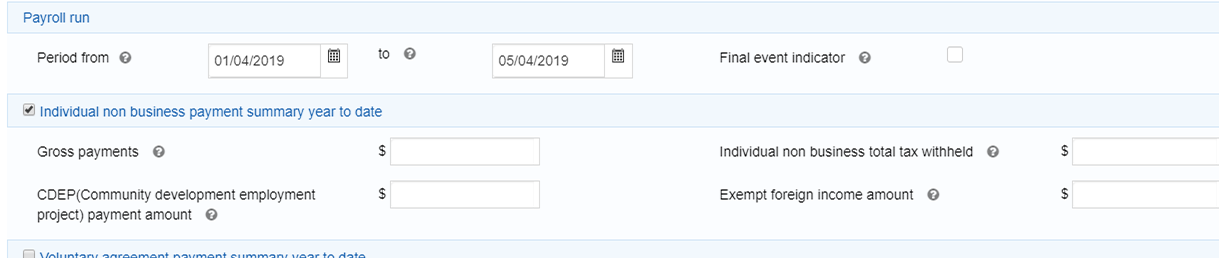
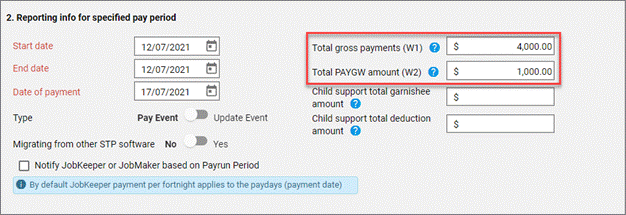
Enter the amount in Total gross payments (W1) and Total PAYGW amount (W2) for the specified pay period.
This amount represents the figures for the specified pay period only. In the next section you will enter the year to date figures.
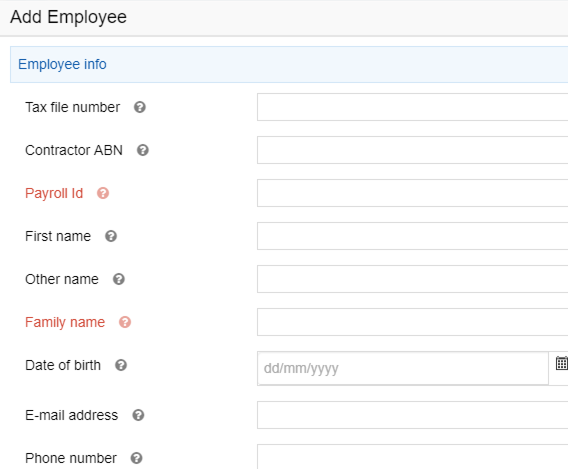
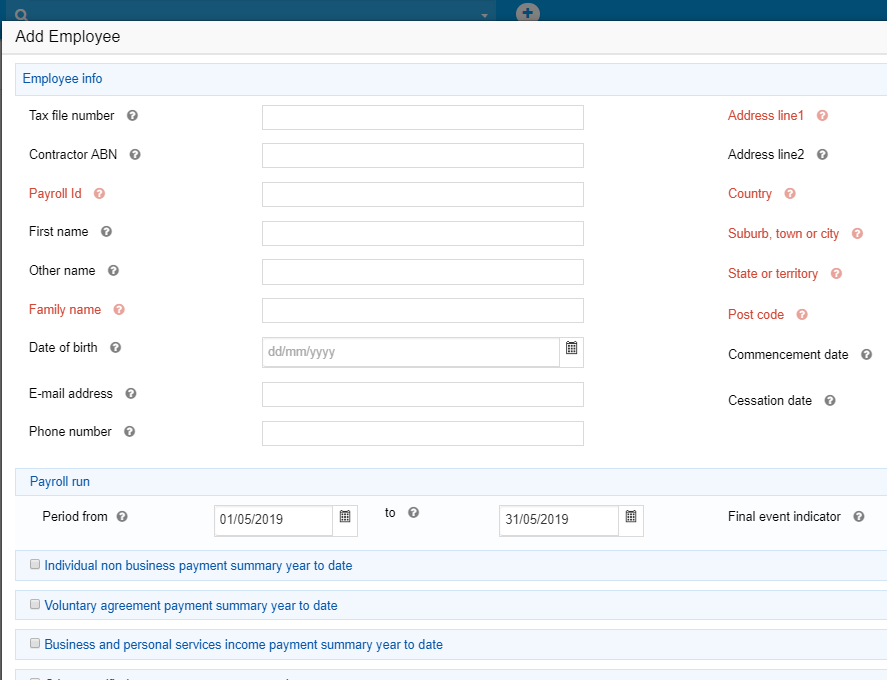
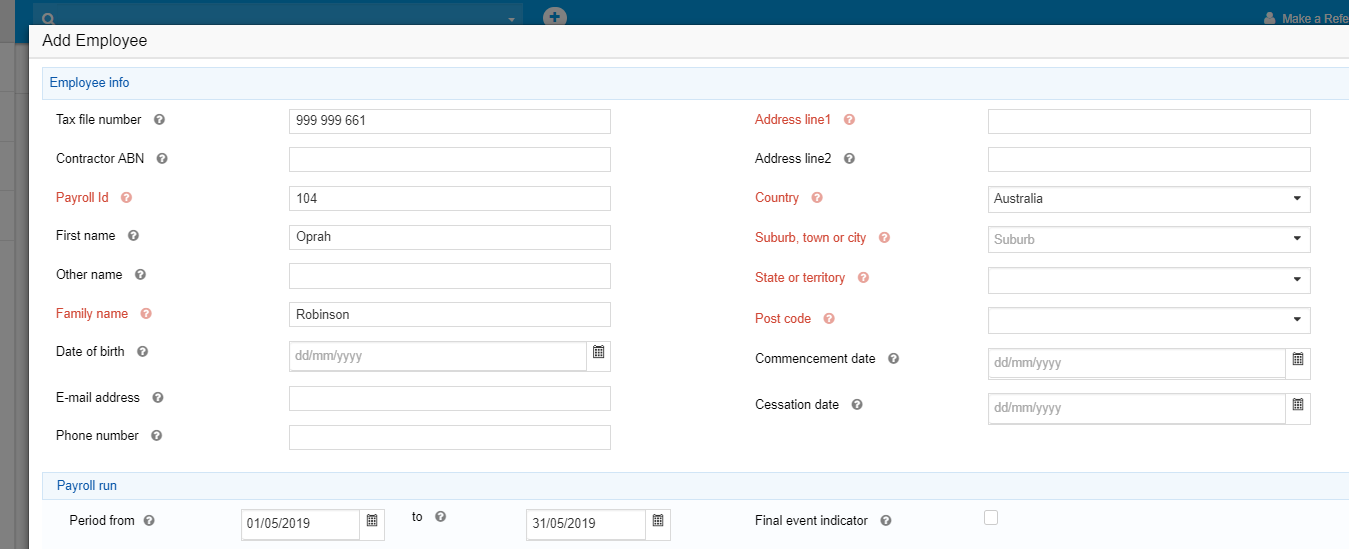
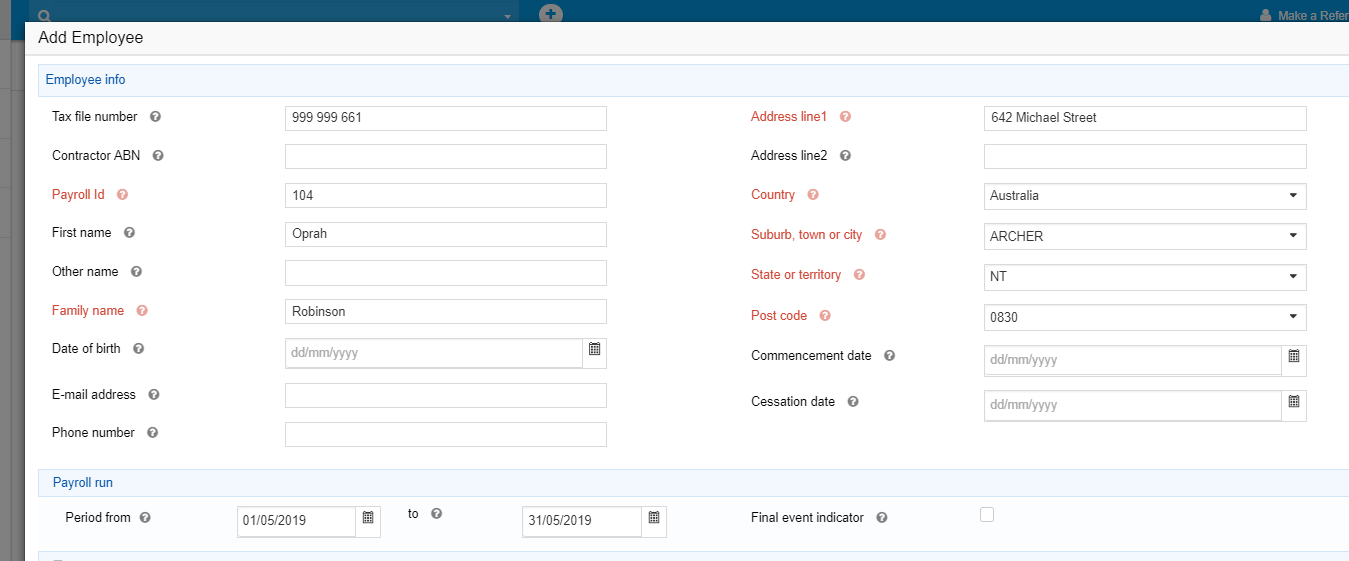
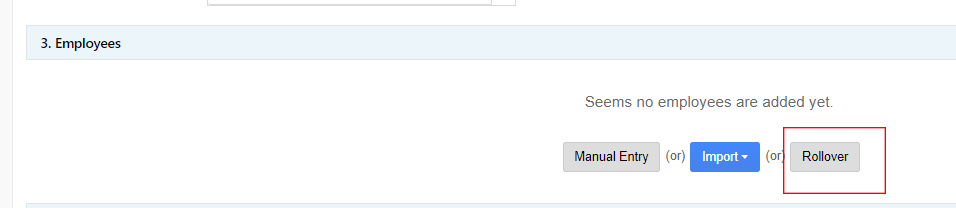
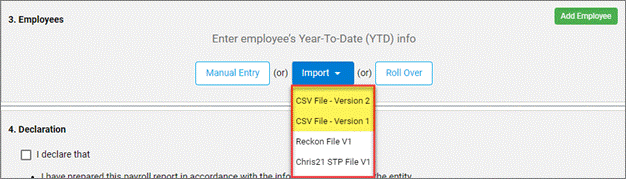
In the Employees section, select Manual Entry, or Add Employee. Either option will then take you to the Add Employee details screen.

![]()

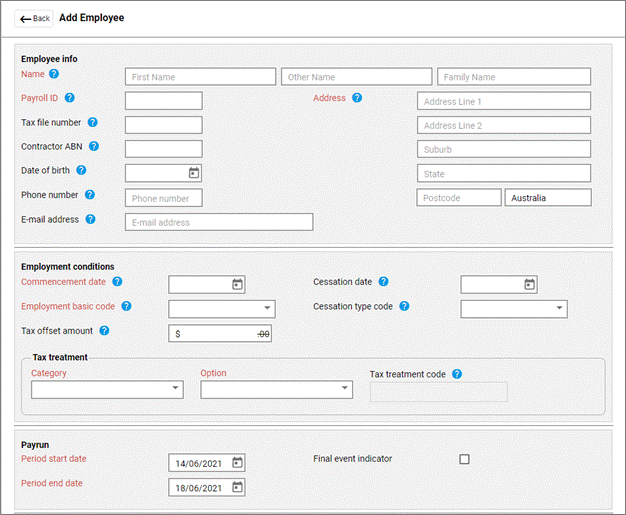
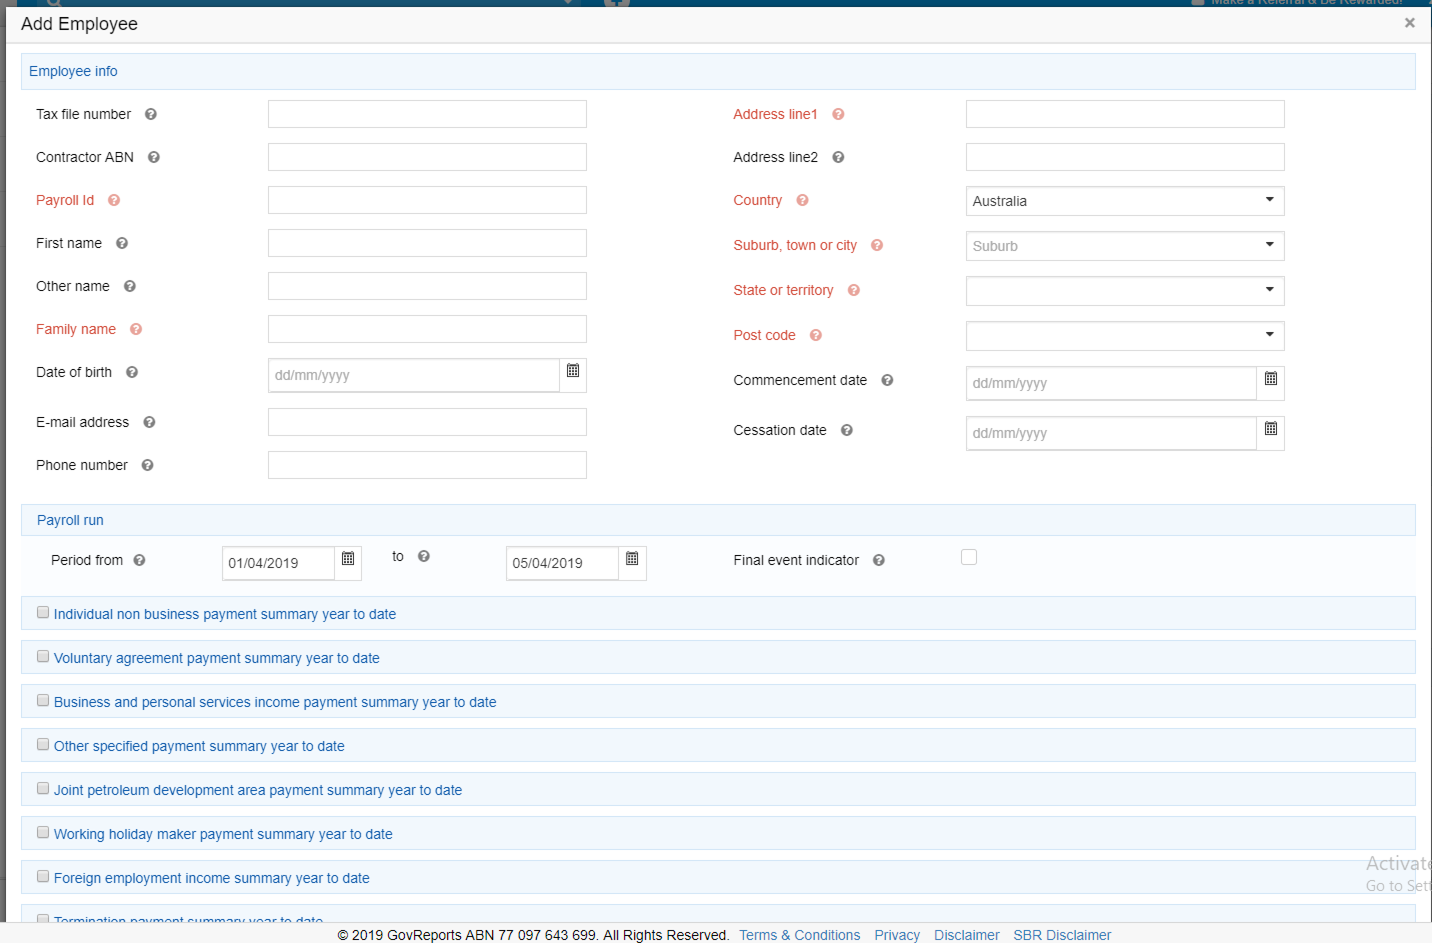
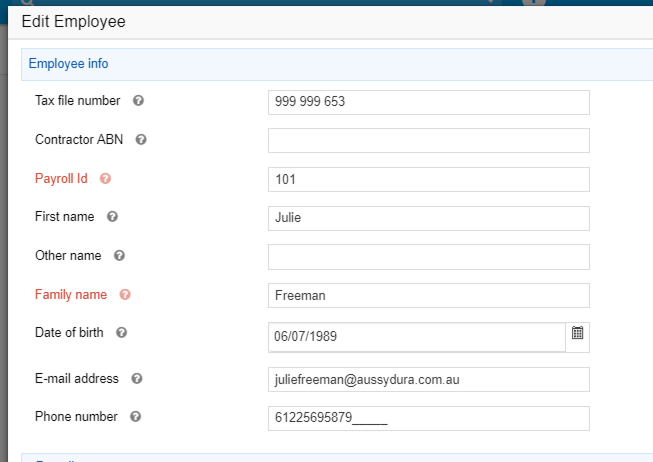
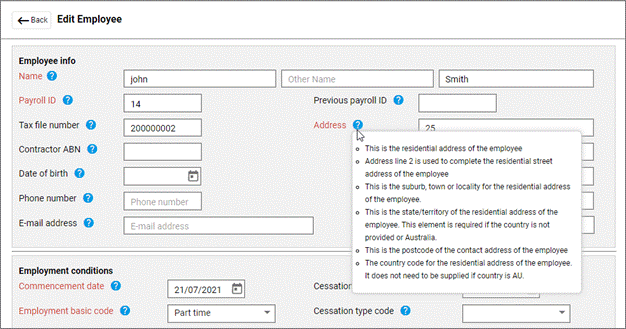
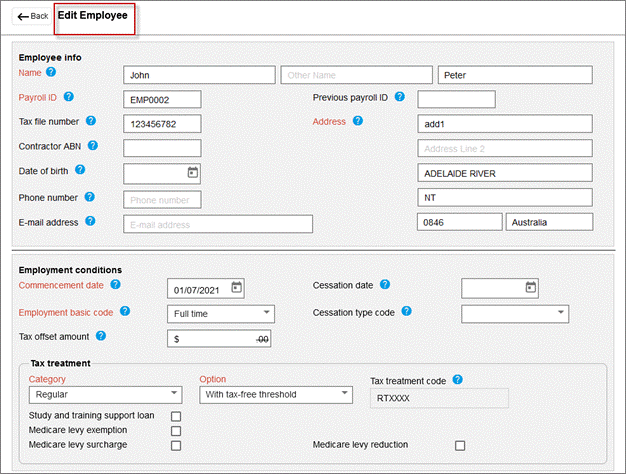
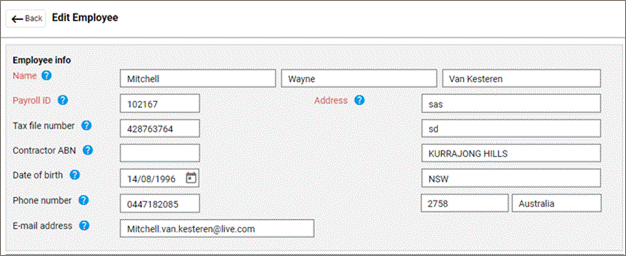
Enter all required employee information. Fields in red are compulsory to fill in.
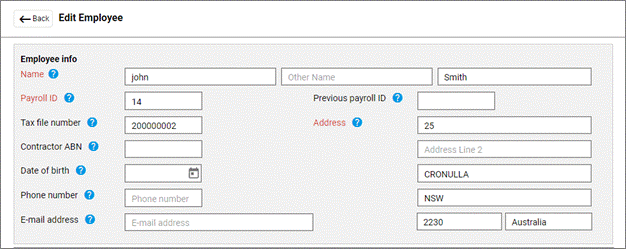
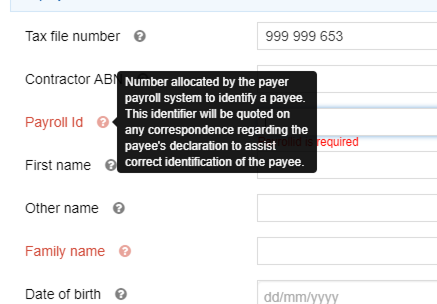
To find more information about a particular field, hover over the question mark next to the field name.

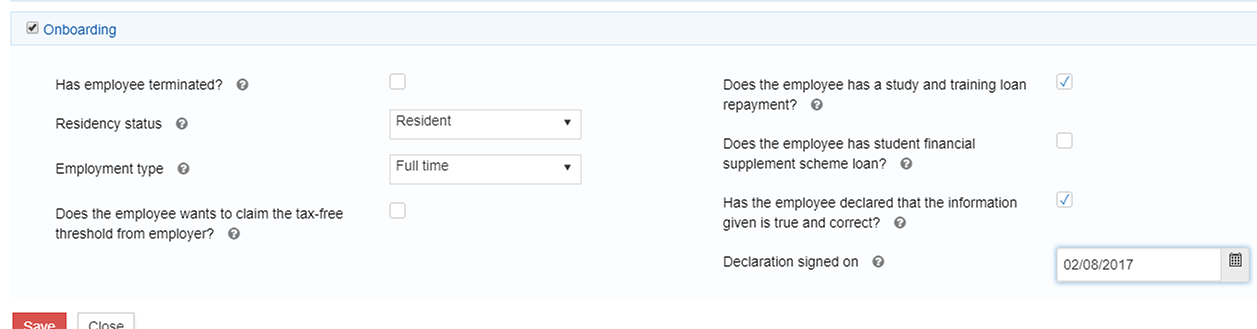
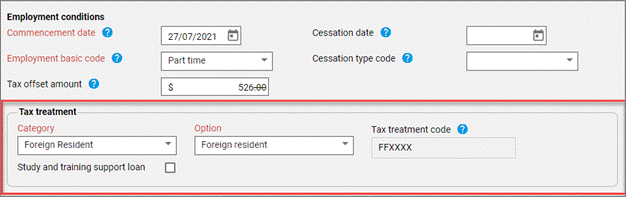
In Employment conditions , enter employment commencement date and employment basic code to define the employment status.
In Tax treatment , the Category and Option are required. Select from the drop-down menu in each field. The Tax treatment code will be prefilled automatically based on your selection.
Depending on the category chosen, other fields may appear to allow tax file number declaration details to be completed.
The pay run Period start date and Period end date will be prefilled based on the pay period entered in the Reporting Info for specified pay period .

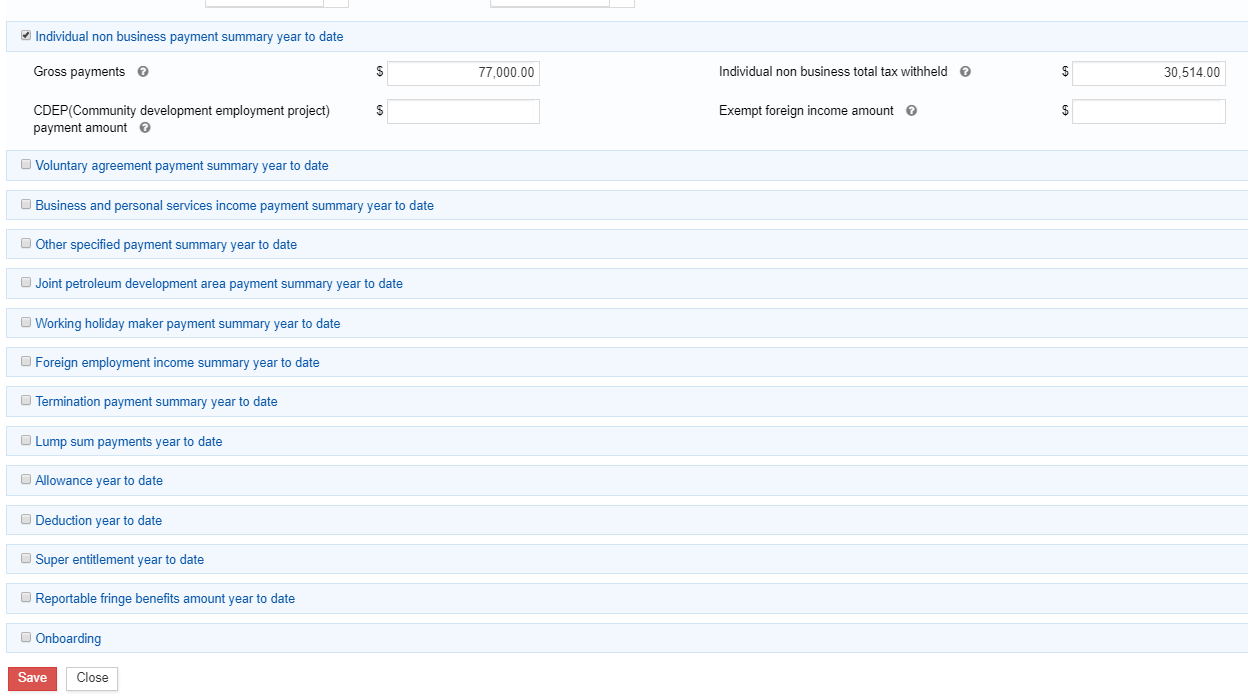
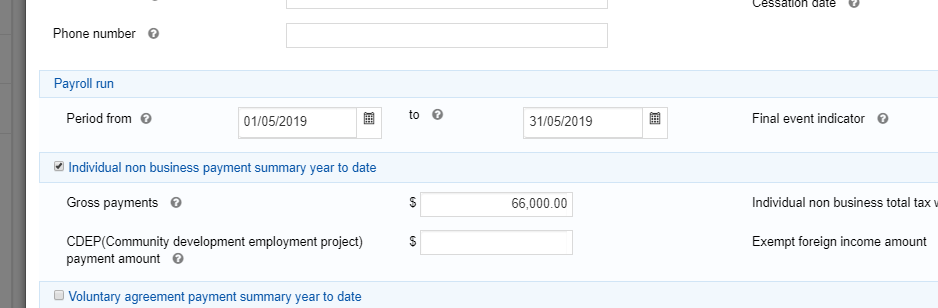
Based on the category selected in the Tax treatment section, the list of possible income streams will be available. Select the income stream from the options and select Add income stream button.

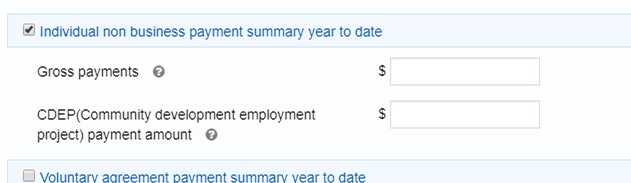
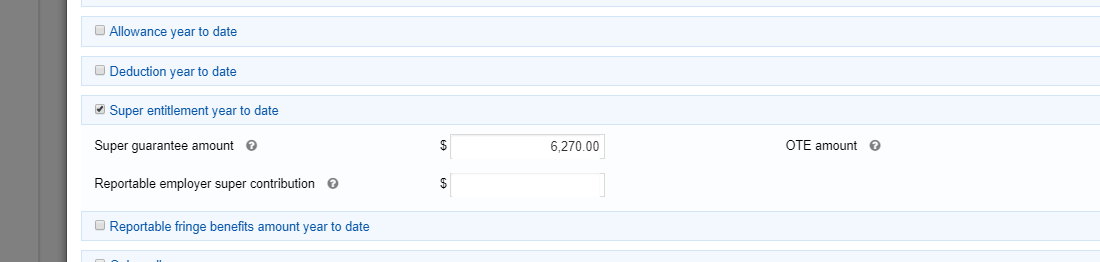
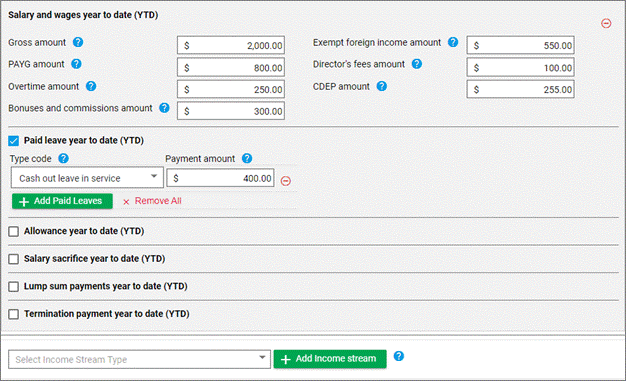
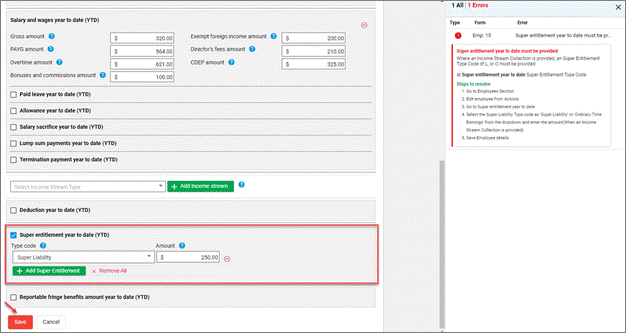
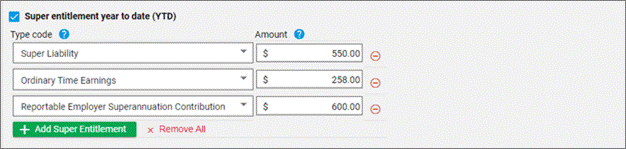
Enter the employee’s Salary and wages year to date (YTD) figures in corresponding fields.
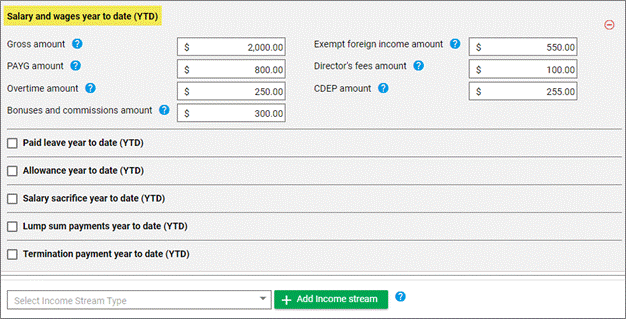
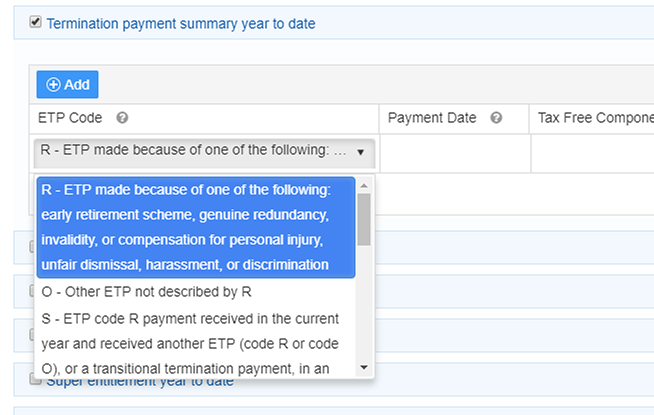
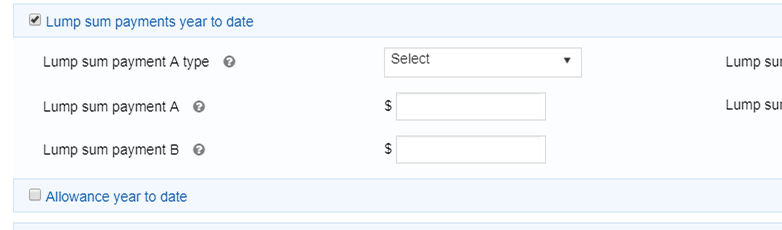
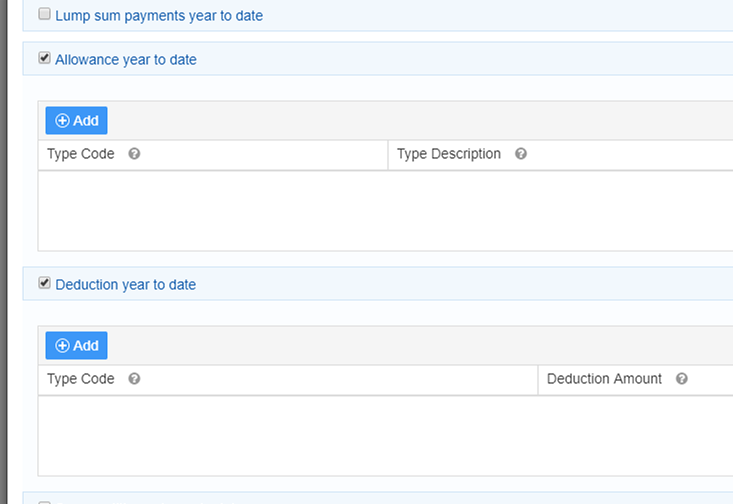
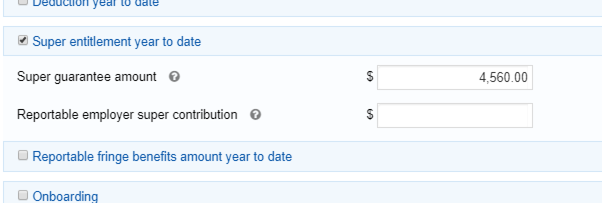
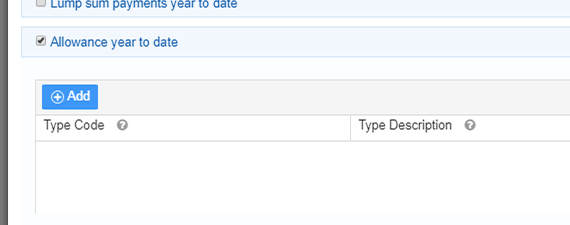
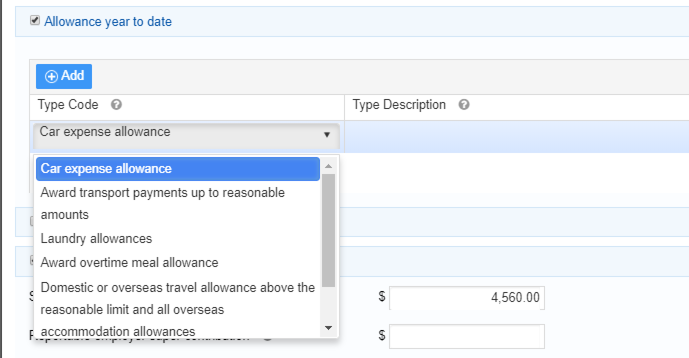
To record paid leave, allowances, salary sacrifice, lump sum payments or termination payments, tick the checkbox for each required section and select the Add option.
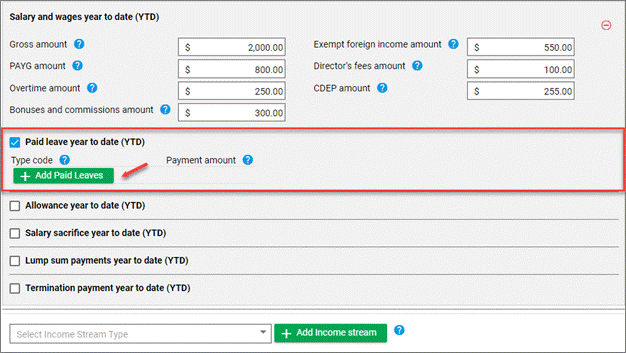
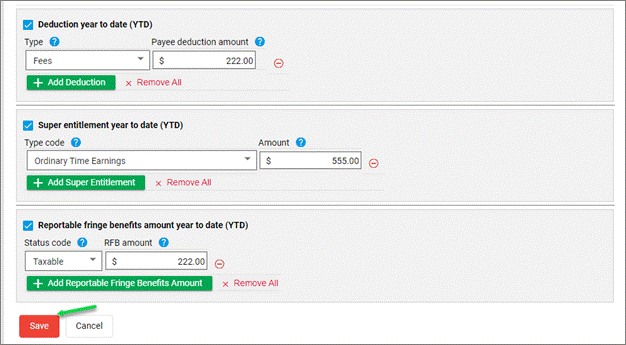
Enter the year to date amounts for each payroll category.
If there is more than one type of income stream, another income stream can be selected and year to date figures entered for all required payroll categories for the second income stream.
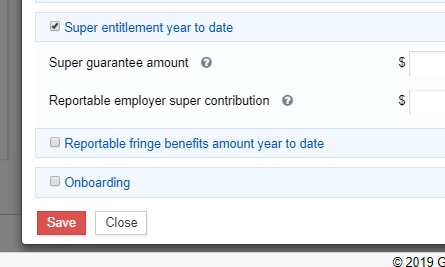
Once you have recorded employees’ year to date figures for all required income streams and payroll categories, select Save.
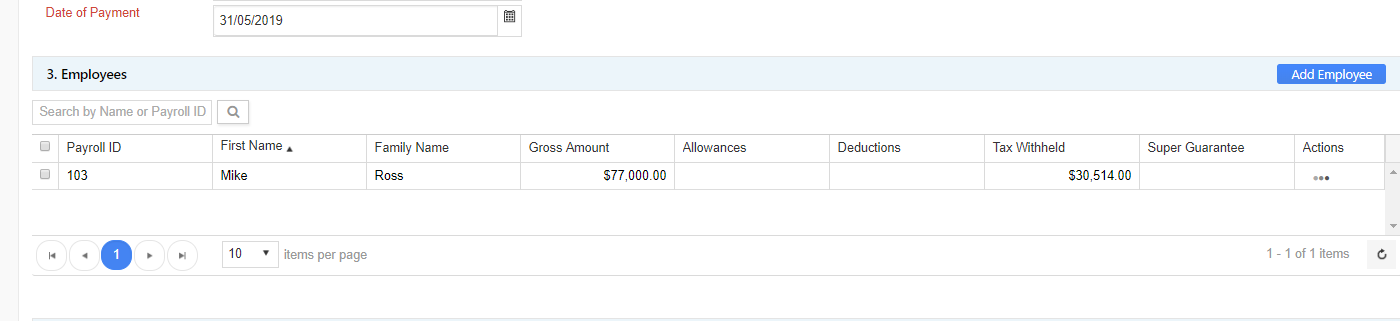
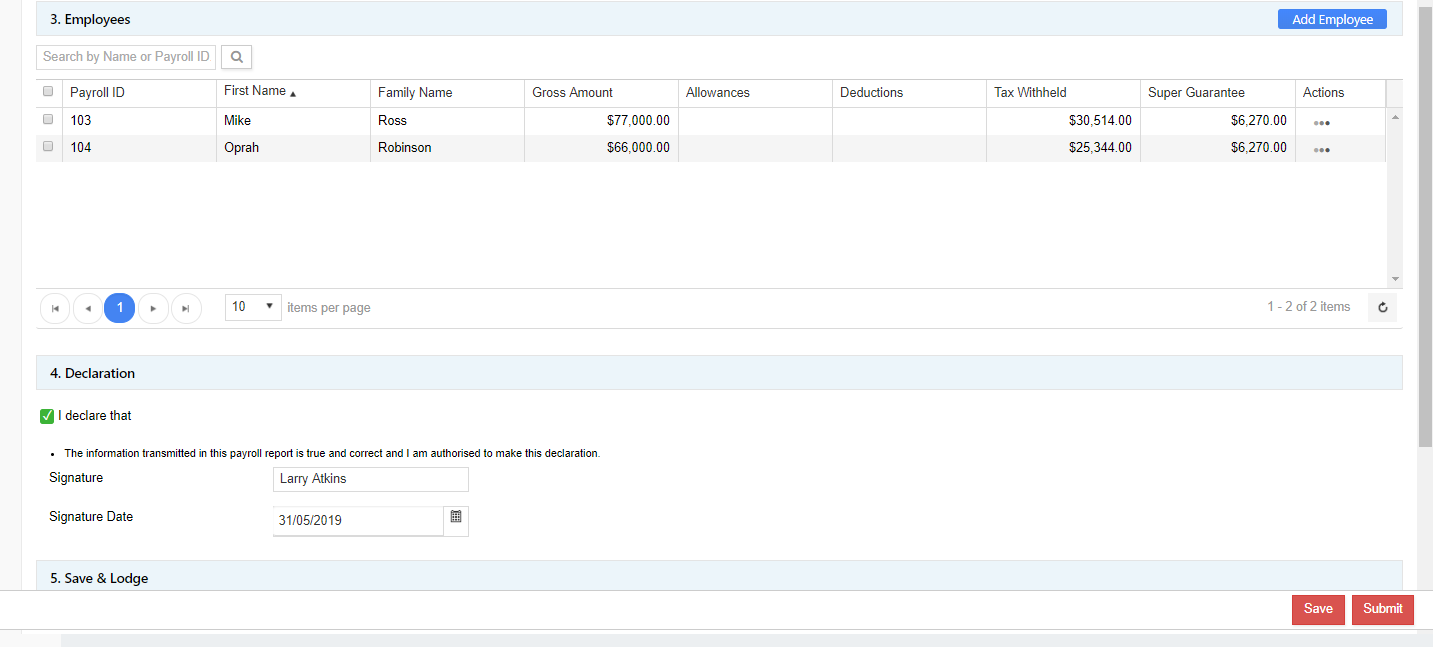
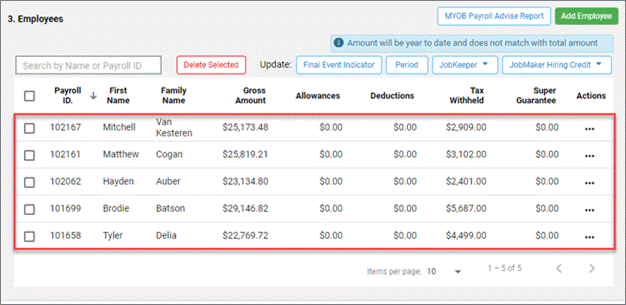
The employee’s payroll details will be populated in the Employees section as a summary.
Add more employees by selecting the Add Employee button .

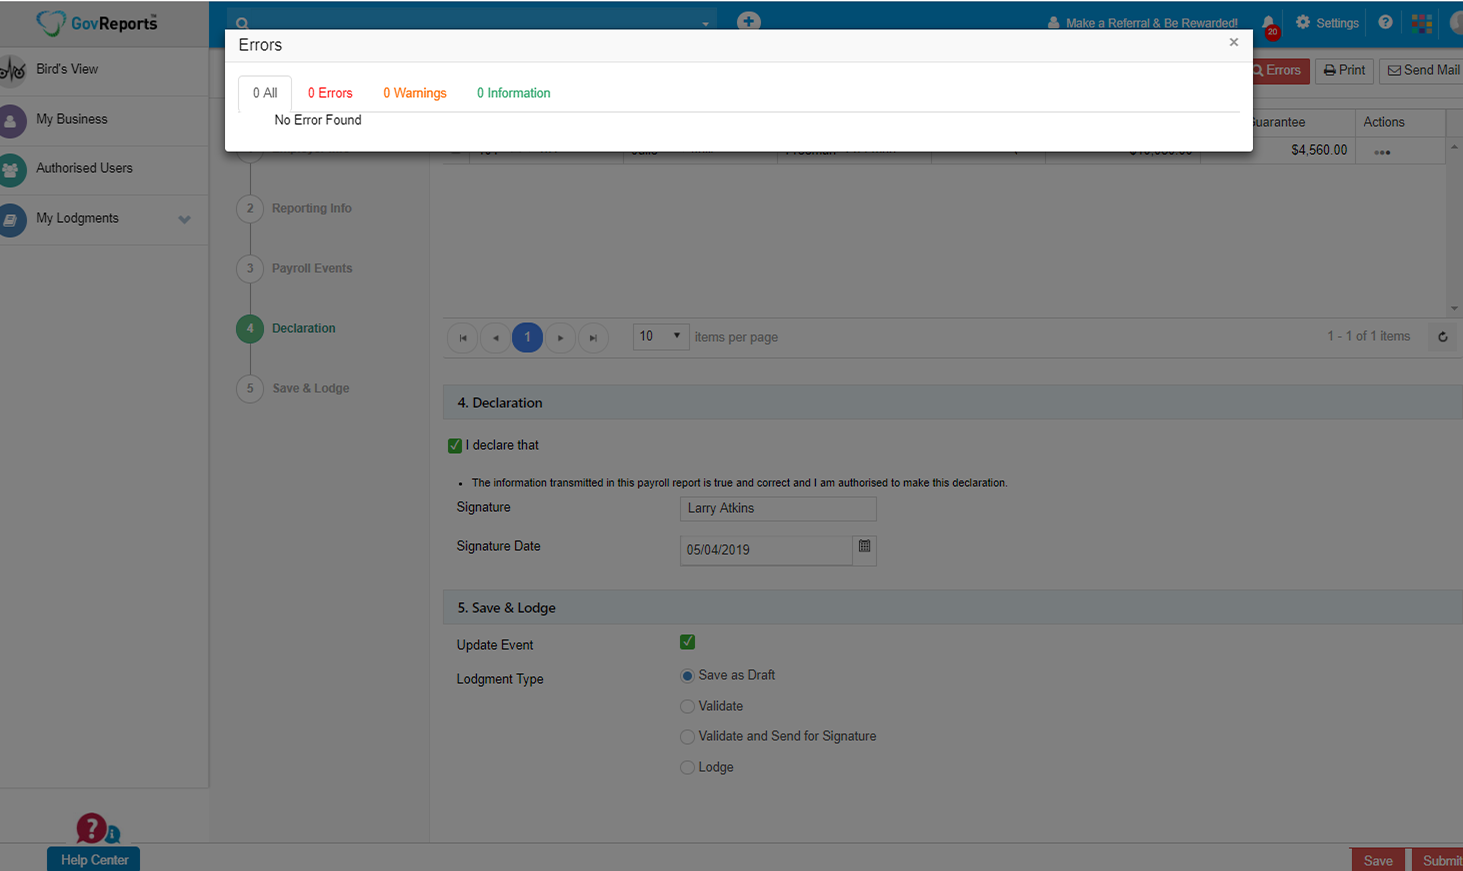
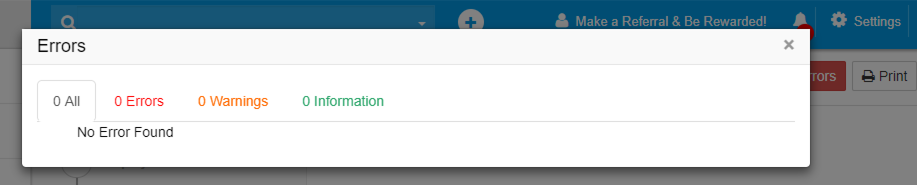
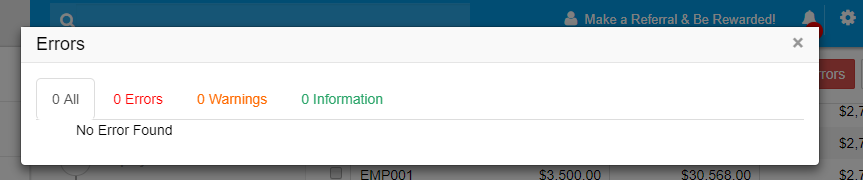
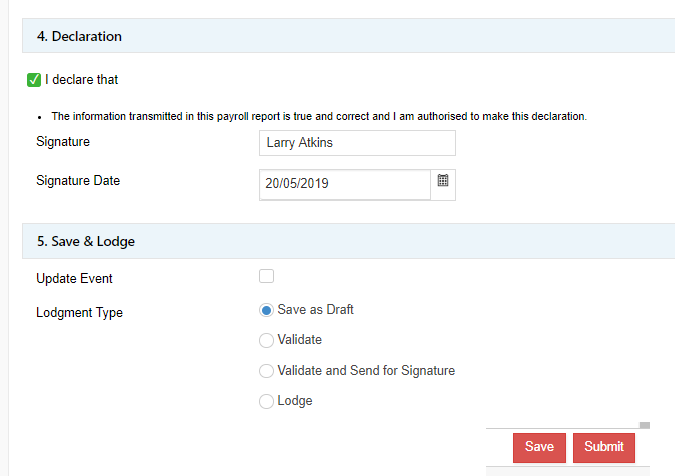
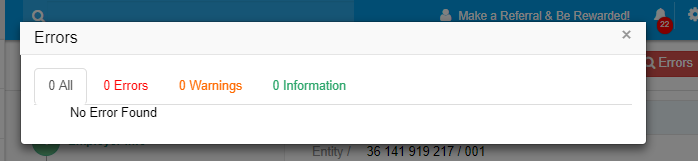
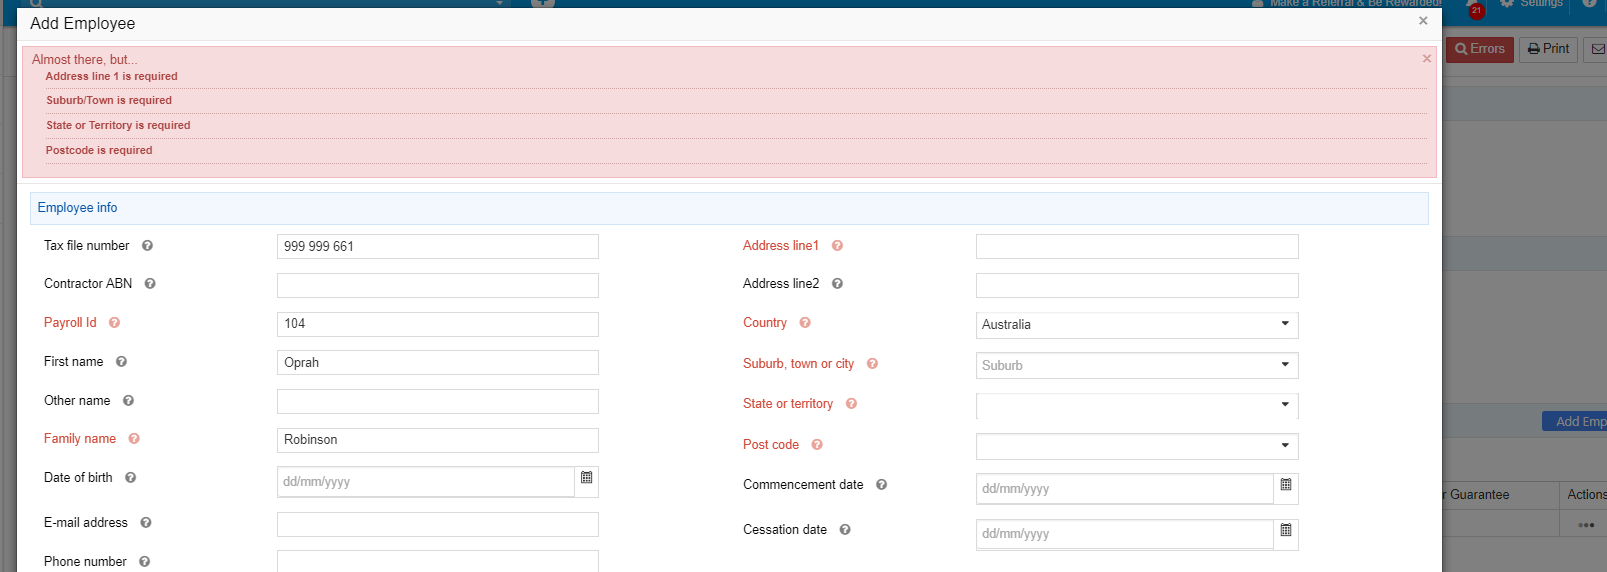
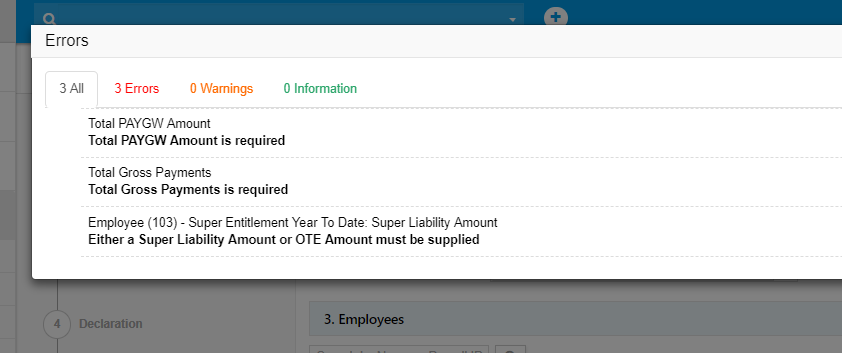
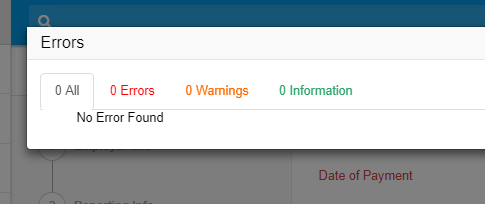
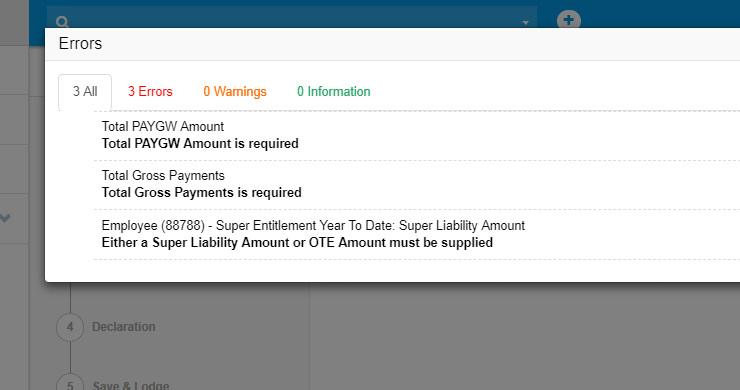
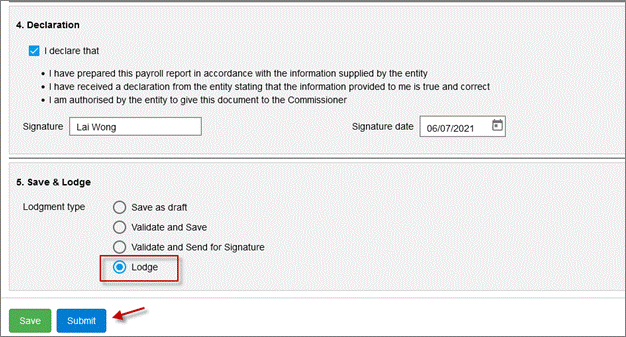
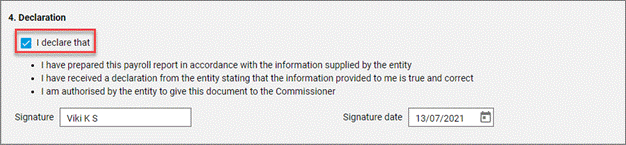
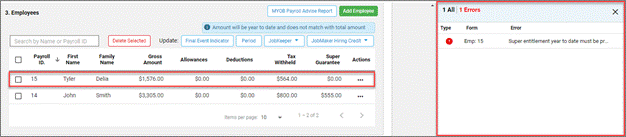
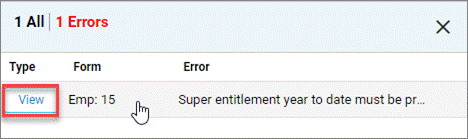
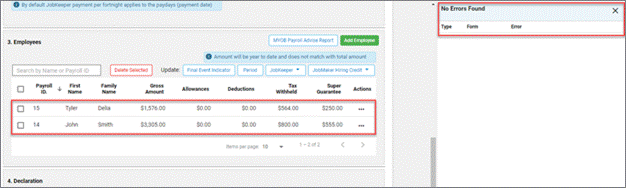
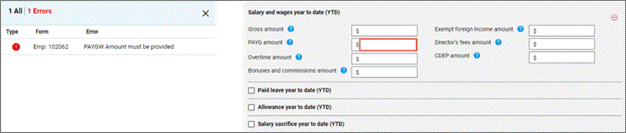
Before making the declaration, check for any errors.
If there are errors present, these will show as a summary to the right of the Payroll Event screen.
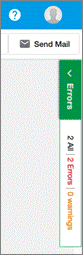
Select the Errors button to expand the error report.

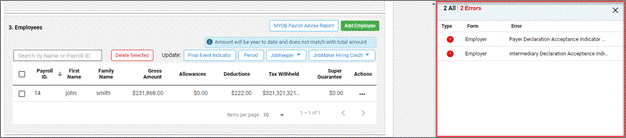
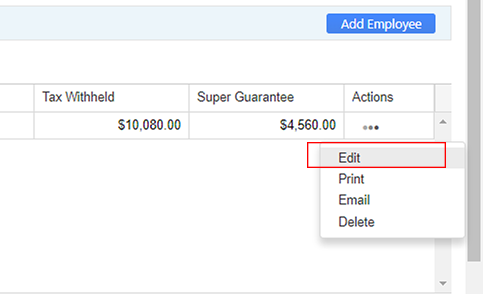
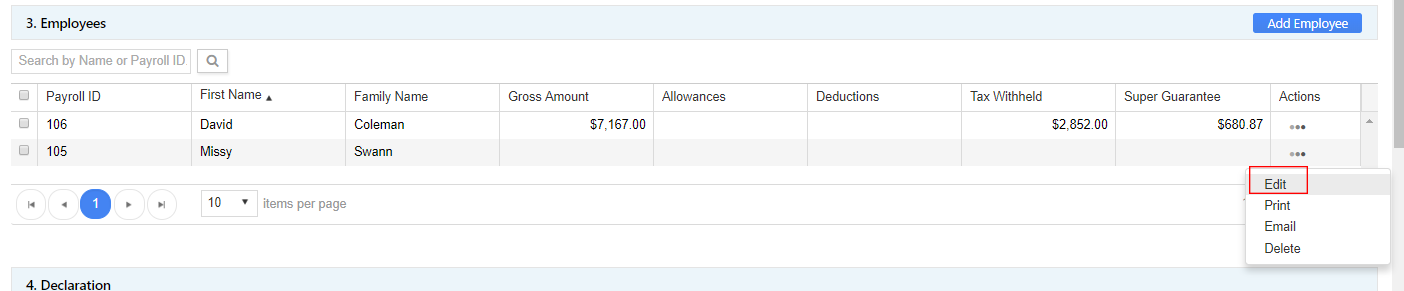
Fix the errors and review the warnings before proceeding. Correct any errors by selecting Edit from the Actions menu, correct relevant details, then Save again.
Further details about correcting errors are explained in the Checking and Correcting Errors section.
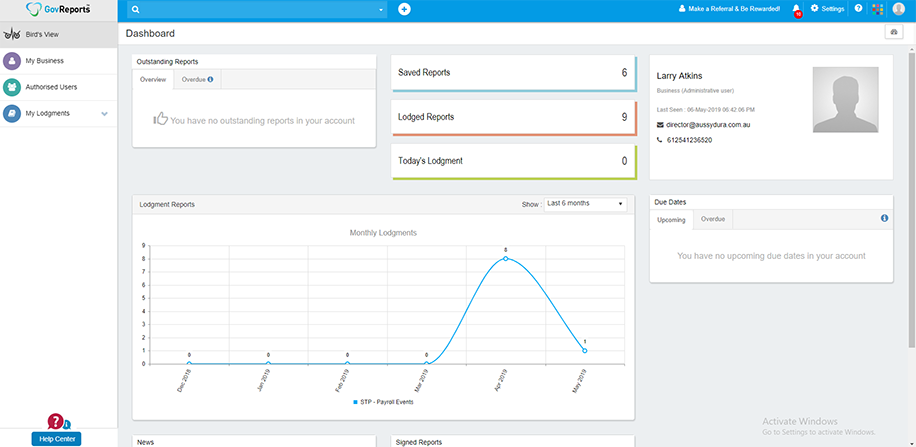
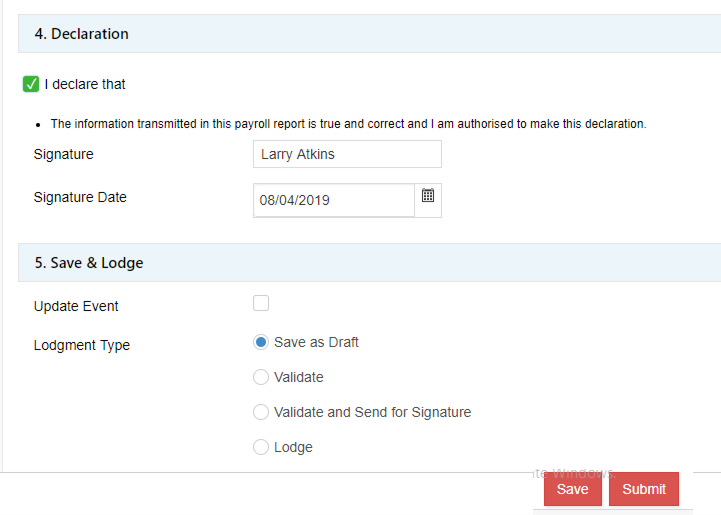
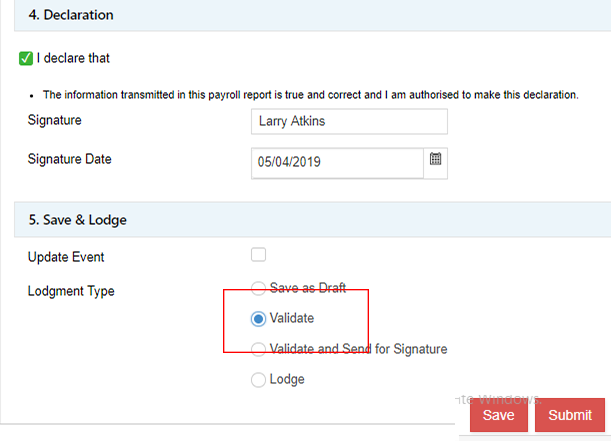
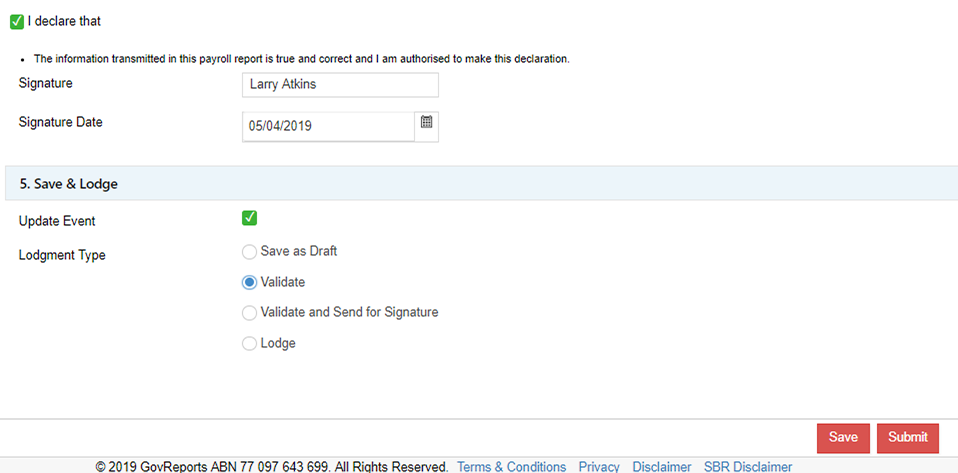
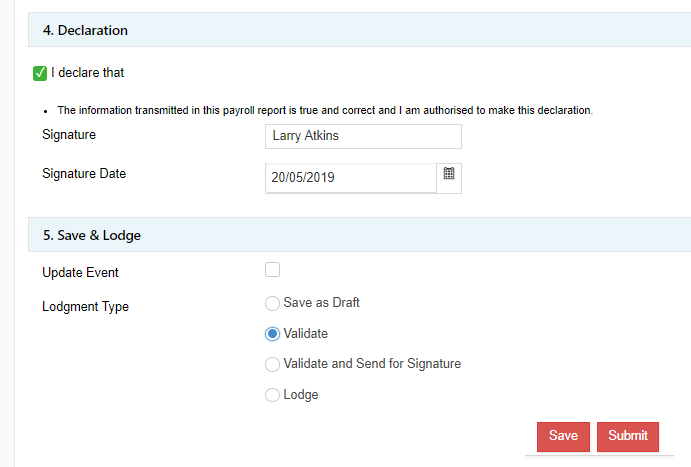
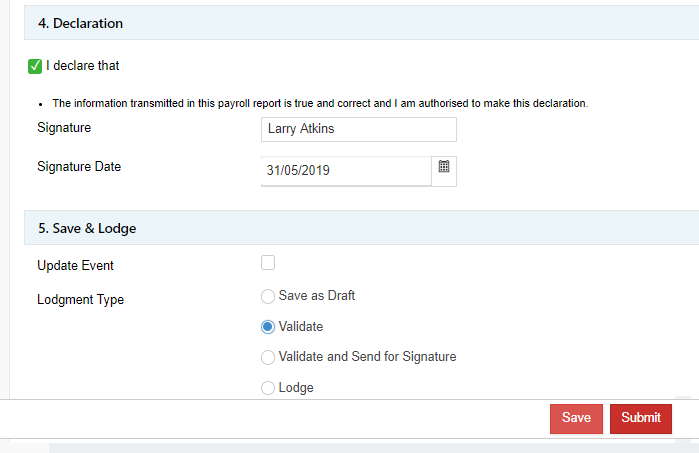
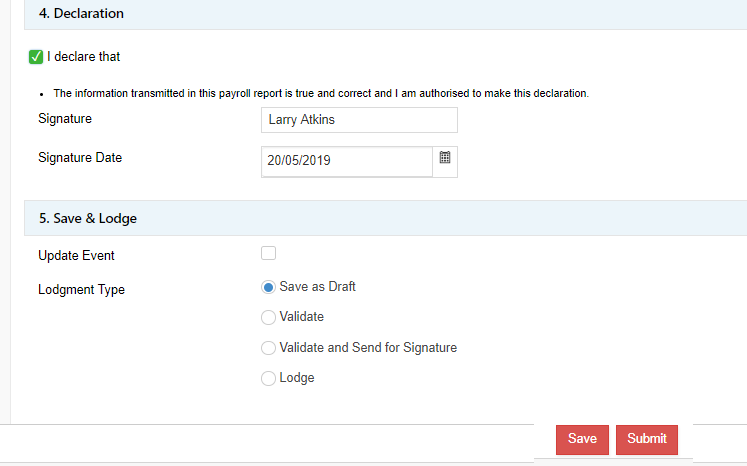
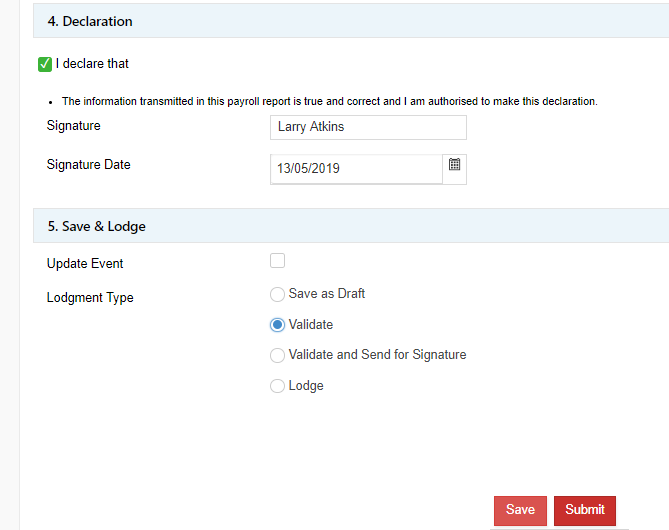
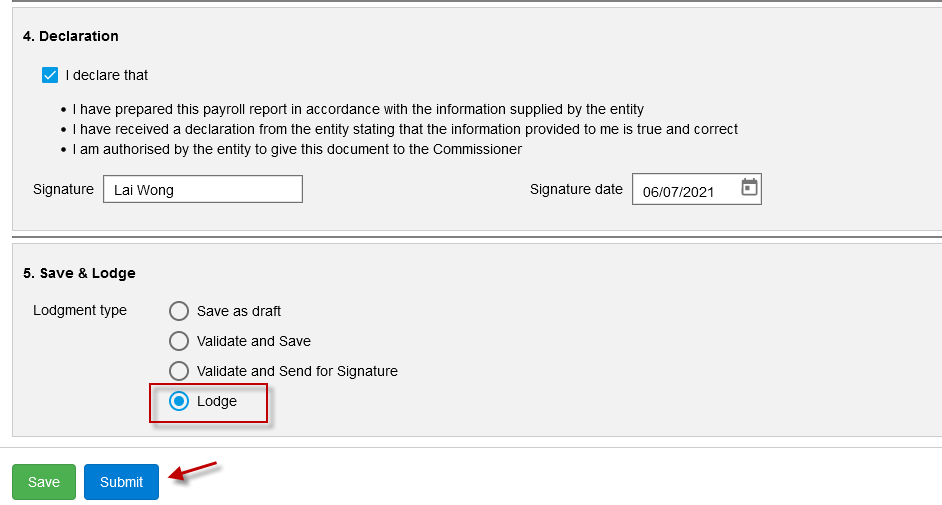
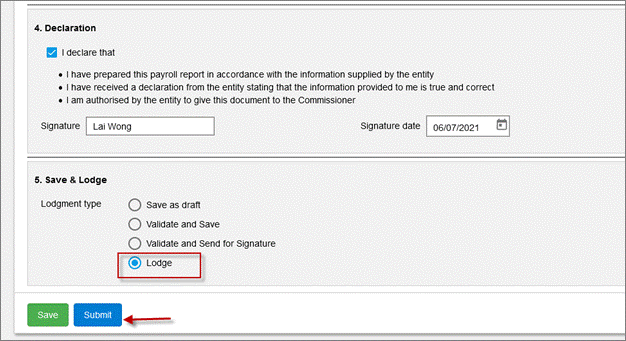
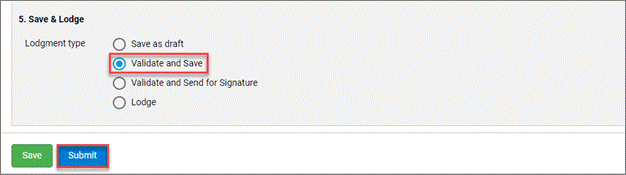
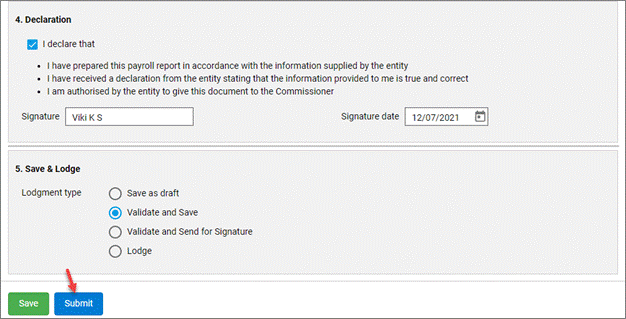
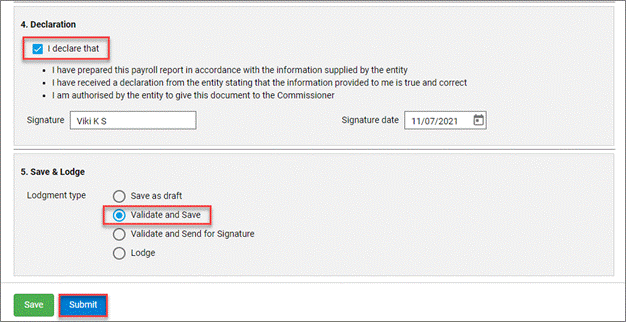
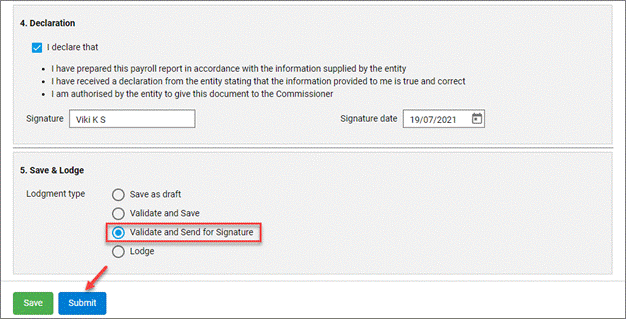
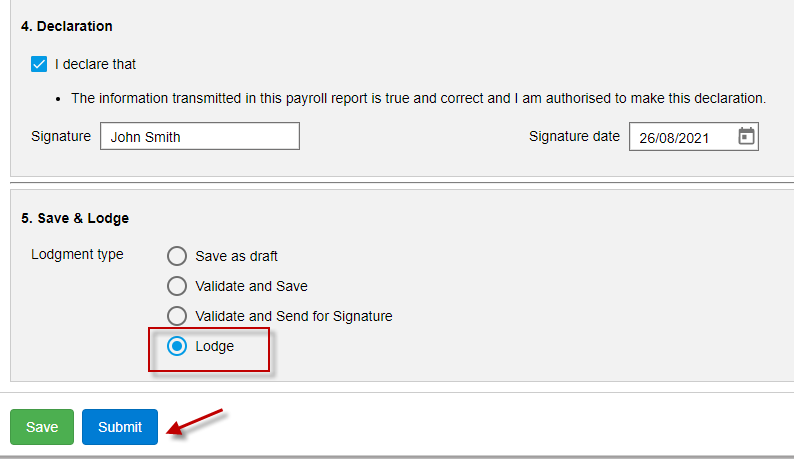
There are several options for saving and lodging reports, including linking a report to a digital signature request for authorisation from the employer.
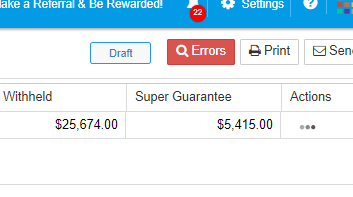
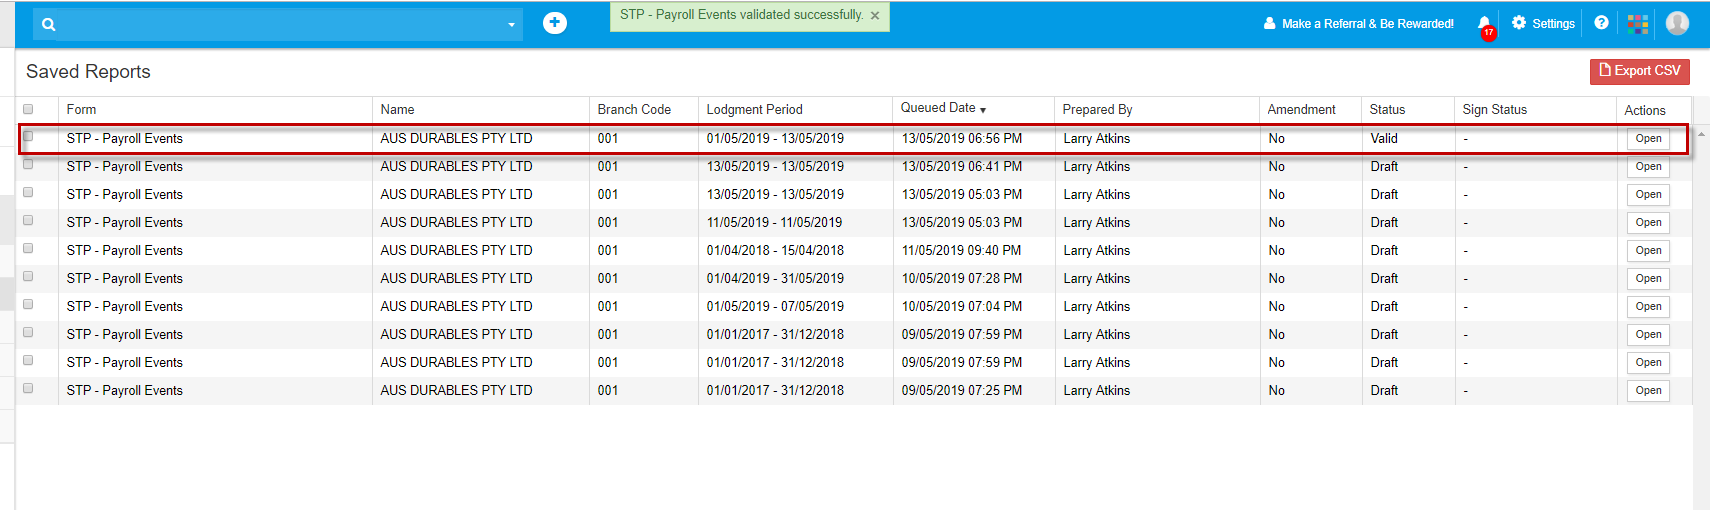
Save as draft saves the STP report as a draft for later use under My Lodgments > Saved Reports or in the client dashboard under Valid/Draft tab.
Validate and Save validates the STP report with the ATO for verification. This option checks for any lodgment errors prior to submitting to the ATO. If there are no errors, the STP report will be saved as Valid status under My Lodgments > Saved Reports.
Validate and Send for Signature validates the STP report, then redirects to GovReports Digital Authentication to send the STP report to your client for their authorisation.
Once authorised by the client, you can proceed to lodge the report from My Lodgments > Saved Reports.
See Sending STP Reports for Digital Signature for more details.
Lodge validates the report and directly submits it to the ATO without the digital signature authorisation process.
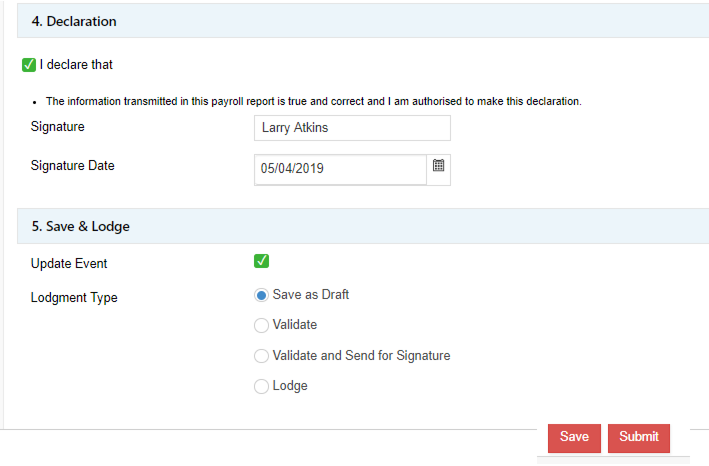
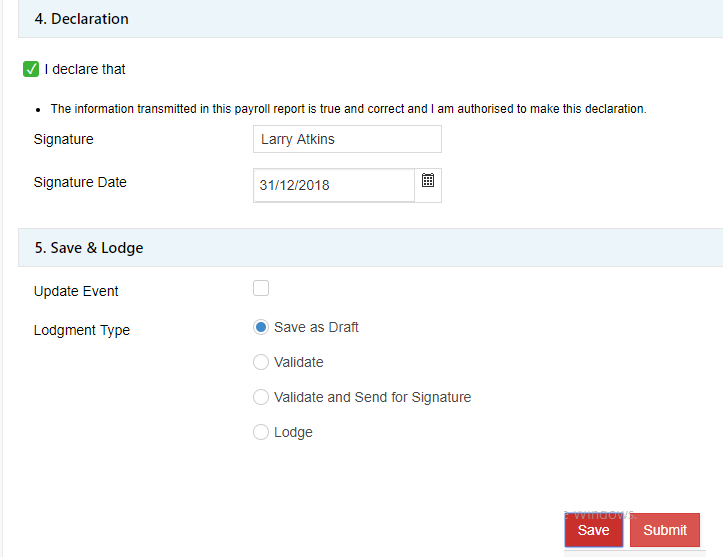
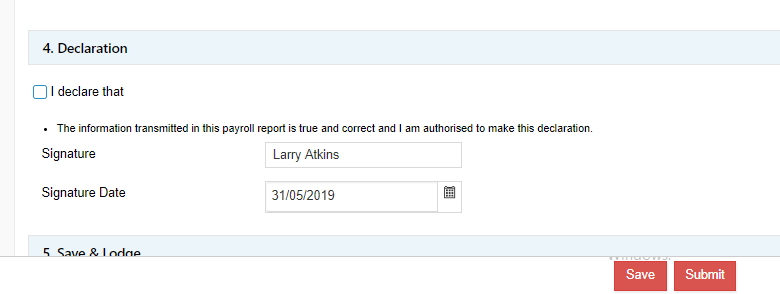
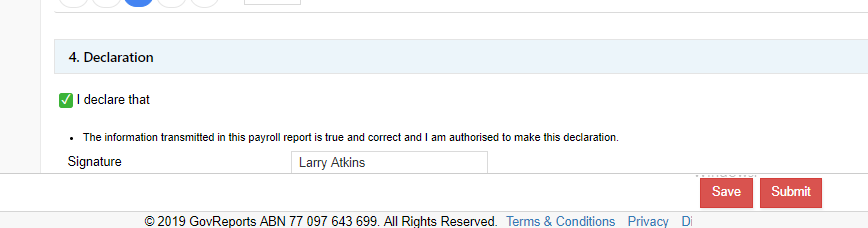
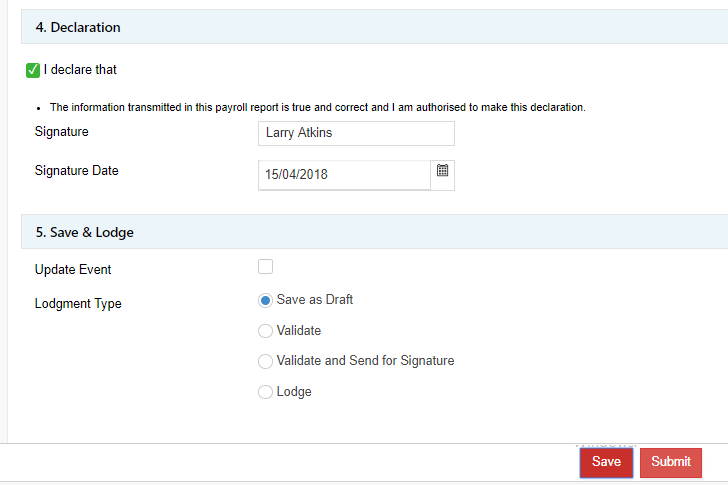
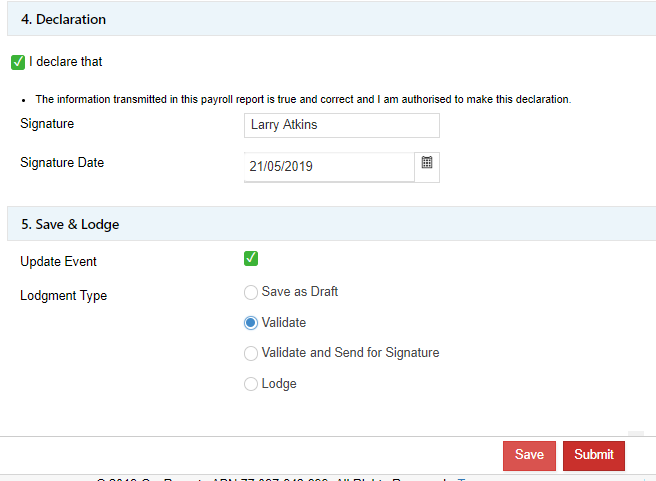
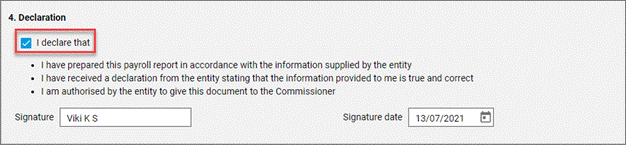
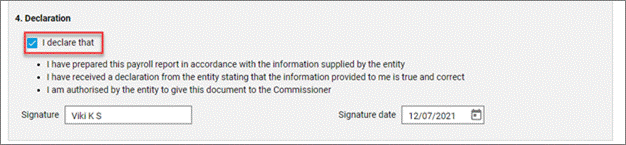
Choose the required option, complete the Declaration then select Submit.

The STP report will be opened with the previously lodged data. Make necessary corrections and Save.
Complete the Declaration, select the lodgment type and Submit.
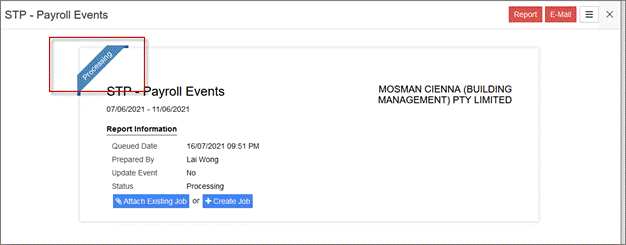
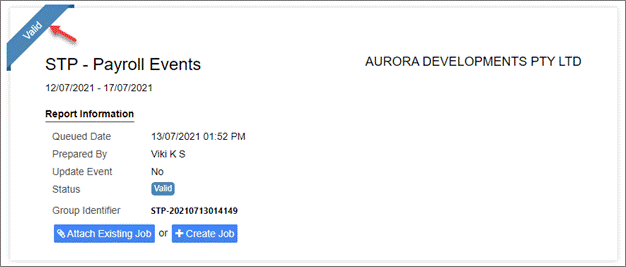
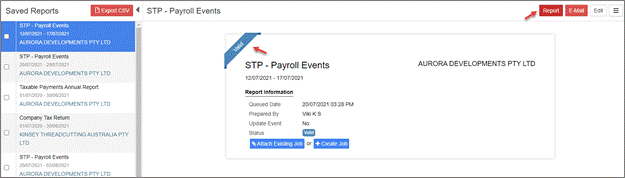
Once you Submit the STP report, the status will change to Processing, which means it is in queue to the ATO. The report will be automatically lodged once it has proceeded through the ATO queue.
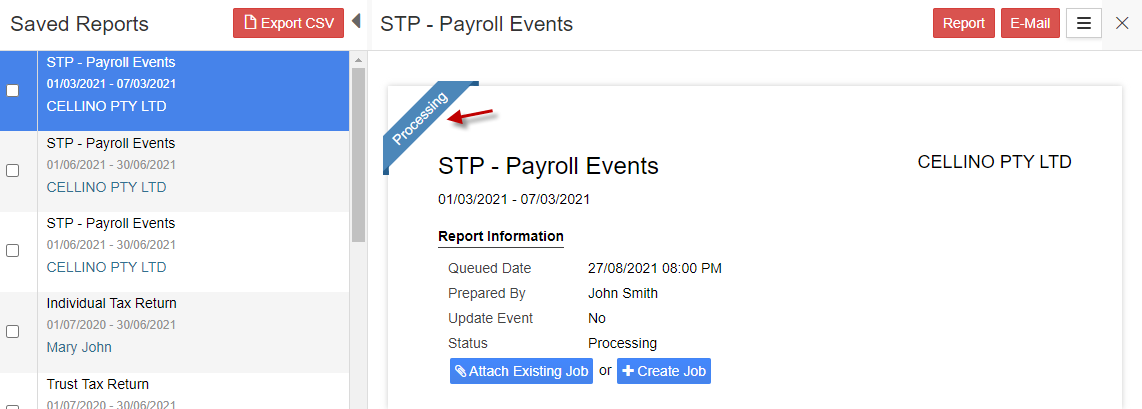
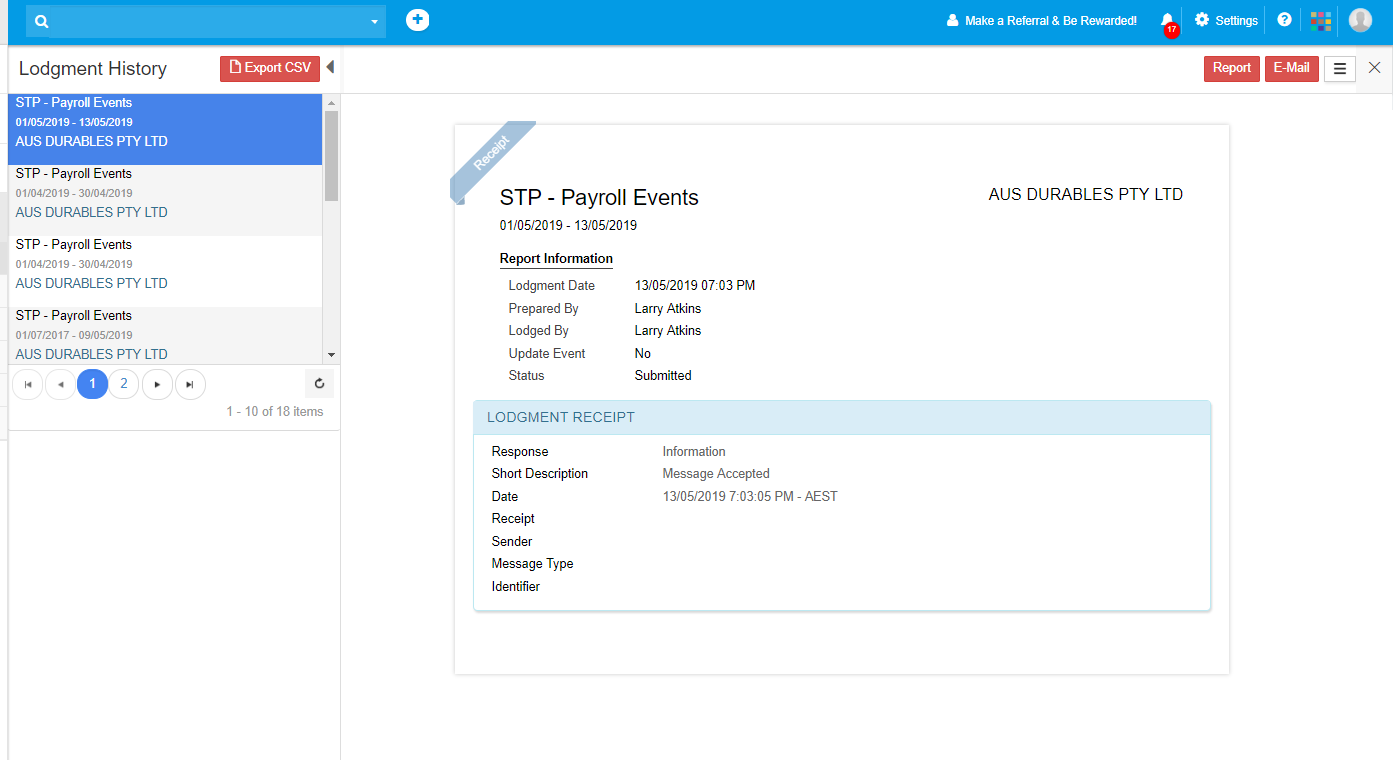
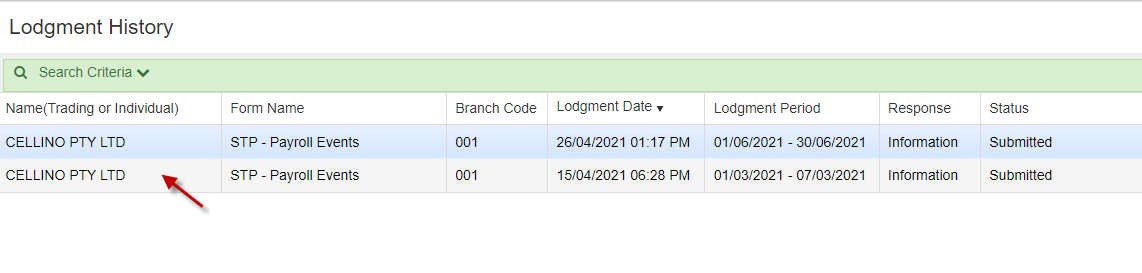
Once the report has been successfully submitted to the ATO, the report will display under My Lodgments > History.
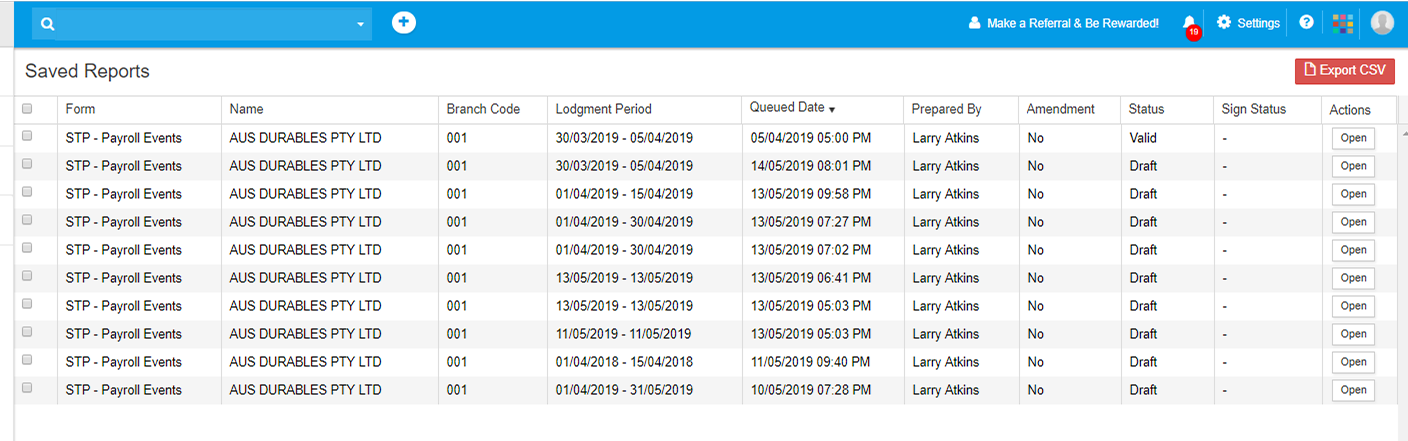
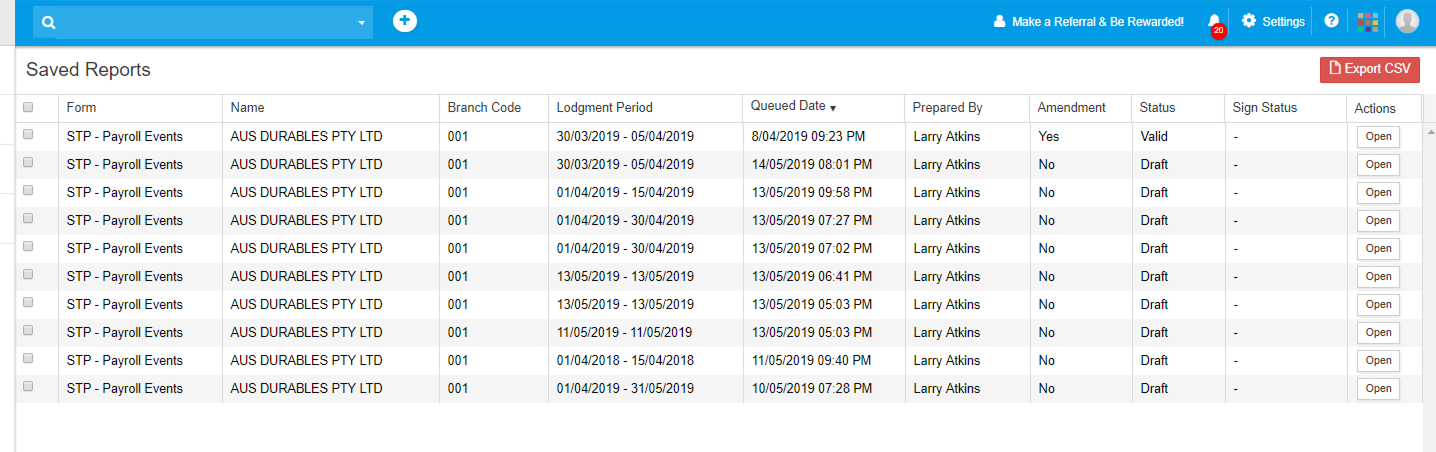
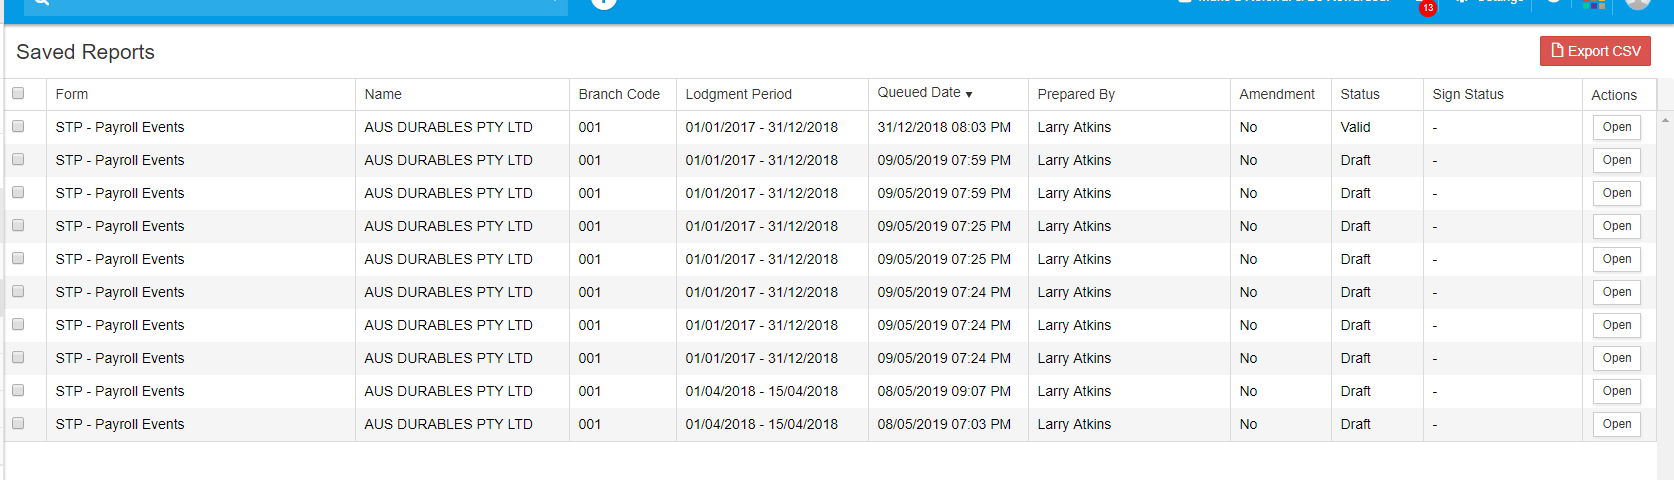
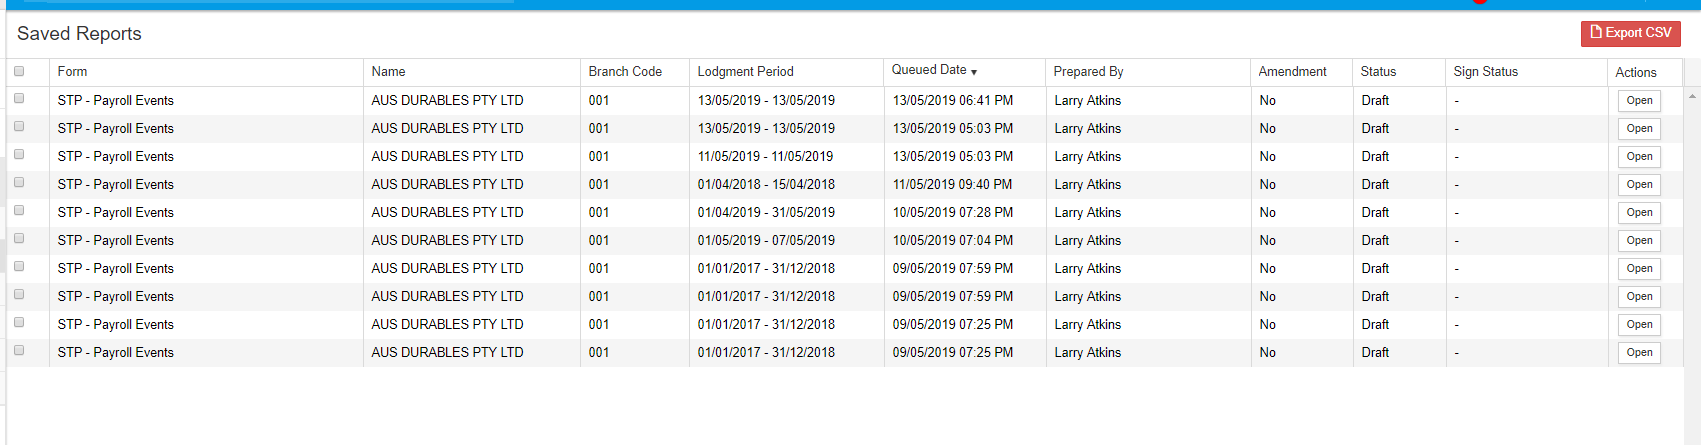
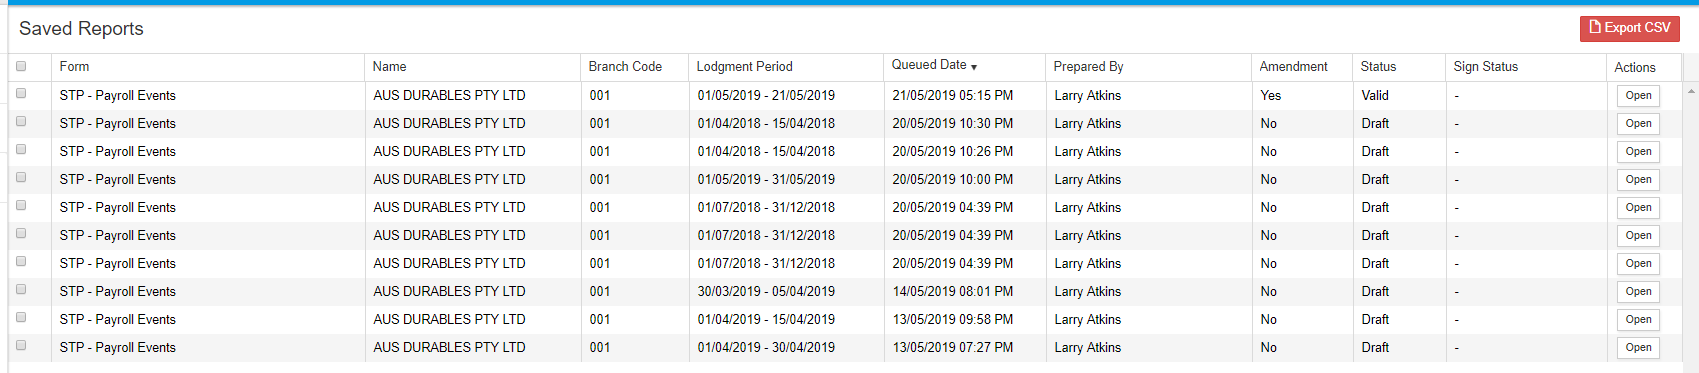
To access saved reports, go to My Lodgments > Saved Reports .
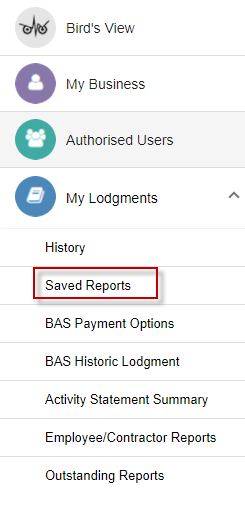
This will show a list of all saved reports for all clients.

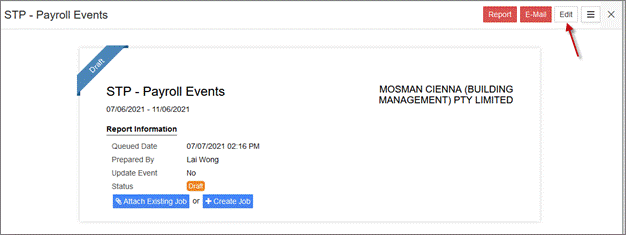
To review or edit a report, Open the draft status report under Actions menu for the required client report.

This displays the reporting information for the Payroll Event. Select Edit to open the event.
Review and make required changes, then select lodgment type. If you select Lodge and there are errors in the report, it will not lodge. You will need to fix the errors and then lodge again. If there are no errors, the report will lodge directly.
Once you Submit the STP report, the status will change to Processing, which means it is in queue to the ATO. The report will be automatically lodged once it has proceeded through the ATO queue.
Once the report has been successfully submitted to the ATO, the report will display under My Lodgments > History.
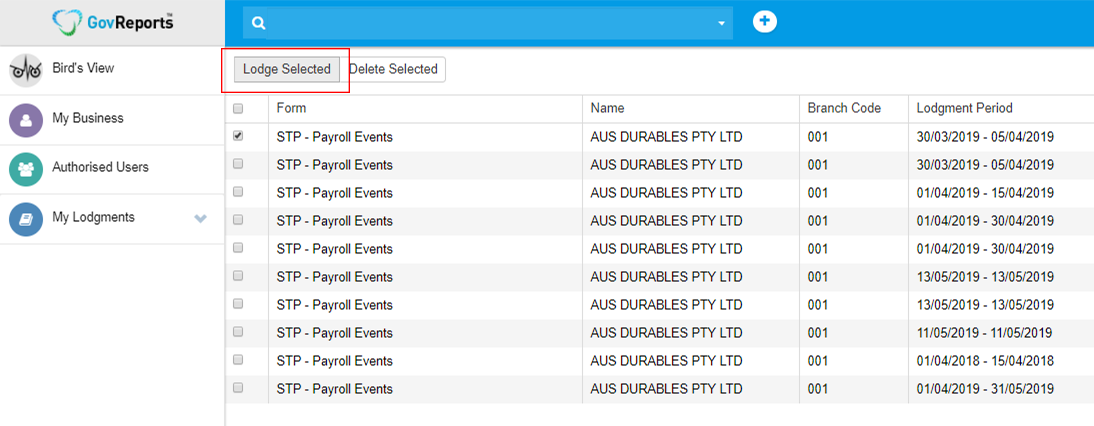
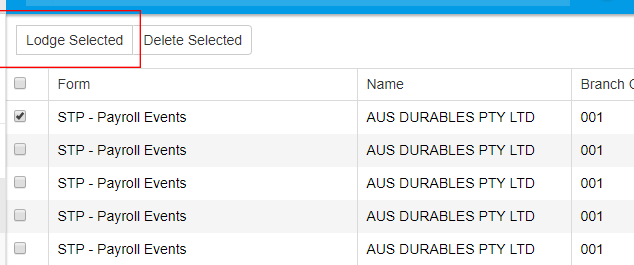
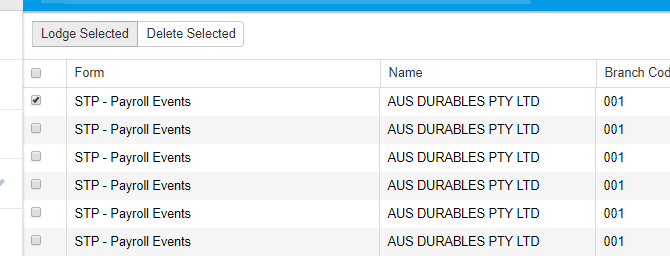
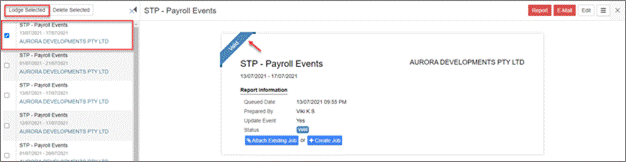
If you have already validated the STP report, (i.e., it is free from errors), and it is not yet lodged, then the report will be listed in Saved Reports with Valid status.
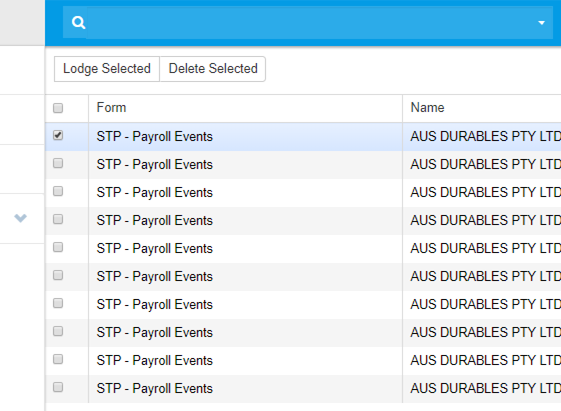
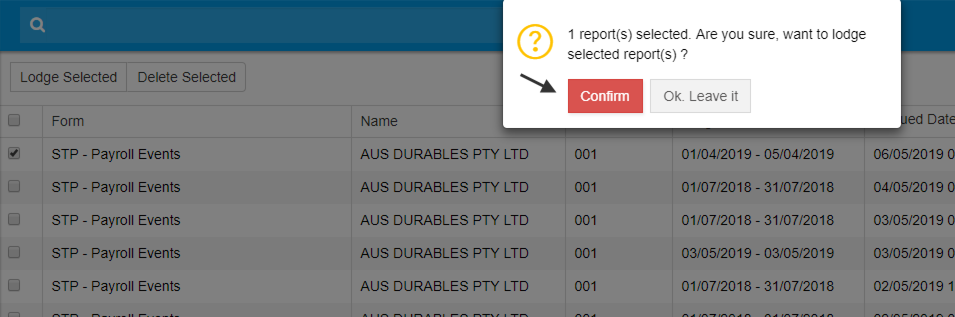
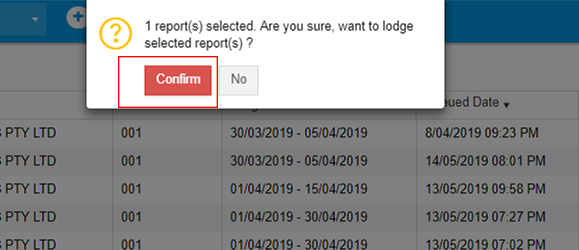
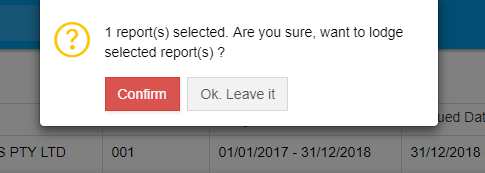
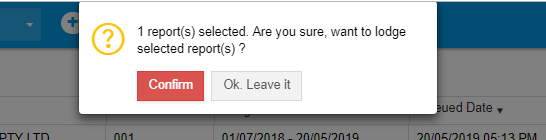
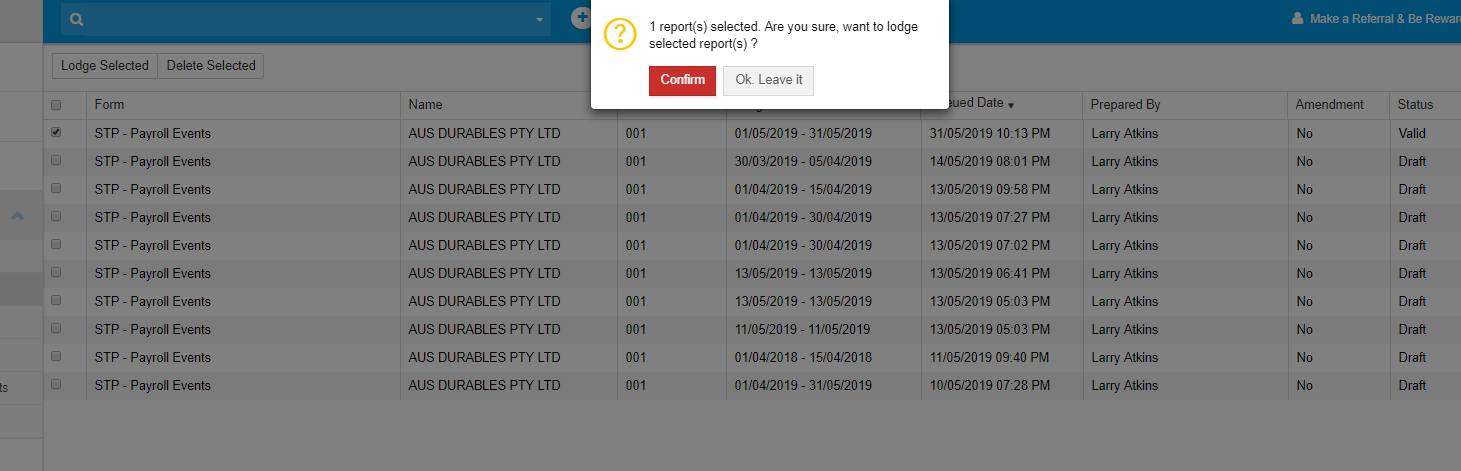
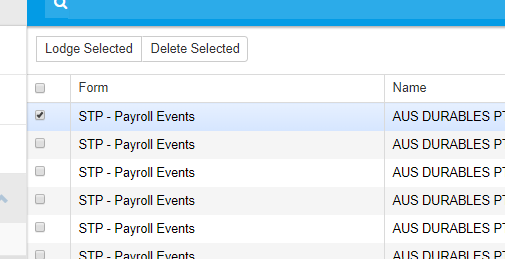
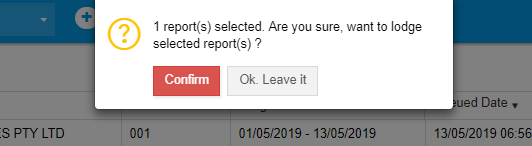
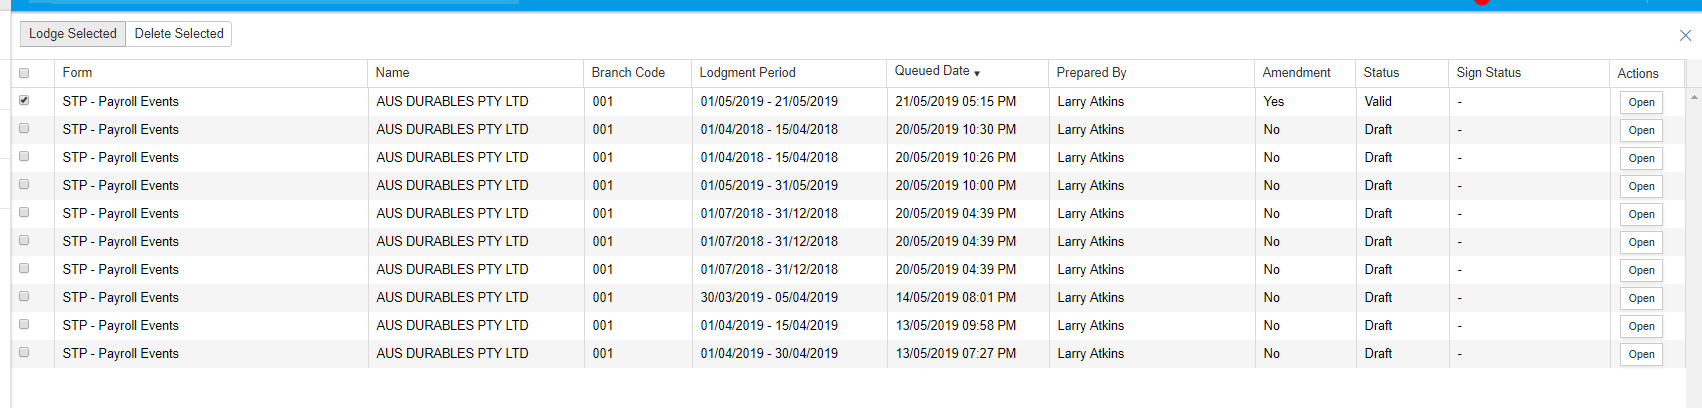
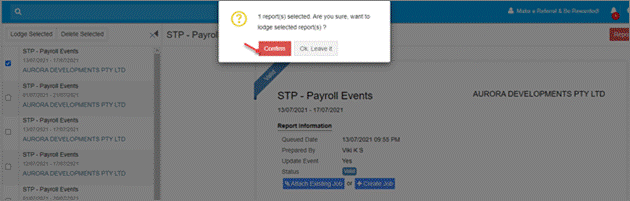
Valid status reports can be lodged directly. Go to My Lodgments > Saved Reports. Tick the required valid status report, then select Lodge Selected and Confirm.
Multiple valid status reports can be selected at the same time for lodgment.


Once you select Lodge Selected, the STP report status will change to Processing. The report will be automatically lodged once it has proceeded through the ATO queue.
Once the report has been successfully submitted to the ATO, the report will display under My Lodgments > History .
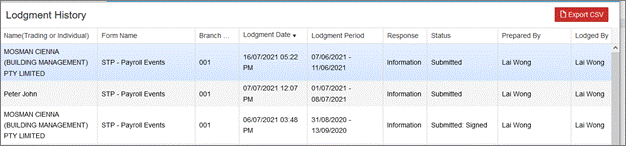
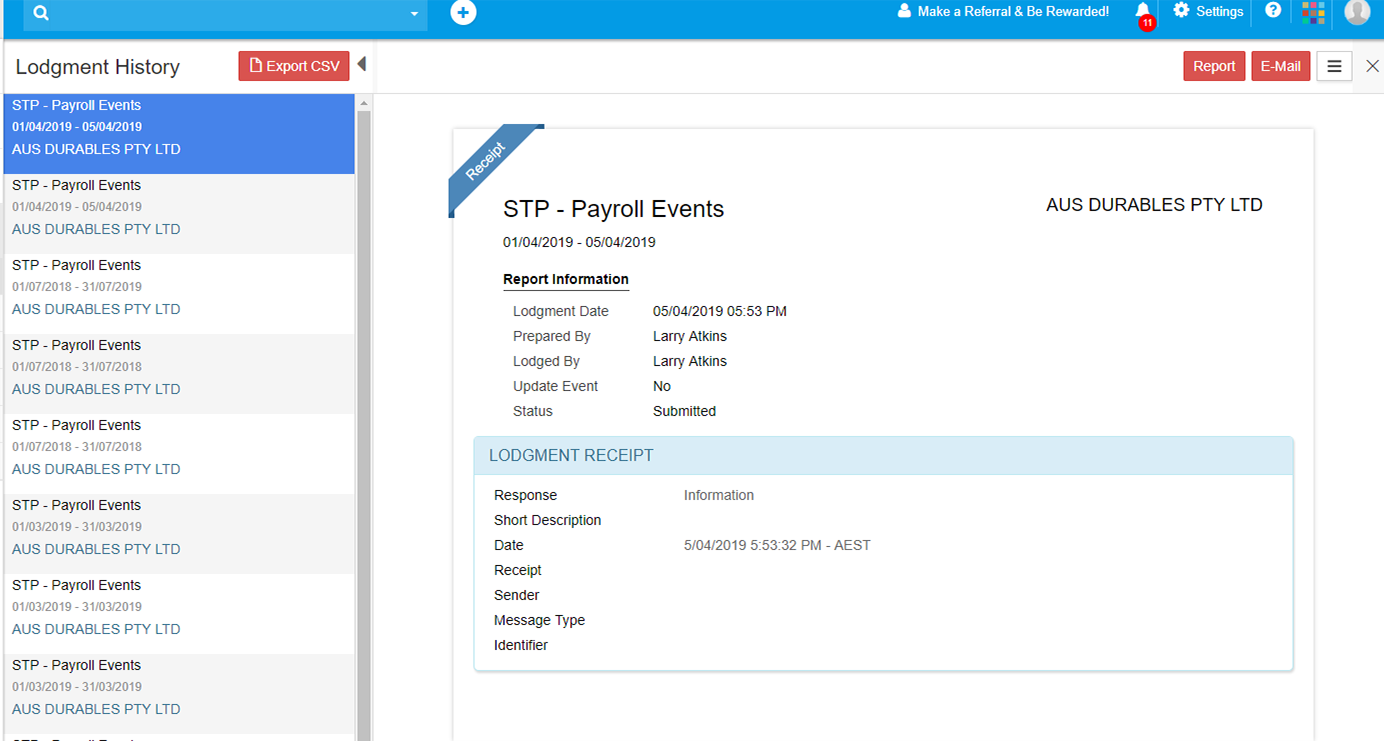
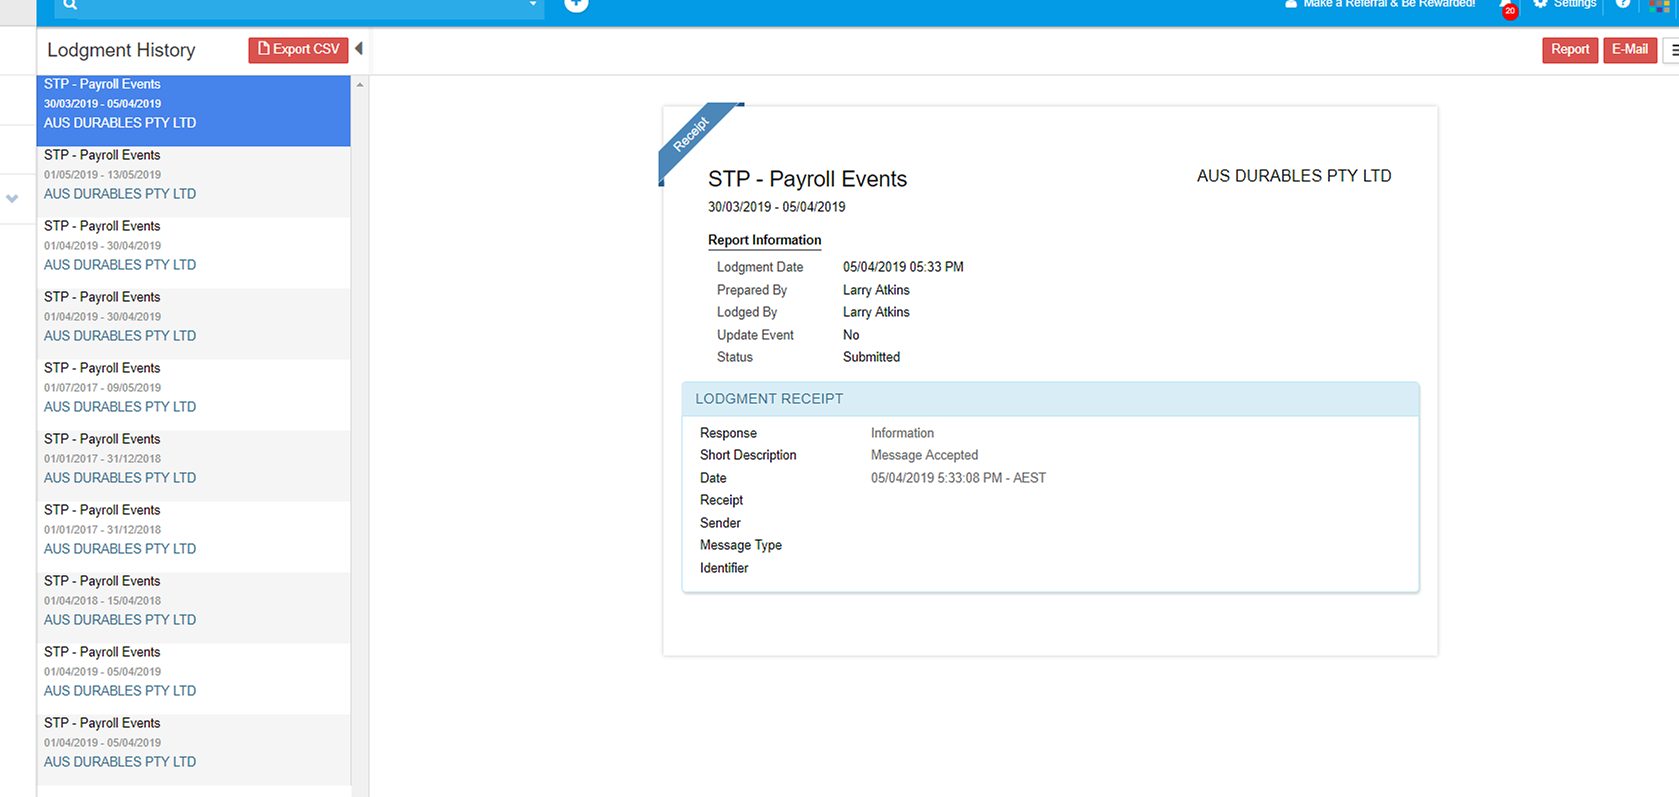
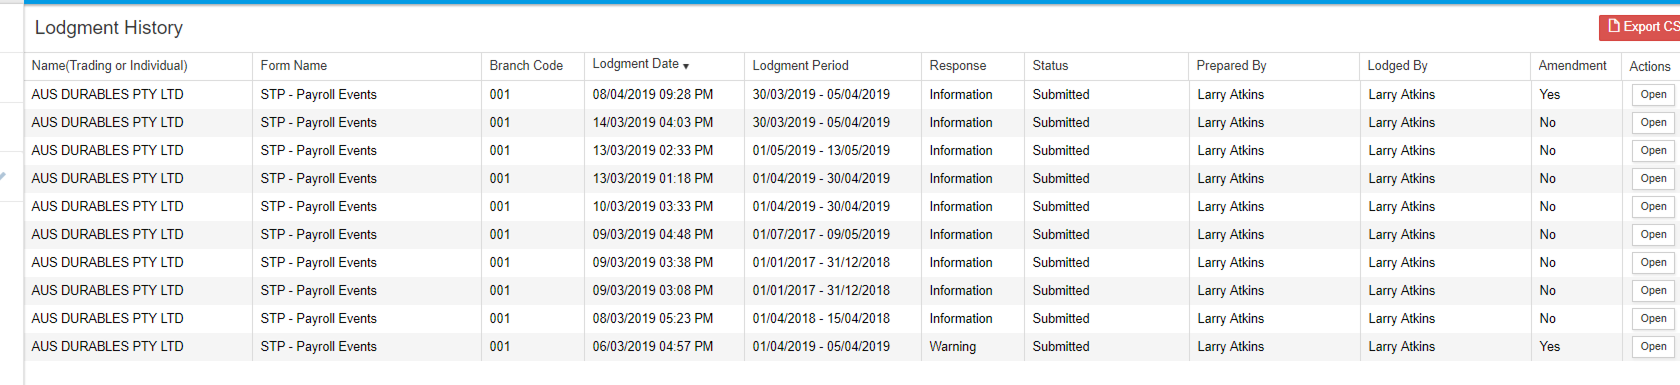
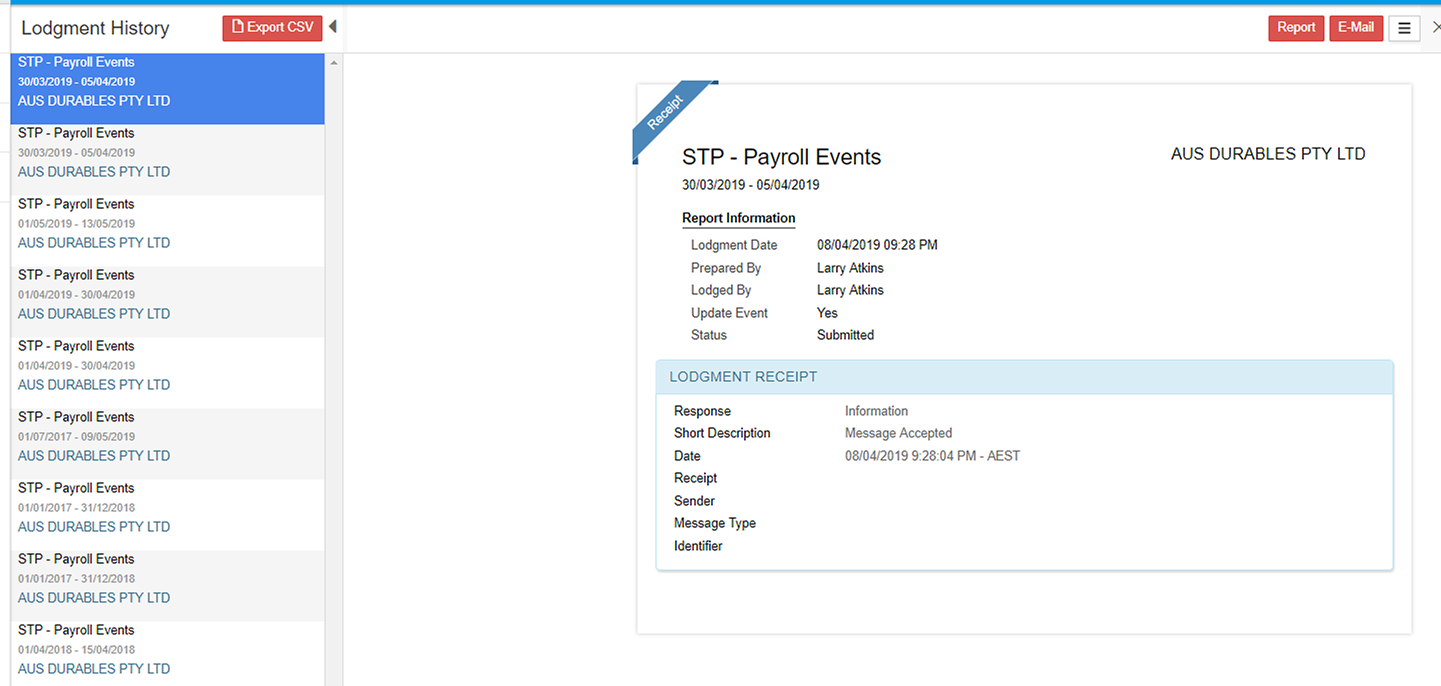
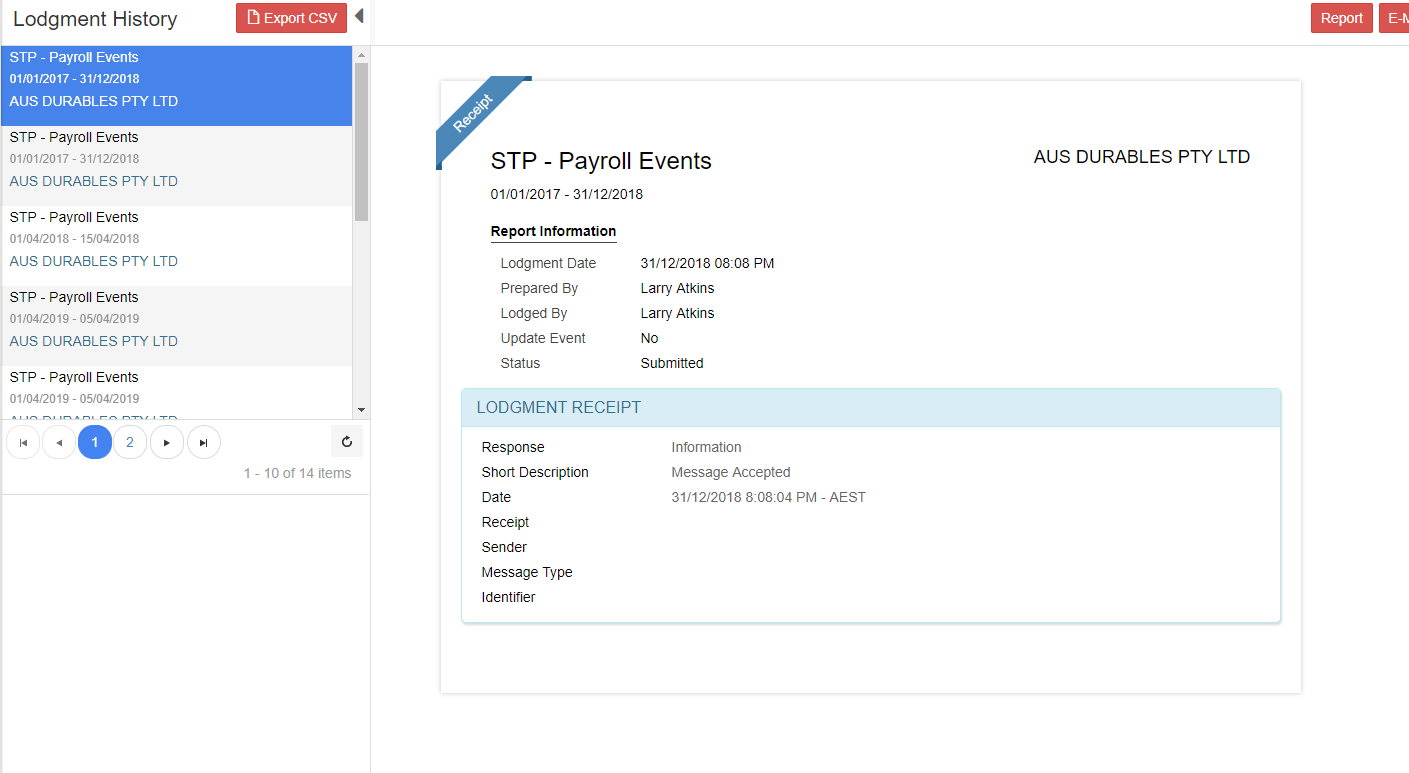
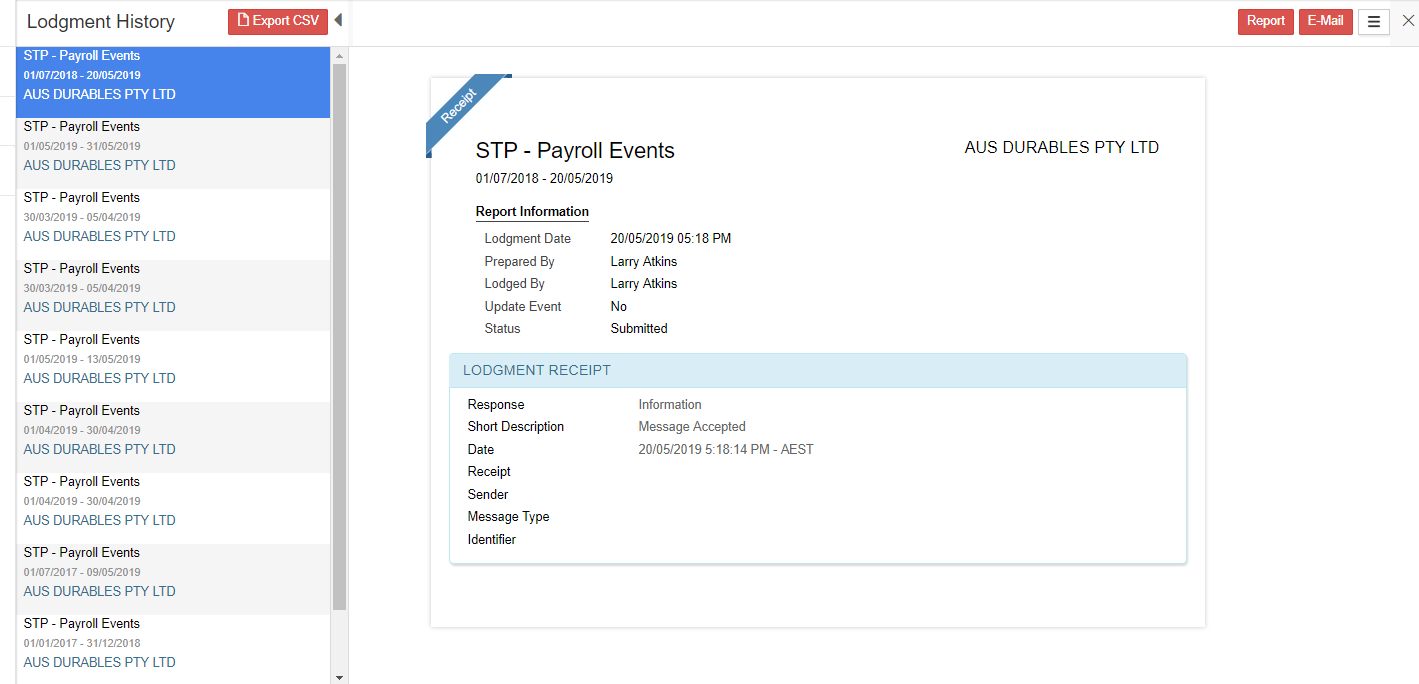
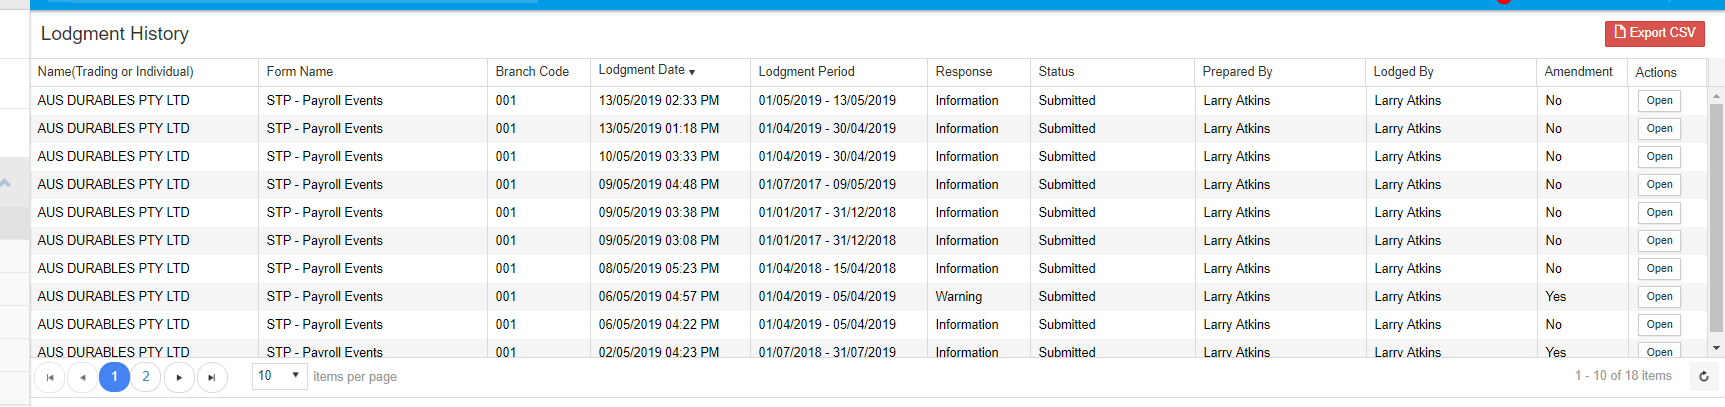
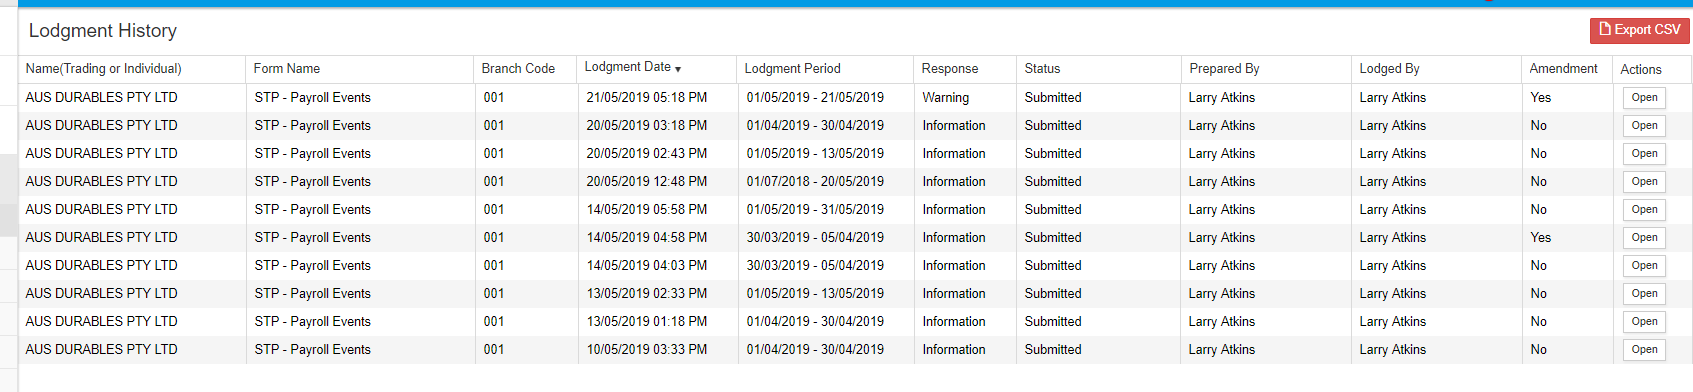
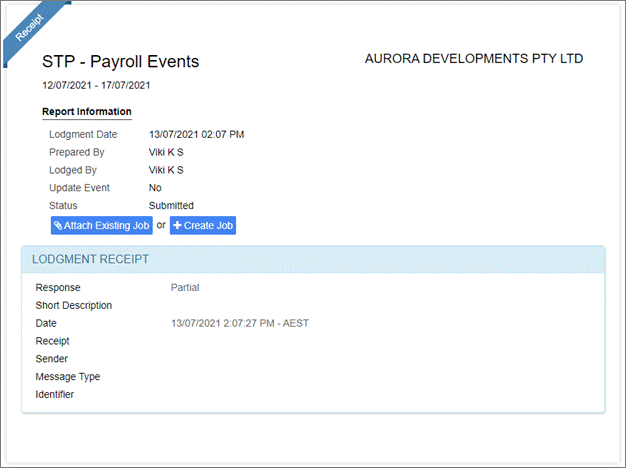
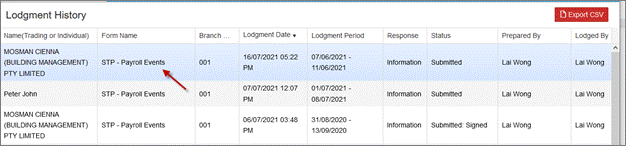
Once a report has been lodged, it can be viewed from My Lodgments > History.
Open the required report to view the lodgment details and receipt.

A payroll event can be updated to report changes to employee year to date amounts previously reported to the ATO. If a payroll event is lodged with the ATO with incorrect information, errors can be rectified and then resubmitted with corrected employee YTD figures.
An updated event is a revision to a previously submitted event and is only done throughout the financial year to correct the amounts reported to the ATO.
Total amounts for the financial year will be reported at the STP Finalisation process.
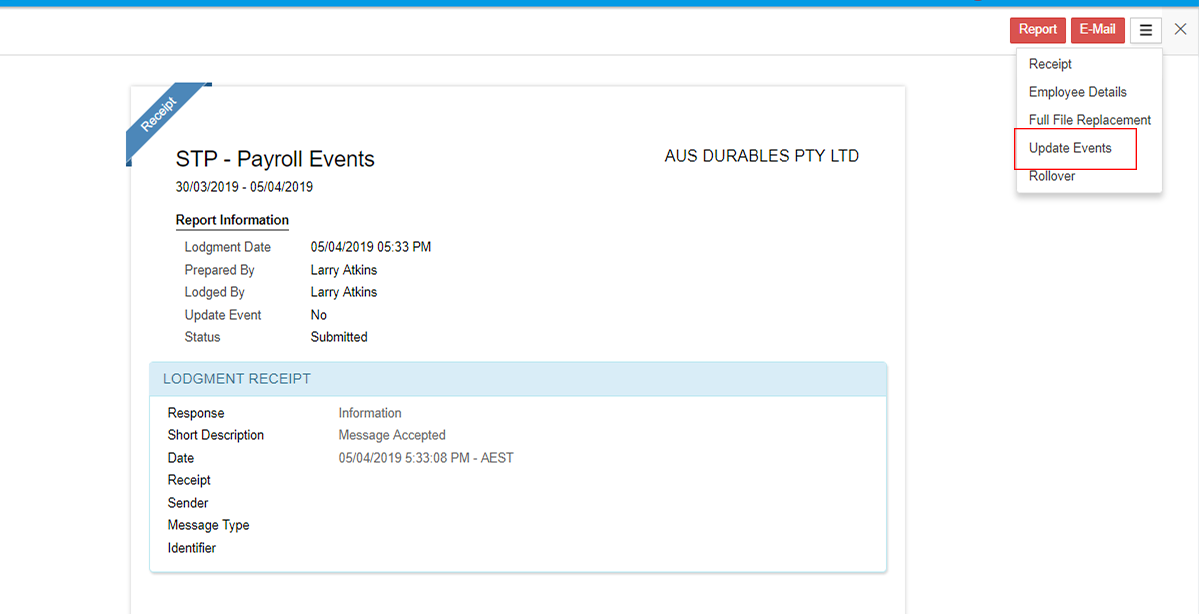
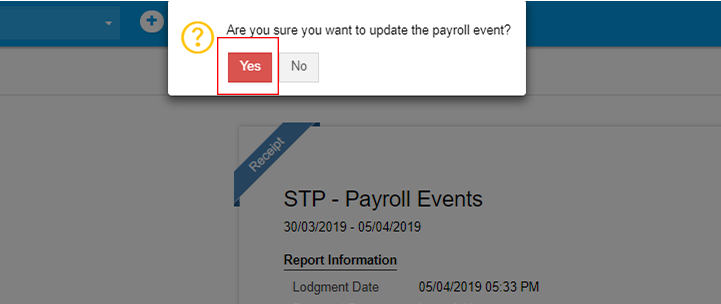
Go to My Lodgments > History.
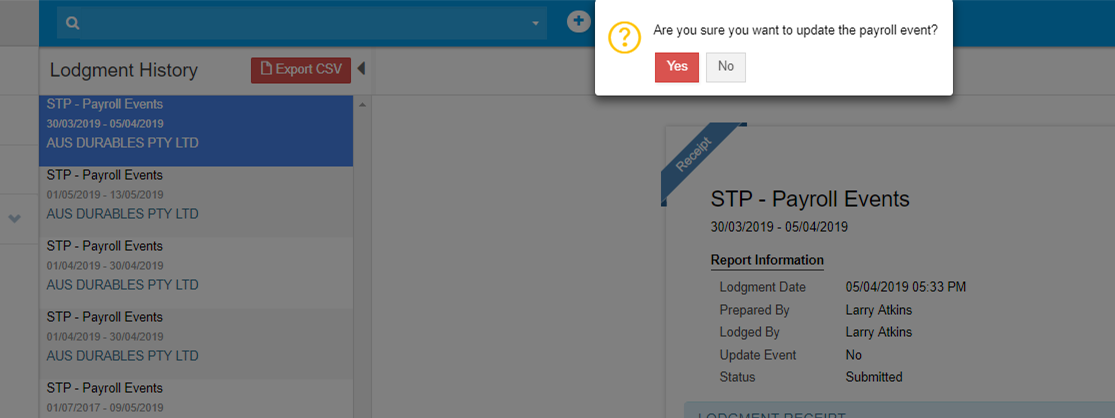
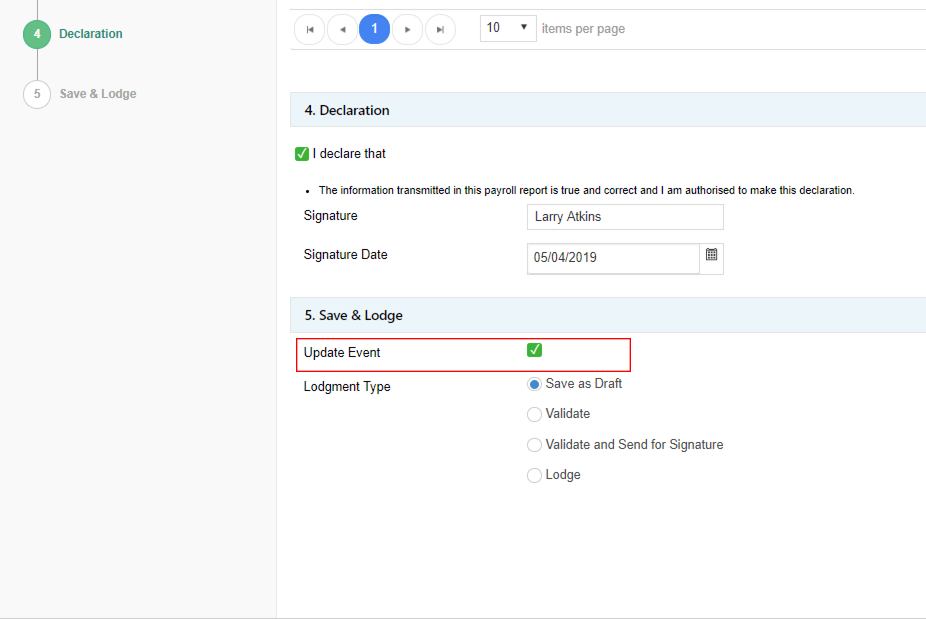
Open the lodged STP report and select the overflow menu icon. Select Update Events and then select Yes to confirm the update.
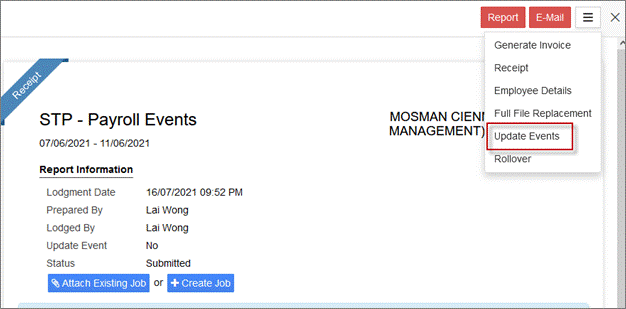
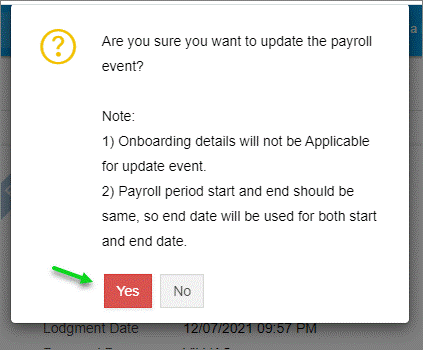
The STP report will be opened with the previously lodged data.
Note that the Update Event indicator is now selected automatically. This notifies the ATO that the event is an updated event, not a new event.
Go to the Employees section and select Edit from the Actions menu. Make the required changes to employee year to date figures and Save.
Complete the Declaration, select the lodgment type and Submit.
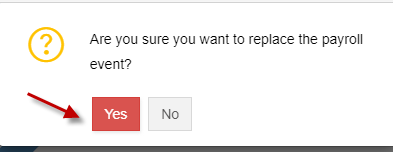
1. A full file replacement provides the ability to replace the latest payroll event that was sent to the ATO in error or contains significant corrupt data.
2. ATO performs data matching on payroll details lodged via STP reports. To amend the total wages paid W1 and PAYG withheld W2 on the Activity statement, full file replacement of the lodged STP is the option to do so.
3. Full file replacement cannot be sent if any payee information sent in the original lodgement has been changed by a subsequent submit or update action.
Note : Full file replacement can be submitted only once for a lodged payroll event.
To do Full file replacement, Go to My Lodgments > History.
Open the lodged STP report
Select Full File Replacement from More actions menu and then select Yes to confirm.
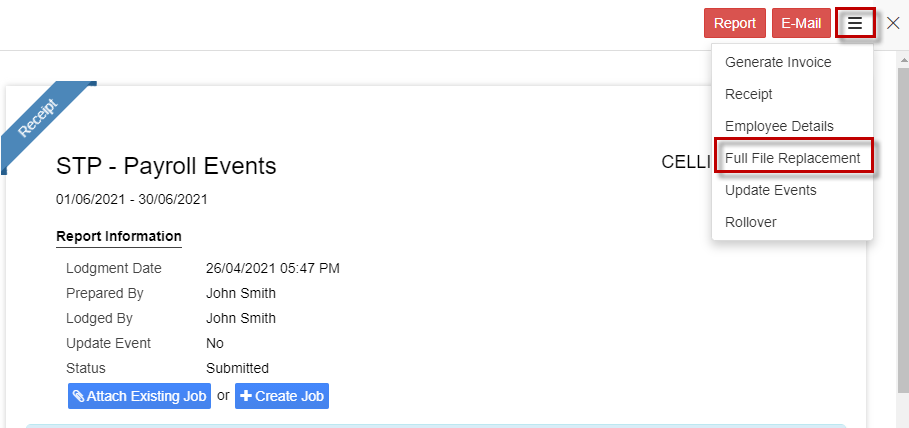
The STP report will be opened with the previously lodged data. Make necessary corrections and Save.
Complete the Declaration, select the lodgment type and Submit.
Once you Submit the STP report, the status will change to Processing, which means it is in queue to the ATO. The report will be automatically lodged once it has proceeded through the ATO queue.
Once the report has been successfully submitted to the ATO, the report will display under My Lodgments > History.
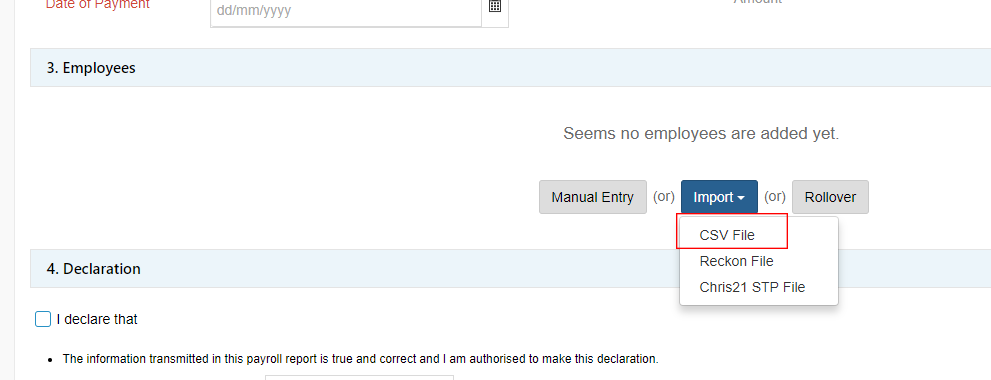
To prepare the STP report by importing details from a CSV file into GovReports, go to My Clients > select client.
Follow the instructions in Converting to STP V2 (New Version) to select the client and swap to STP V2 if this has not already been completed.
To start a new payroll event go to My Clients > select client. Select Forms then STP – Payroll Events.
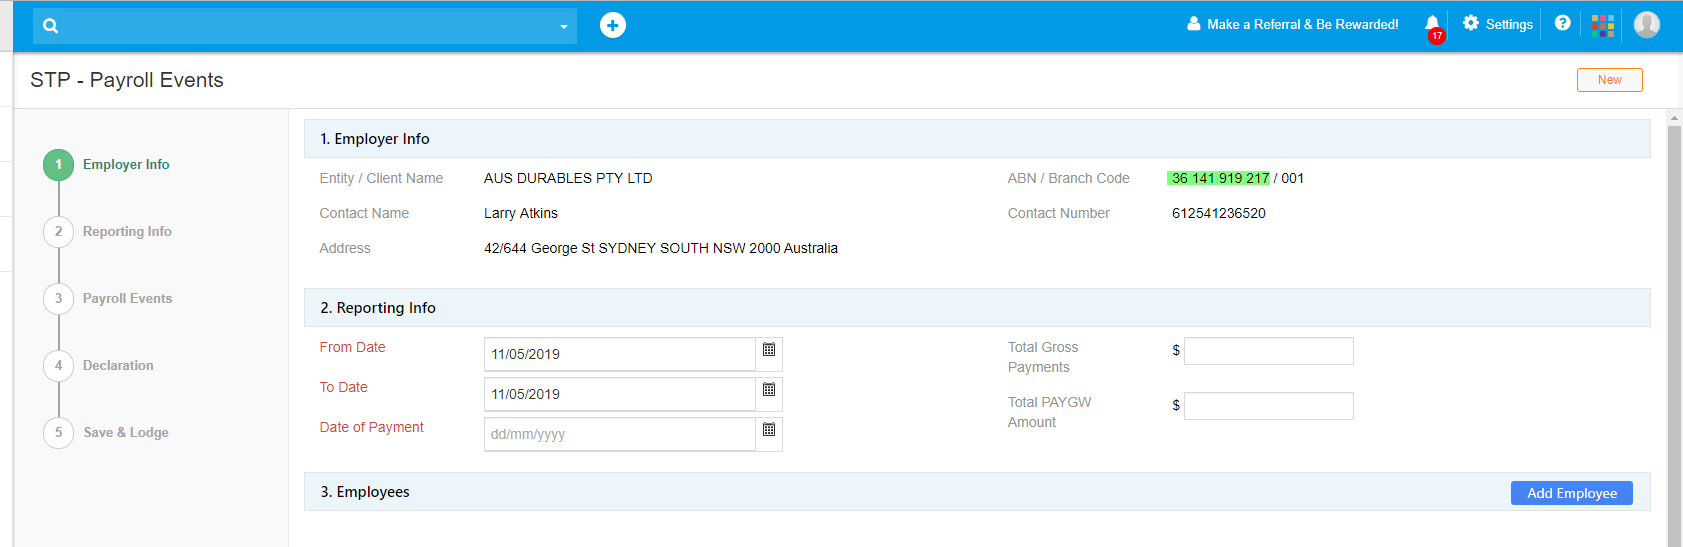
Check that the prefilled employer information is correct.
In Reporting info for specified pay period, enter pay run start date, end date and date of payment.
Make sure these details are correct before proceeding.
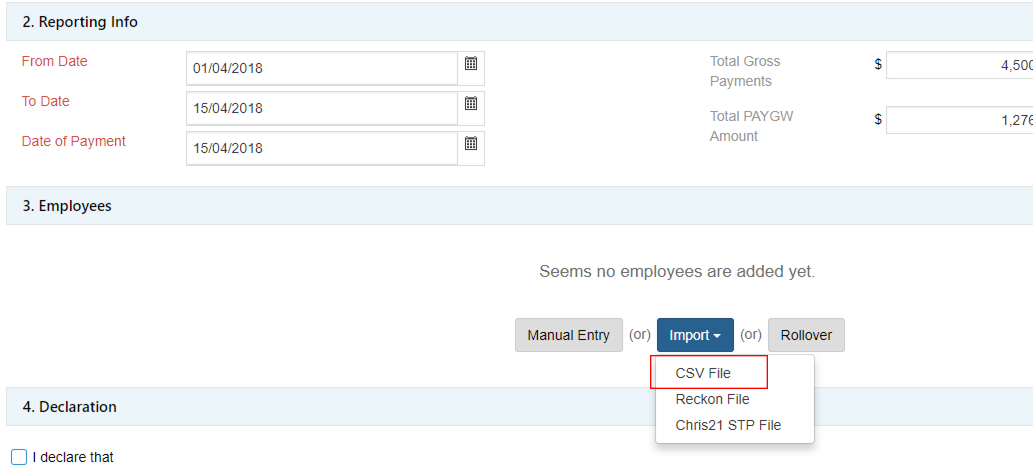
In the Employees section, select Import.

Currently GovReports accepts both STP CSV files version 1 and 2. If you are using an STP CSV File V1 note that you will need to complete additional mandatory fields after importing before you can lodge. This is because STP V1 CSV files do not have all the ATO required fields for STP V2 reporting.
Select Version 1 or 2.
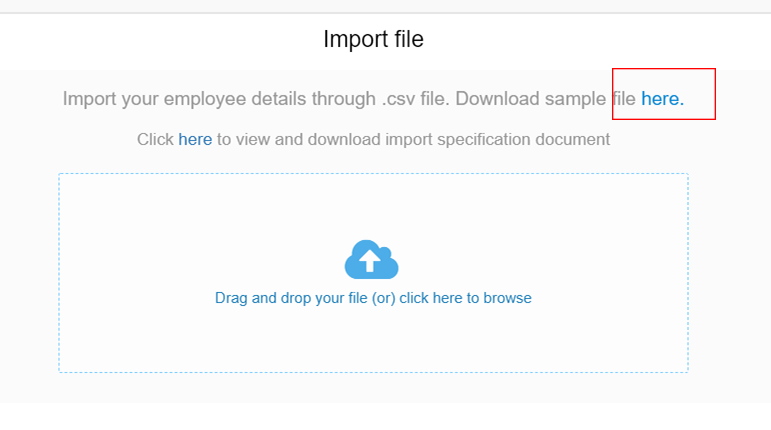
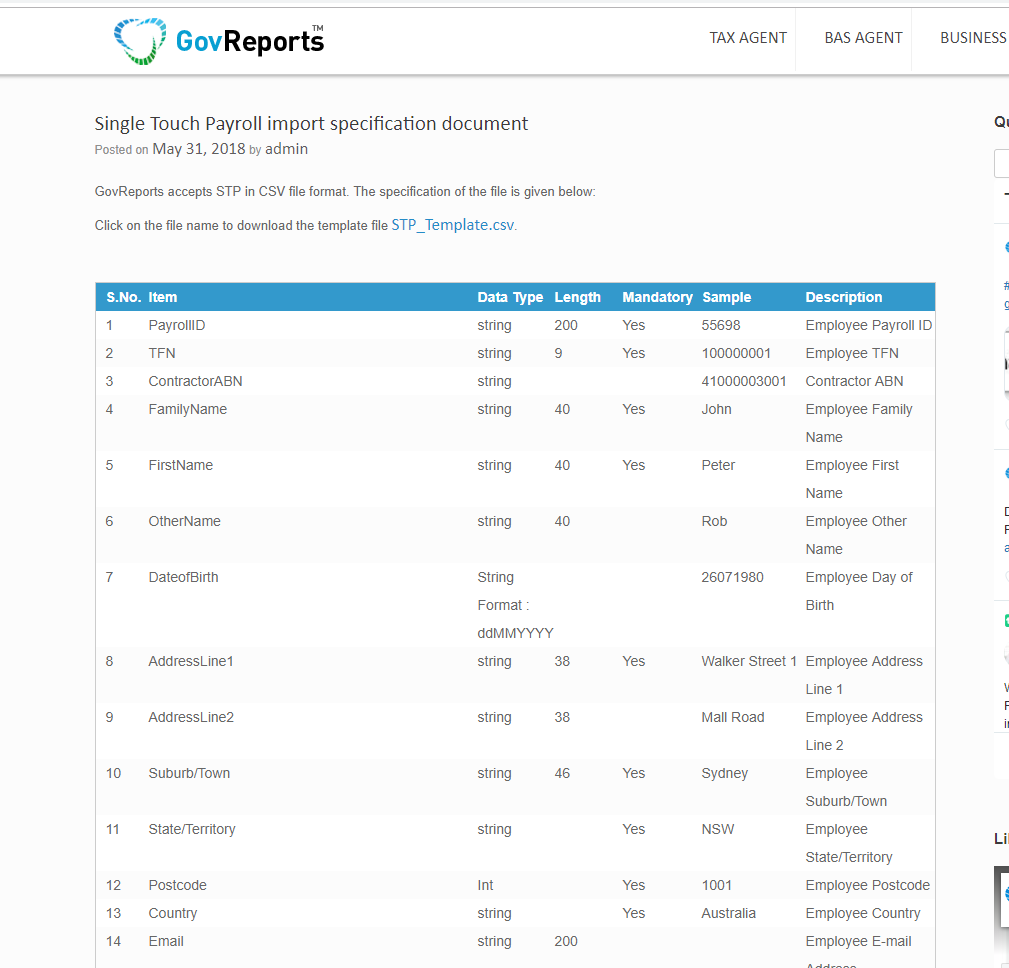
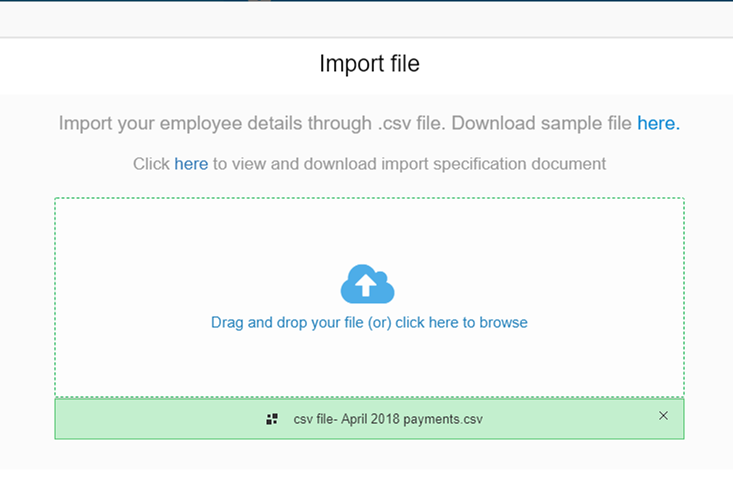
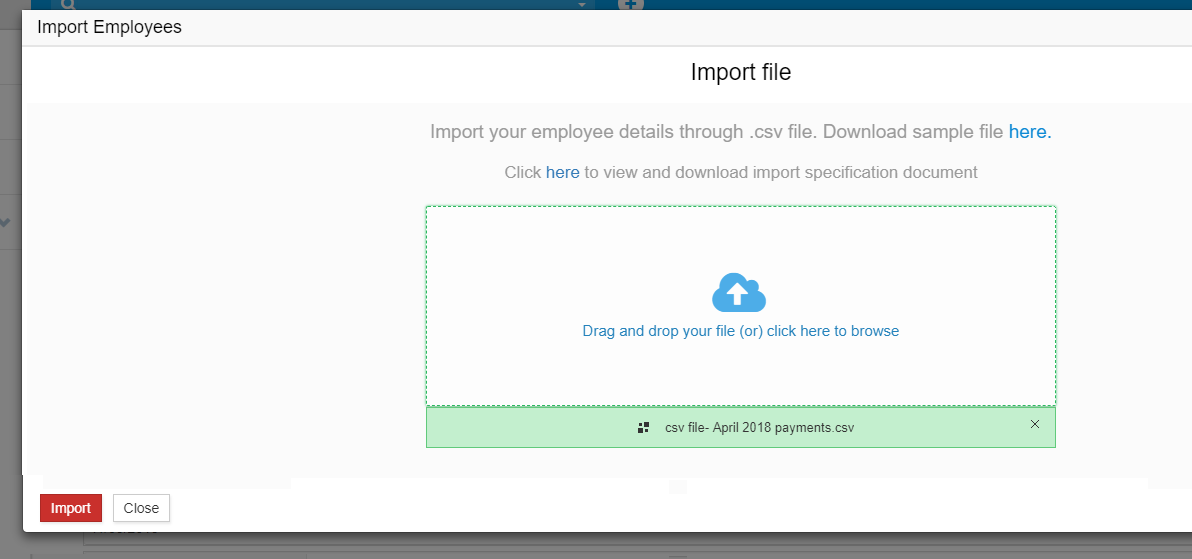
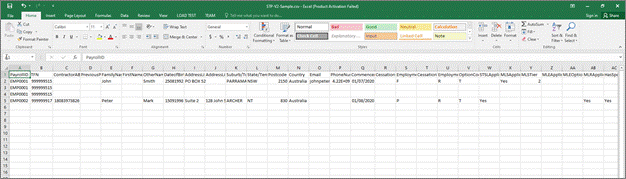
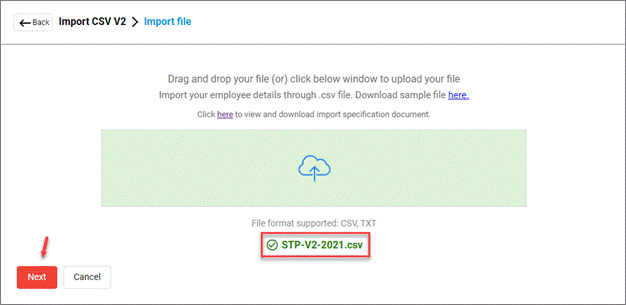
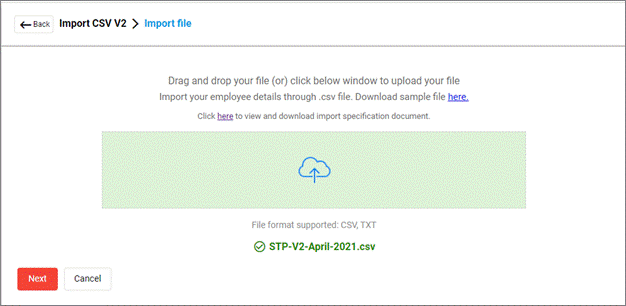
The Import File screen appears. Download the sample file.
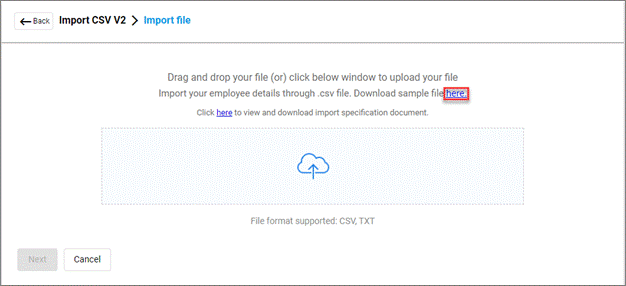
The sample CSV file has demonstration employee entries. The employee entries to be imported must be in this format.
View the import specification document in the GovReports blog link for more details: https://blog.govreports.com.au/single-touch-payroll-import-specification-document/
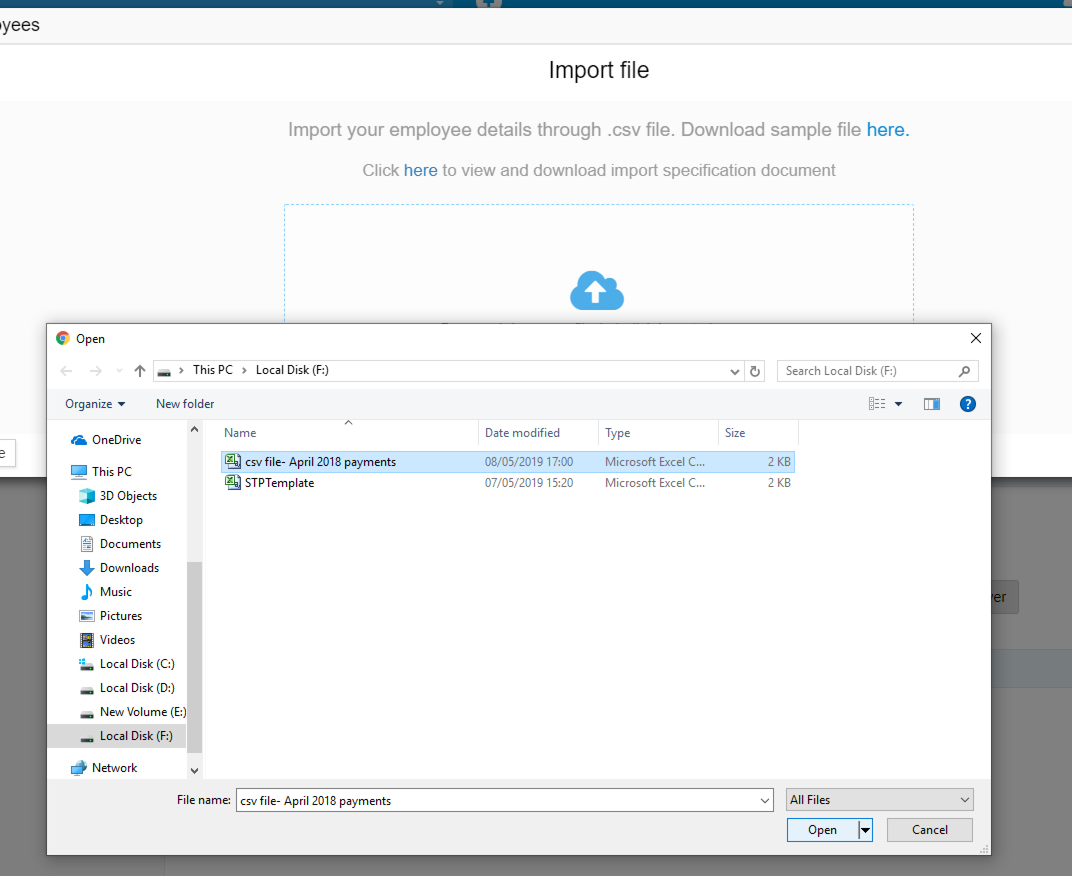
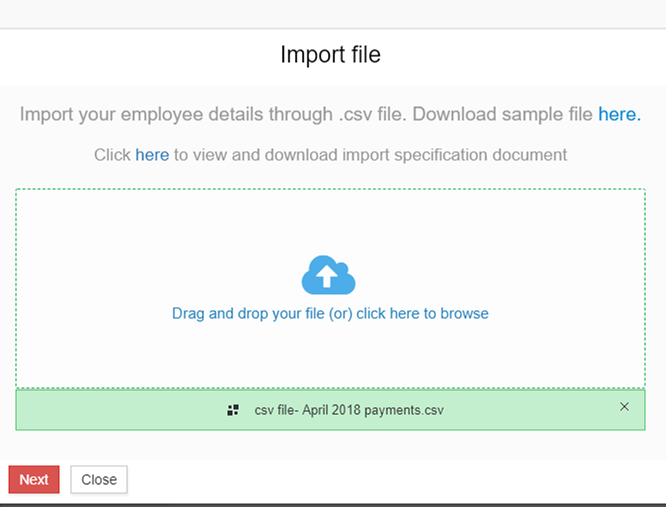
Upload the CSV file.
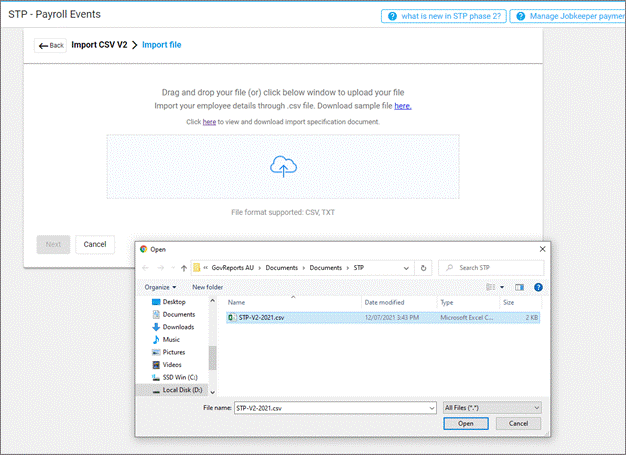
The CSV file will be uploaded. Select Next.
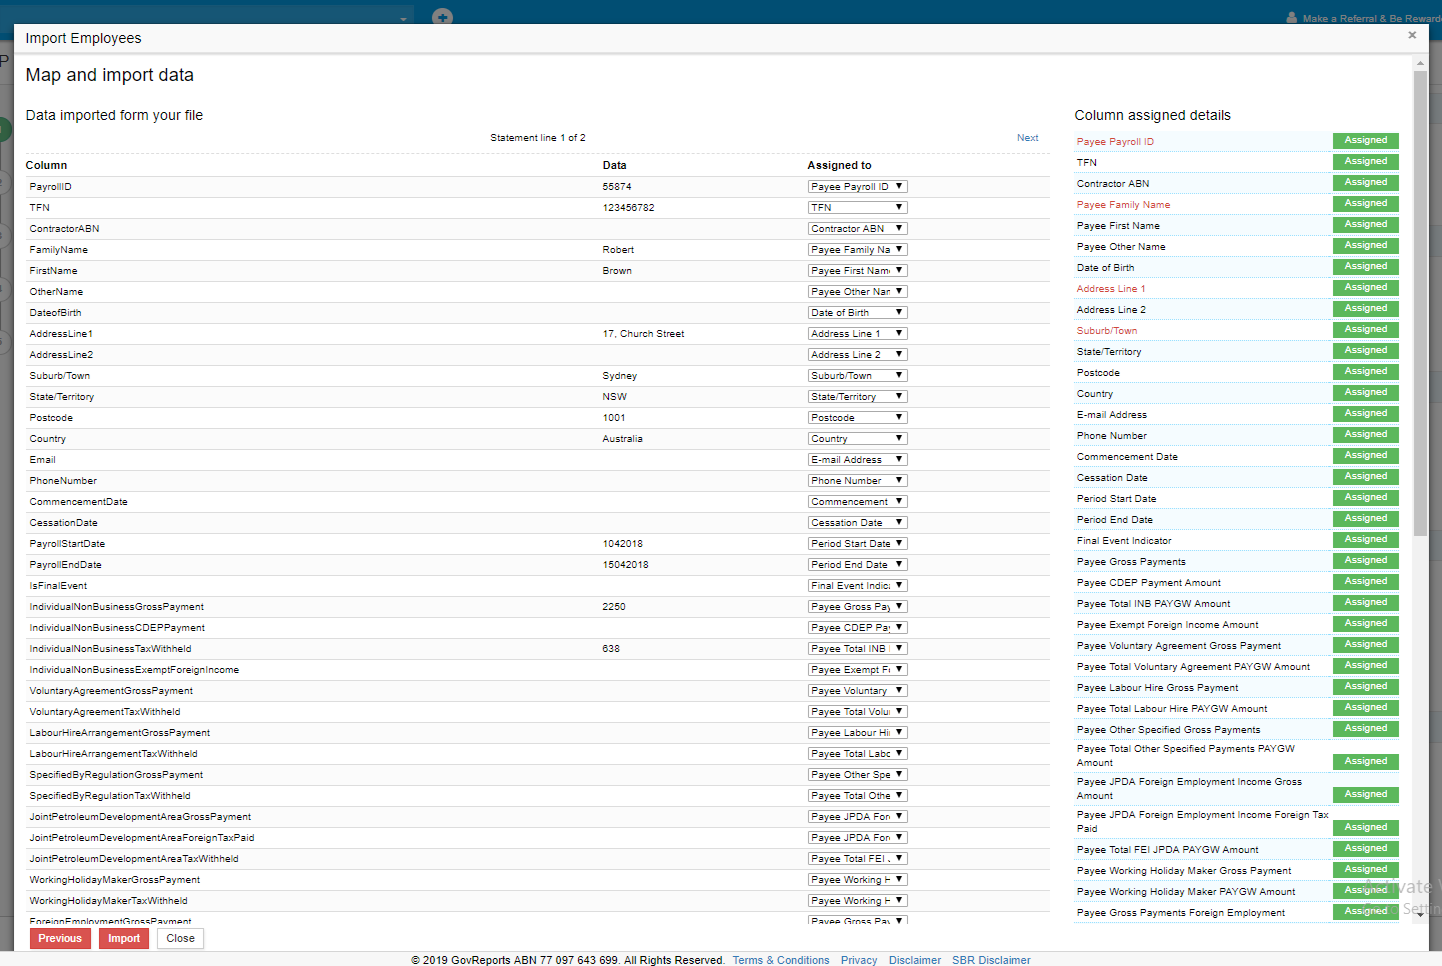
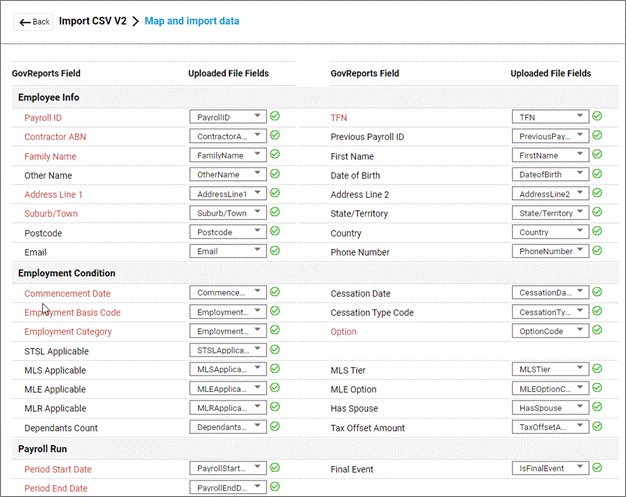
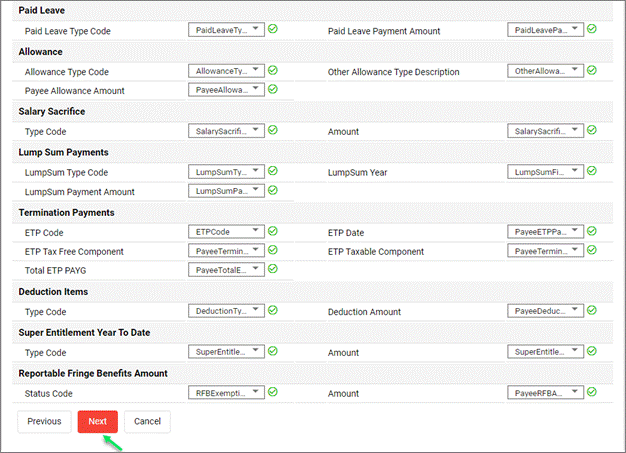
Review the fields and the mapping. Make any required changes, then select Next.
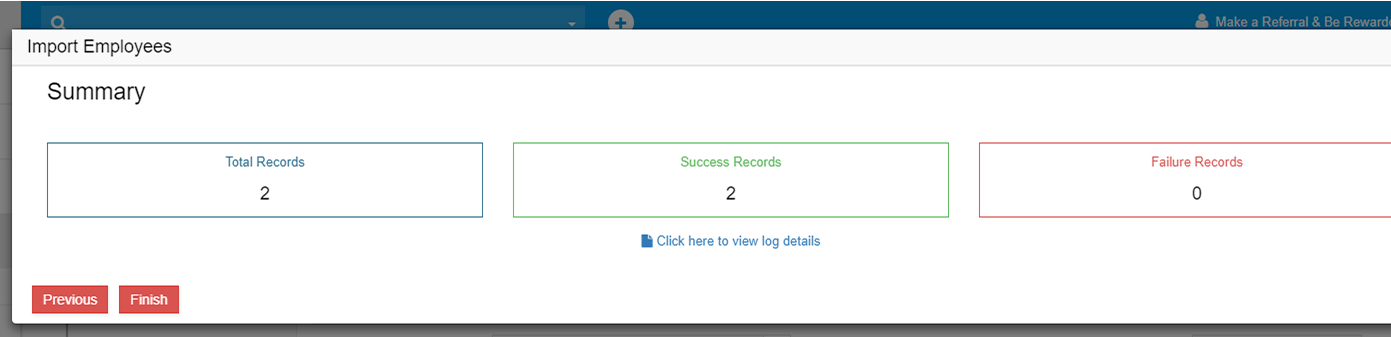
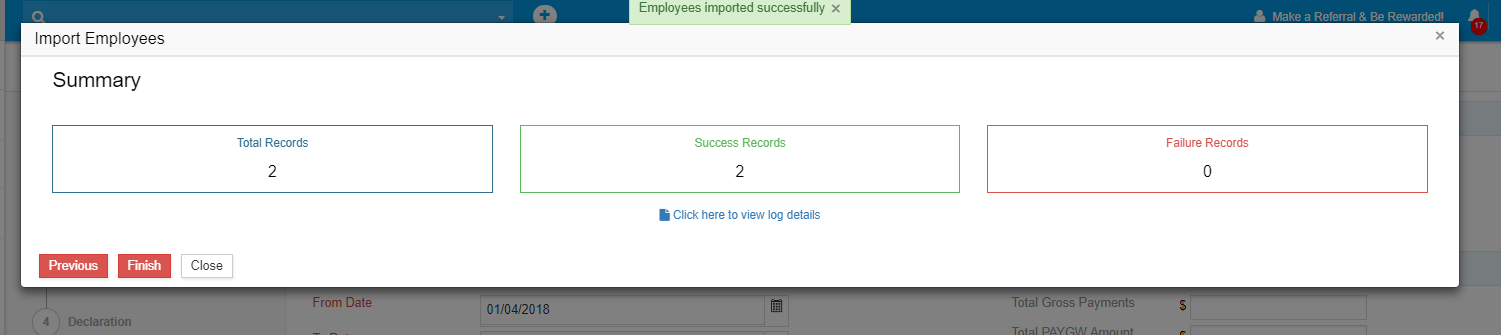
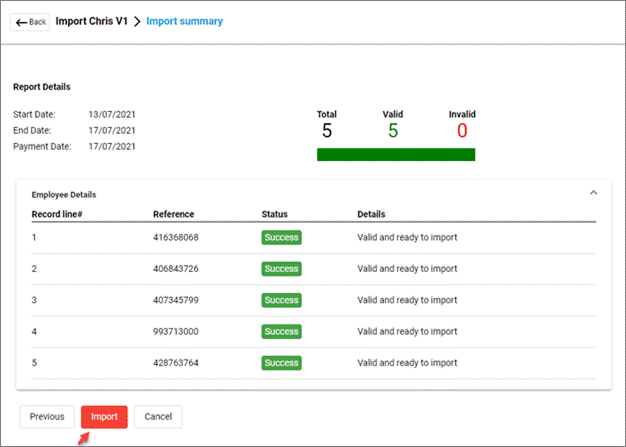
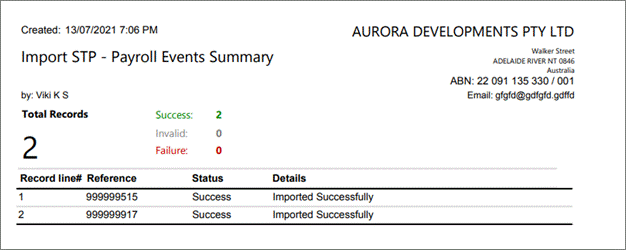
View the import summaryand check for errors.
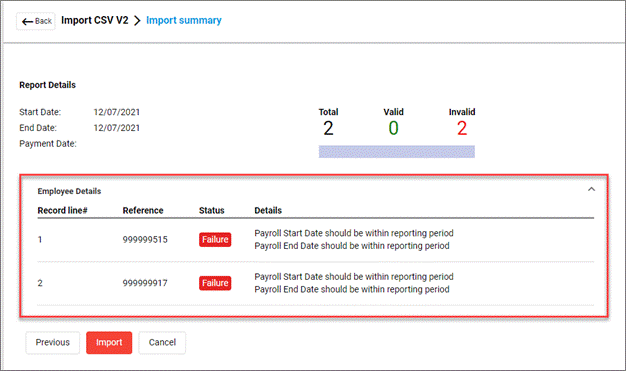
If needed, Cancel the import, make corrections to the CSV file and import again.
Once the import shows as Valid it is ready to Import.
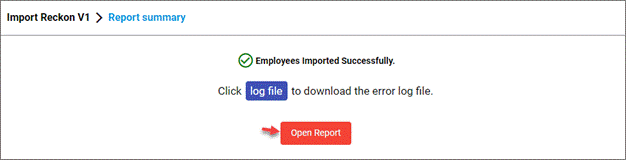
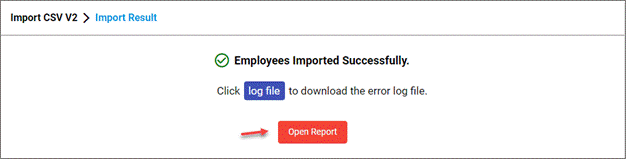
Once the details have been saved, select log file to check the import log.
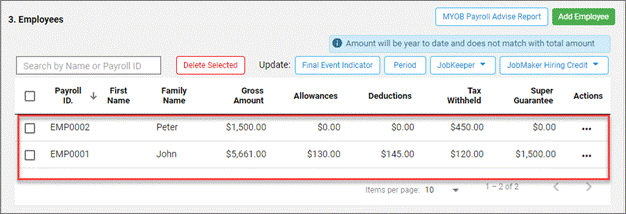
Select Open Report and the details will populate the Employees section.
Review the employee details and complete the declaration before submitting.
Before making the declaration, check for any errors.
If there are no errors, select lodgment type and Save or Submit.
The validated payroll information will be redirected to Saved Reports screen automatically. The status shows as Valid.
The report will also be listed under Saved Reports and client dashboard.
To lodge saved reports, follow instructions at Save and Lodge Options .
To prepare the STP report by importing details from a Reckon file into GovReports, go to My Clients > select client then open the STP form.
Follow the instructions in Converting to STP V2 (New Version) to select the client and swap to STP V2 if this has not already been completed.
To start a new payroll event go to My Clients > select client. Select Forms then STP – Payroll Events.
Check that the prefilled employer information is correct.
In Reporting info for specified pay period, enter pay run start date, end date and date of payment.
Make sure these details are correct before proceeding. Check that the payer ABN in the Reckon file matches the ABN listed in the employer information.
In the Employeessection, select Import.
Select Reckon File V1.

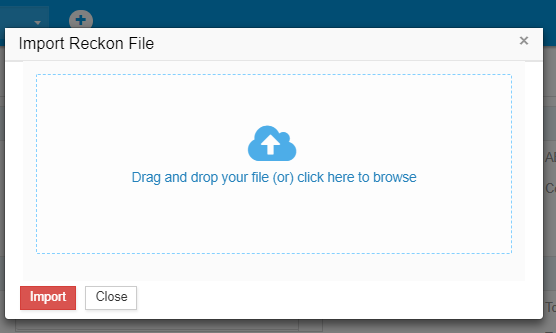
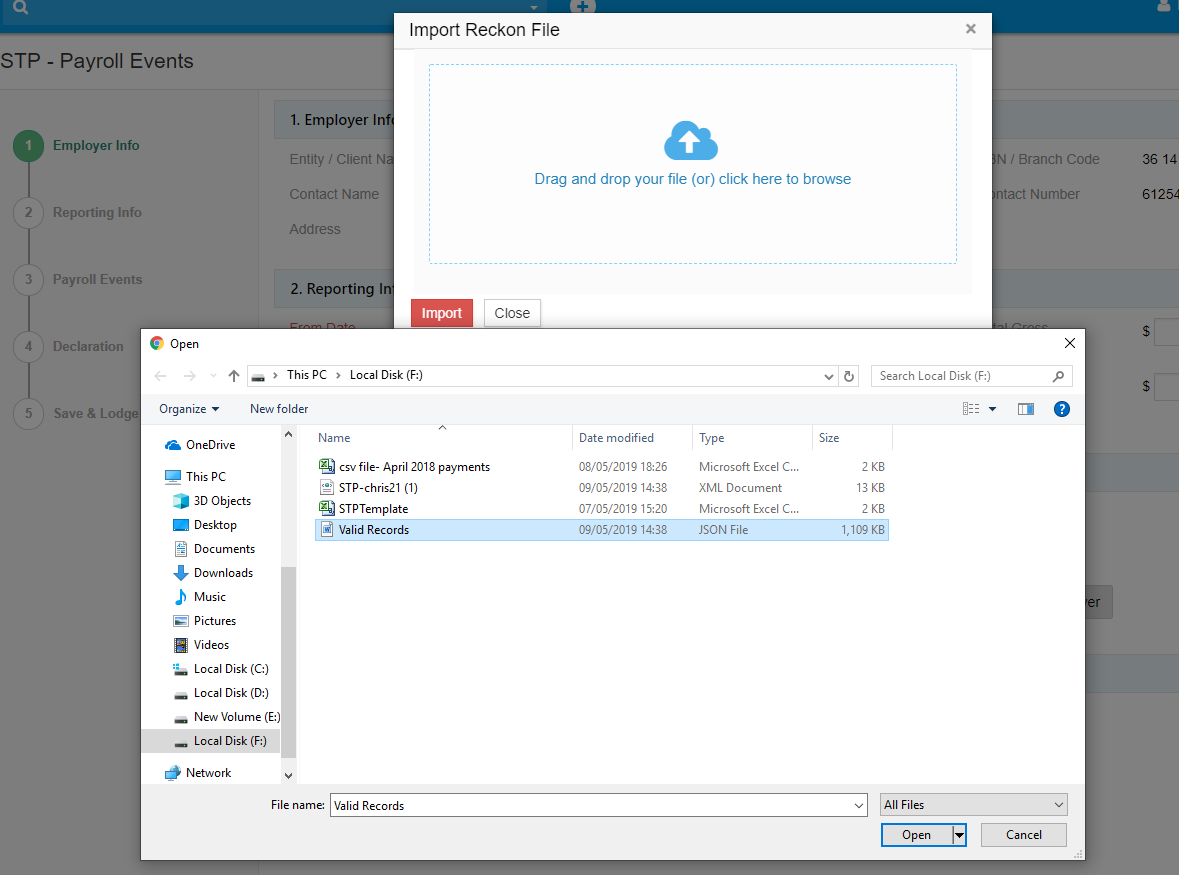
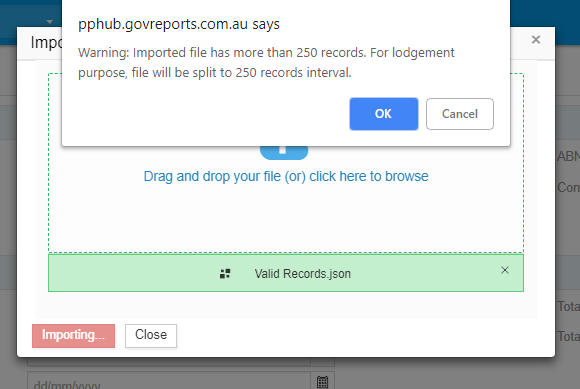
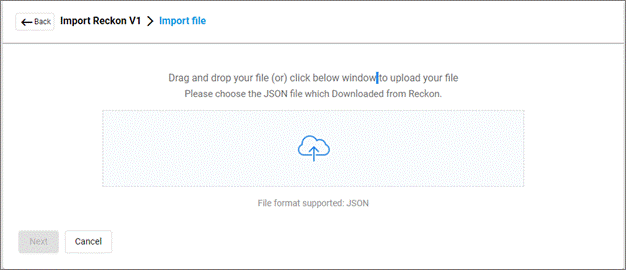
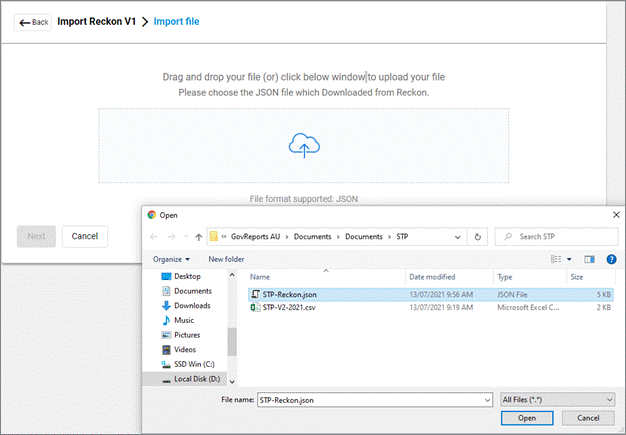
Upload the Reckon JSON file then select Next.
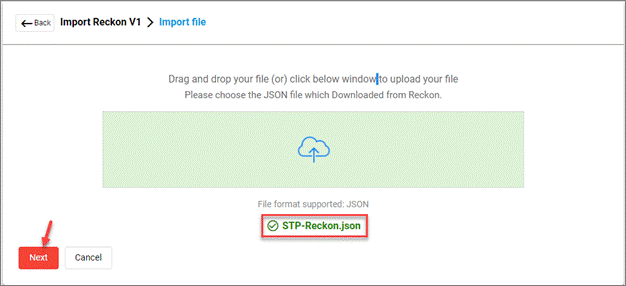
If records are validated, select Next again.
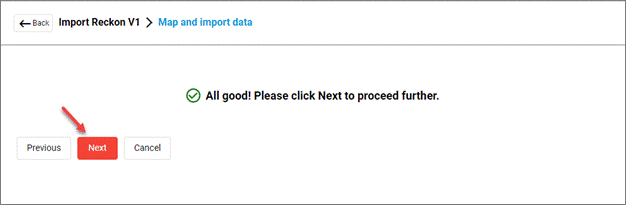
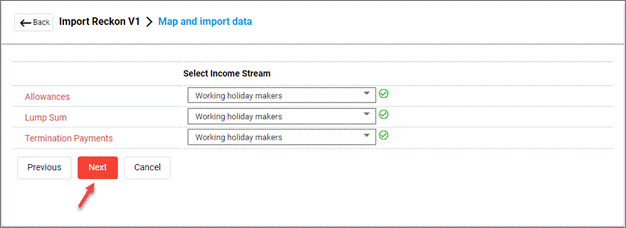
Review the fields and the mapping. Make any required changes, then select Next.
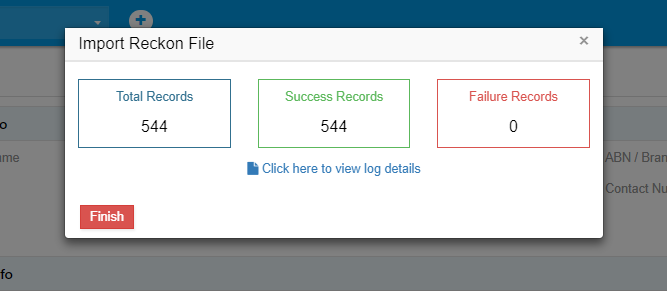
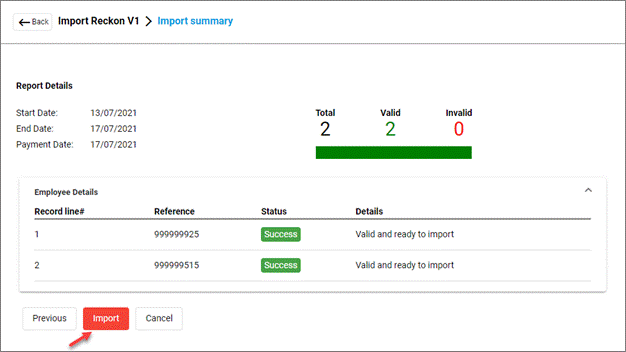
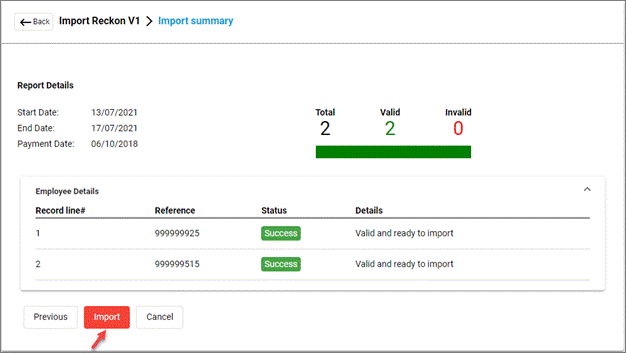
View the import summary and check for errors.
If needed, Cancel the import, make corrections to the Reckon file, export the JSON file and import again.
Once the import shows as Valid it is ready to Import.
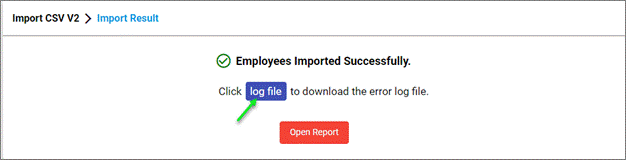
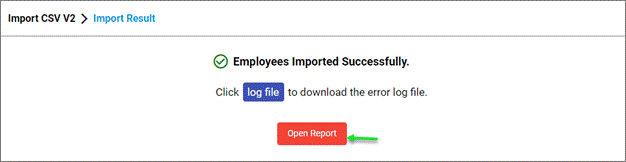
Once the details have been saved, select log file to check the import log.
Select Open Report and the details will populate the Employees section.

Review the employee details and complete the declaration before submitting.
Before making the declaration, check for any errors.
If there are no errors, select lodgment type and Save or Submit.
To lodge saved reports, follow instructions at Save and Lodge Options .
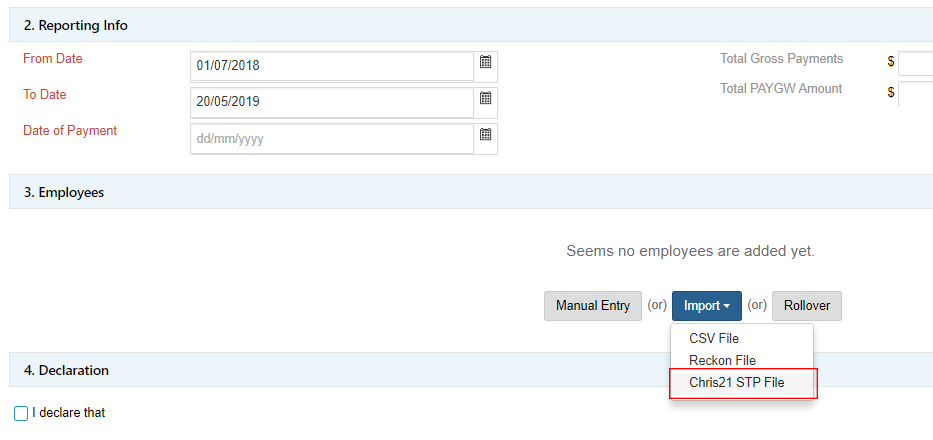
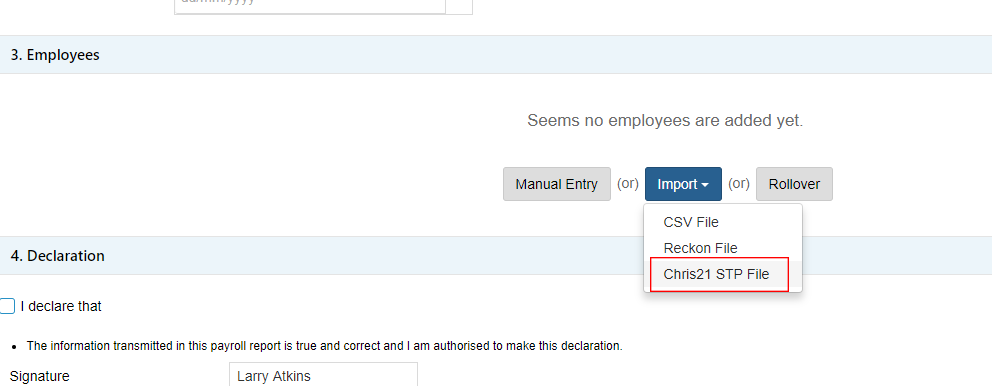
To prepare the STP report by importing details from a Chris21 STP file into GovReports, go to My Clients > select client then open the STP form.
Follow the instructions in Converting to STP V2 (New Version) to select the client and swap to STP V2 if this has not already been completed.
To start a new payroll event go to My Clients > select client. Select Forms then STP – Payroll Events.
Check that the prefilled employer information is correct.
In Reporting info for specified pay period, enter pay run start date, end date and date of payment.
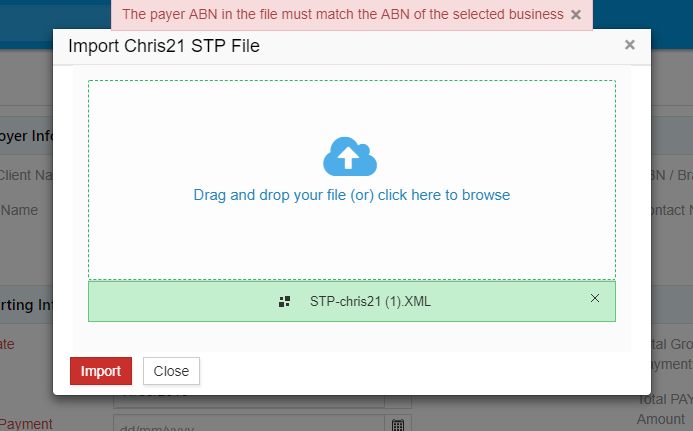
Make sure these details are correct before proceeding. Check that the payer ABN in the Chris21 file matches the ABN listed in the employer information.
In the Employees section, select Import.

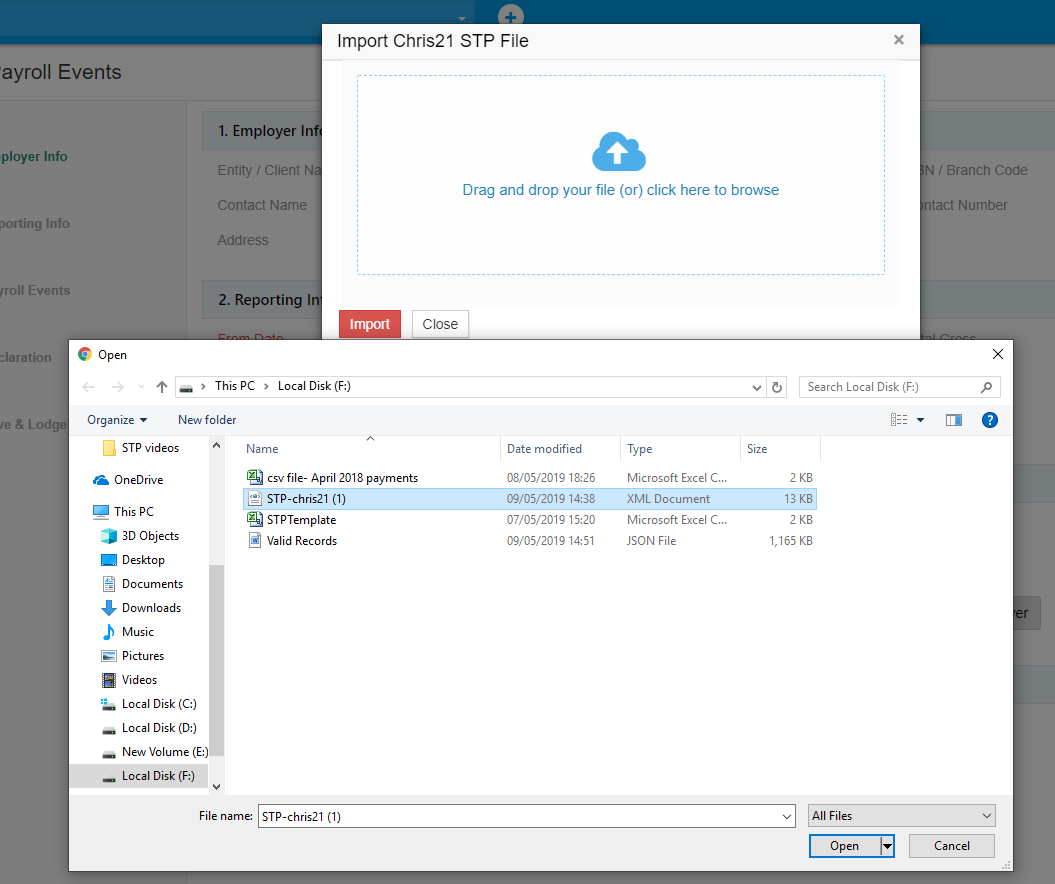
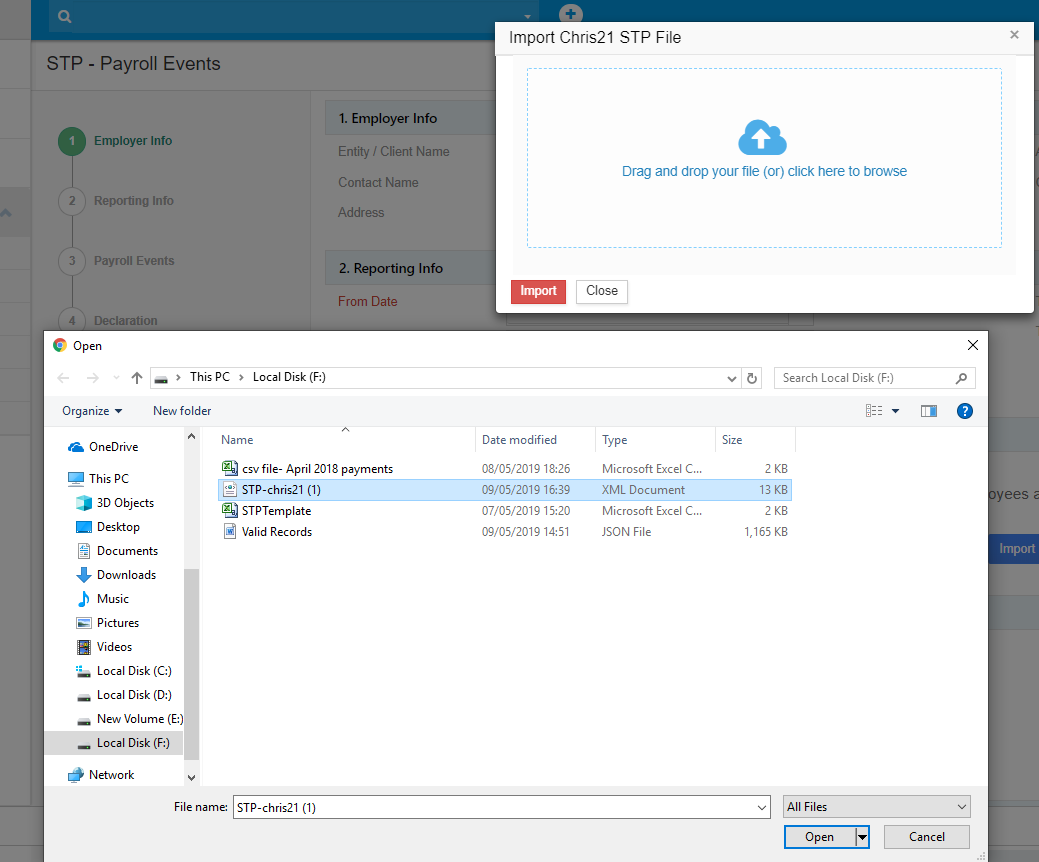
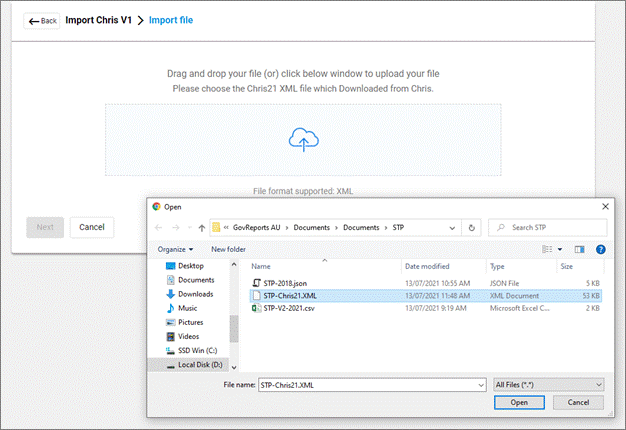
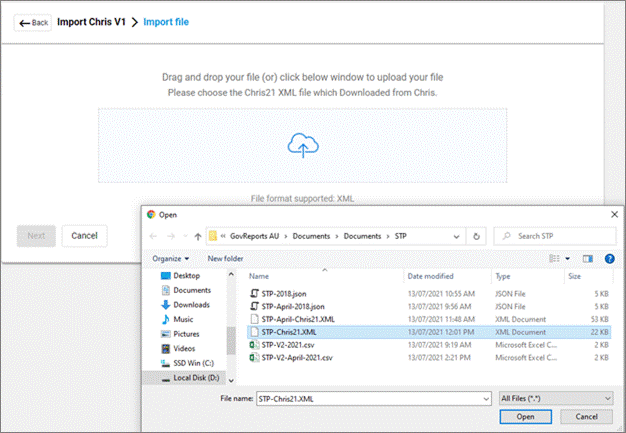
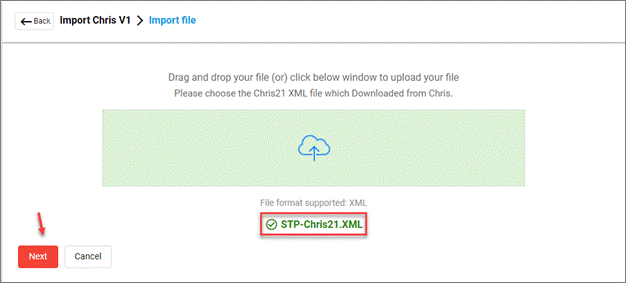
Upload the Chris21 file then select Next.
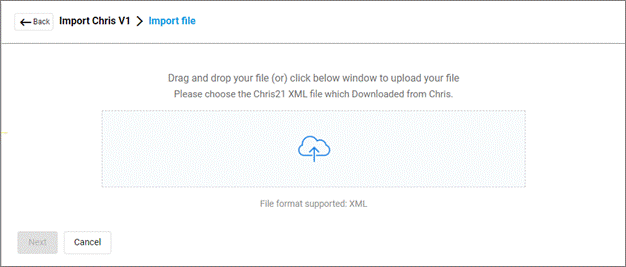
Upload the Chris 21 XML file then select Next.

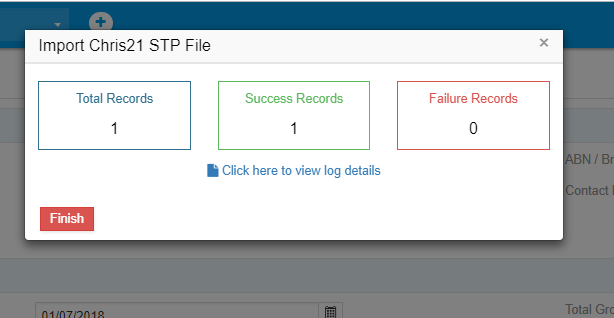
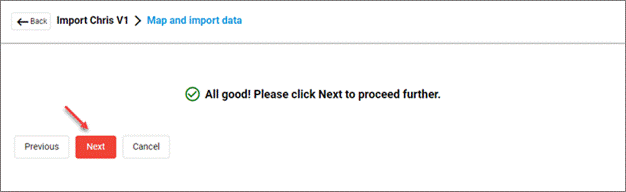
If records are validated, select Next again.
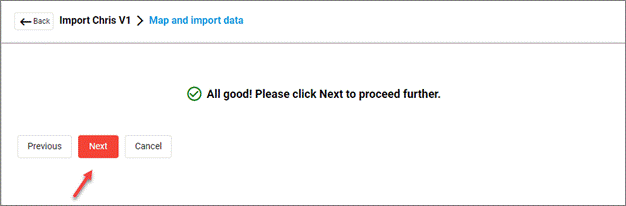
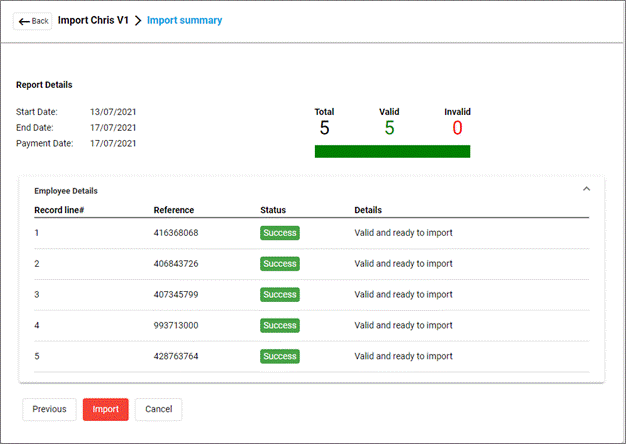
View the import summary and check for errors.
If needed, Cancel the import, make corrections to the Chris21 file, export the XML file and import again.
Once the import shows as Valid it is ready to Import.
Once the details have been saved, select log file to check the import log.
Select Open Report and the details will populate the Employees section.
Review the employee details and complete the declaration before submitting.

Before making the declaration, check for any errors.
If there are no errors, select lodgment type and Save or Submit.
To lodge saved reports, follow instructions at Save and Lodge Options .
Importing information from MYOB is a slightly different process from importing from other software.
The first time you add details from MYOB, you need to enter the employee details manually. The employee’s payroll ID number must be exactly the same as the identifier in MYOB. Other identification fields including name and TFN must also match MYOB; for example, if the employee name in MYOB includes a middle name this must be added to GovReports.
Once this has been added manually the first time, future pay runs can be rolled over and employee details will populate.
Export the MYOB payroll advice report to CSV format.
To prepare the STP report by importing details from an MYOB Payroll Advice Report into GovReports, go to My Clients > select client then open the STP form.
Follow the instructions in Converting to STP V2 (New Version) to select the client and swap to STP V2 if this has not already been completed.
To start a new payroll event go to My Clients > select client. Select Forms then STP – Payroll Events.
Check that the prefilled employer information is correct.
In Reporting info for specified pay period, enter pay run start date, end date and date of payment to match the MYOB Payroll Advice Report that is being imported.
Make sure these details are correct before proceeding.
Enter employee details manually before importing the first MYOB payroll advice report.
Select MYOB Payroll Advice Report and choose the file or drag and drop .

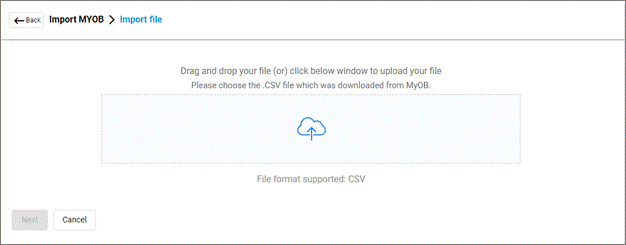
The file must be CSV format. Once successfully uploaded, select Next.
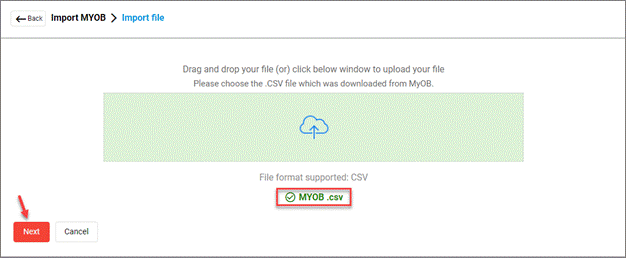
Select Import.
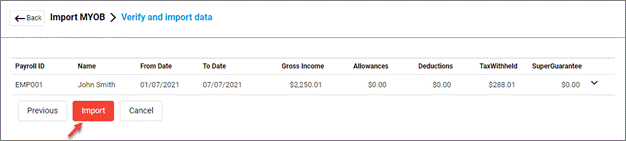
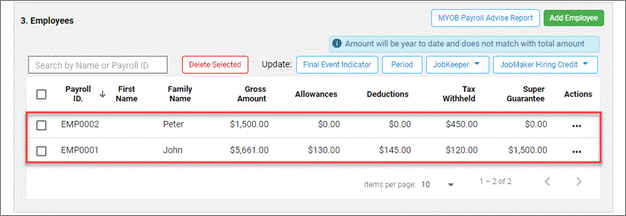
Check that the payroll details and year to date amounts are correct.
Before making a declaration or lodging, check for errors . Correct any errors by selecting Edit from the Actions menu, correct relevant details, then Save again.
Choose the required lodgment type option, complete the Declaration then select Submit.
To lodge saved reports, follow instructions at Save and Lodge Options .
STP reports must be free from errors before being submitted to the ATO.
Errors are shown on the right side of STP forms as shown previously at checking for errors .
Hover your mouse over the error and select View which will redirect you to the respective field to correct the error. You will also be shown steps to resolve the error.

After entering the required information to correct the error, select Save.
After the listed errors have been corrected, the form is ready for lodgment.
Before making the declaration, select lodgment type and Save or Submit.
To lodge saved reports, follow instructions at Save and Lodge Options .
The validated payroll information will be redirected to Saved Reports screen automatically. The status shows as Valid.
The report will also be listed under Saved Reports and client dashboard.
Remember that you can only lodge forms that have Valid status. If you try to lodge a draft report, you will receive a notification that the report is still draft status, and that you must validate it before lodging.

To lodge saved reports, follow instructions at Save and Lodge Options .
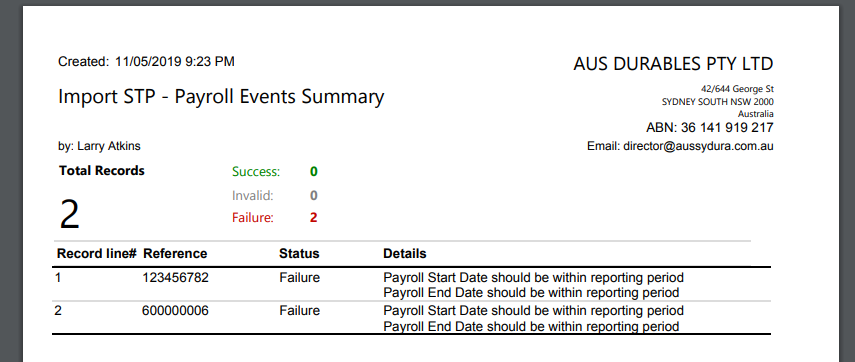
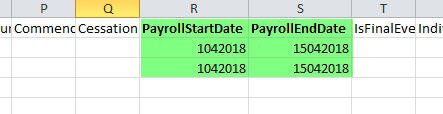
To correct errors in a CSV file, open the CSV file, check for payroll start and end dates.
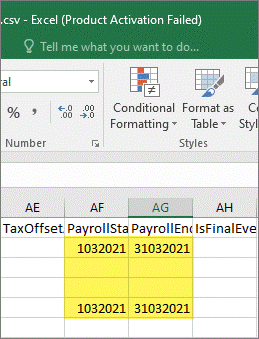
The dates in the CSV file should be the same as the Reporting Info for specified pay period section in STP Payroll Events form.
Other common errors relate to incorrect codes or formats being used or missing data in required fields.
View the import specification document in the GovReports blog link for more details: https://blog.govreports.com.au/single-touch-payroll-import-specification-document/
After correcting any errors in the CSV file upload again.
Once all records have been validated successfully select Import.

Once the details have been saved, select log file to check the import log.

Select Open Report and the details will populate the Employees section.
In this example, the error is caused by missing amounts in the gross payment and PAYGW fields.

In this case, you do not need to import the CSV file again but can manually enter the missing amounts then select Save to proceed with reviewing, validating, authorising and lodging.
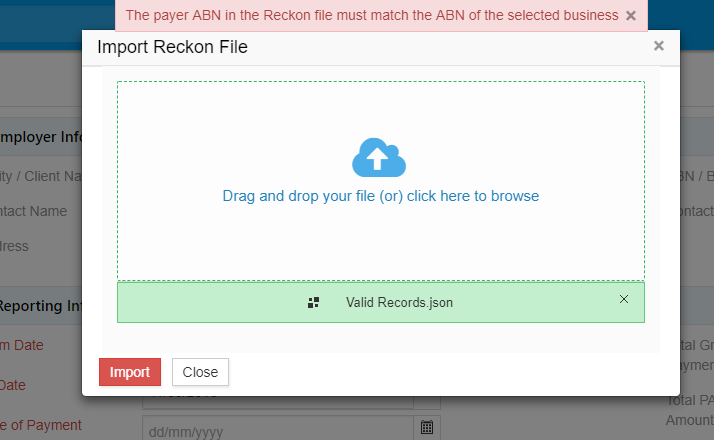
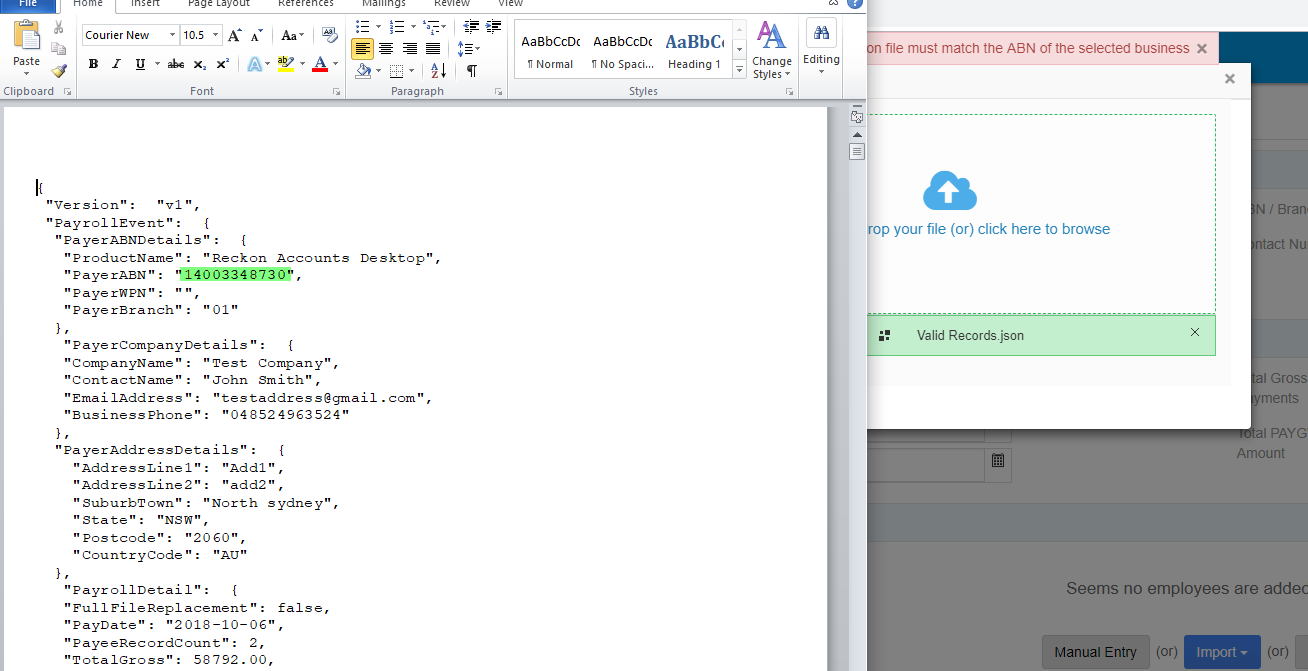
If you receive the error message “The payer ABN in the Reckon file must match the ABN of the selected business” you will be prevented from importing the file.
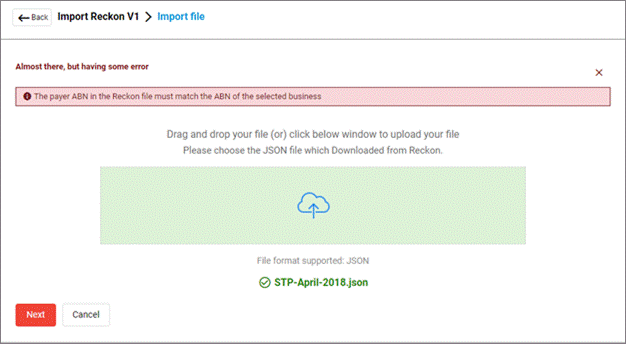
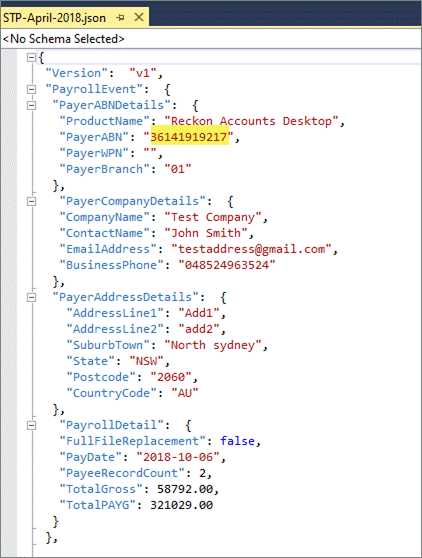
Open the Reckon file. Check the ABN information in the Reckon file.
If the ABN is correct in the Reckon file, check the client details in GovReports. Edit the client details so that the ABN is the same as the Reckon file.
If the ABN is correct in GovReports and incorrect in Reckon, the details must be updated in Reckon, the JSON file exported again, and then uploaded again to GovReports.
If you receive the error message “The payer ABN in the Reckon file must match the ABN of the selected business” you will be prevented from importing the file.
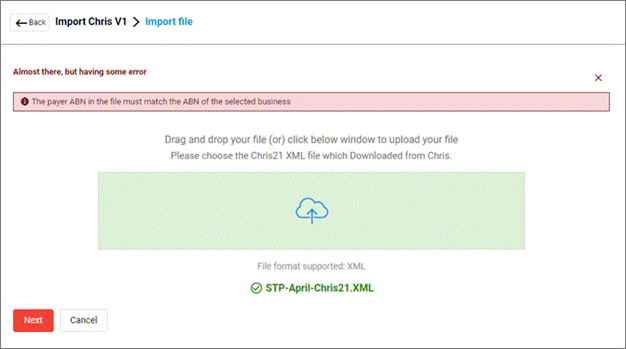
If you get this message, the selected Chris21 STP file cannot be imported but a different file with matching ABN can be imported.
When the correct Chris21 STP file is imported, the import summary will be valid.
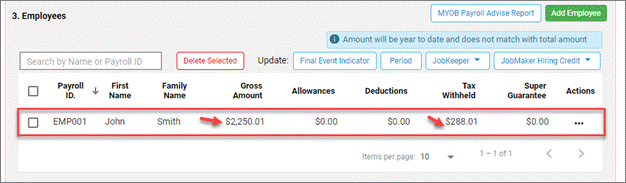
If you receive the error message “No records found for the given period”, check that you have entered the pay run dates and payment date into GovReports exactly as is listed in the MYOB report.
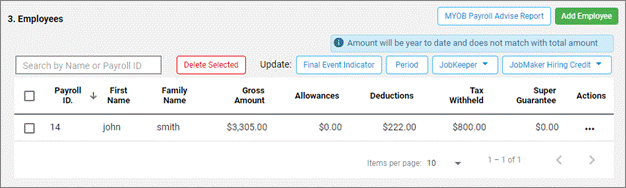
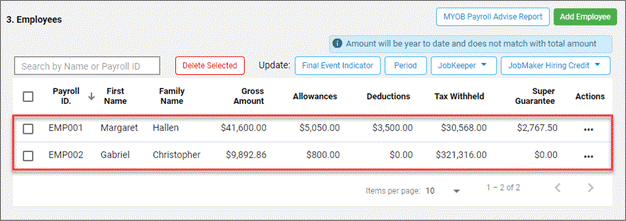
If you receive the error message “Amount will be year to date and does not match with total amount”, check that you have entered the year to date figures, not just the specified pay period figures.
Correct the entries in Reporting info for specified pay period and import the MYOB Payroll Advice Report again.
To delete a draft event, for example if pay events have been unnecessarily duplicated, find the event under My Lodgments > Saved Reports.
Select the report to be deleted, then Delete Selected.


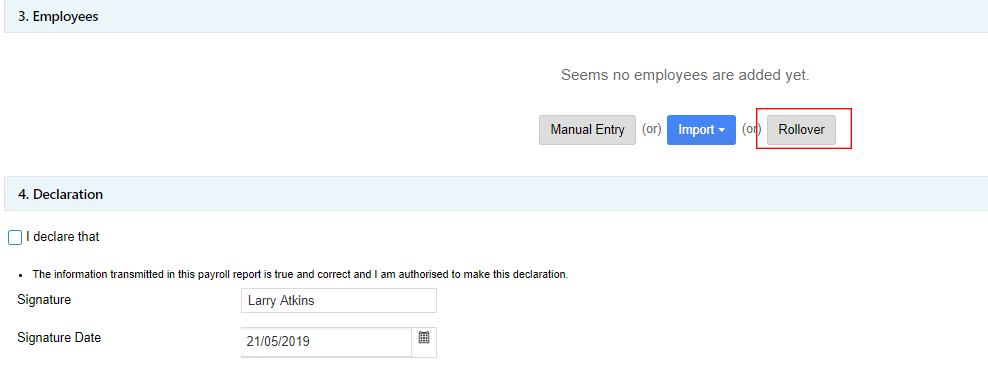
The roll over option is available for each pay cycle to easily repeat pay runs. The employee’s basic information is populated every payroll event. Use the Roll Over option in GovReports Employees information to enter appropriate payroll category figures.
To prepare the STP report in GovReports, go to My Clients > select client.
Follow the instructions in Converting to STP V2 (New Version) to select the client and swap to STP V2 if this has not already been completed.
If STP has already been swapped to V2, go to My Clients > select client > Forms. Select STP – Payroll Events.
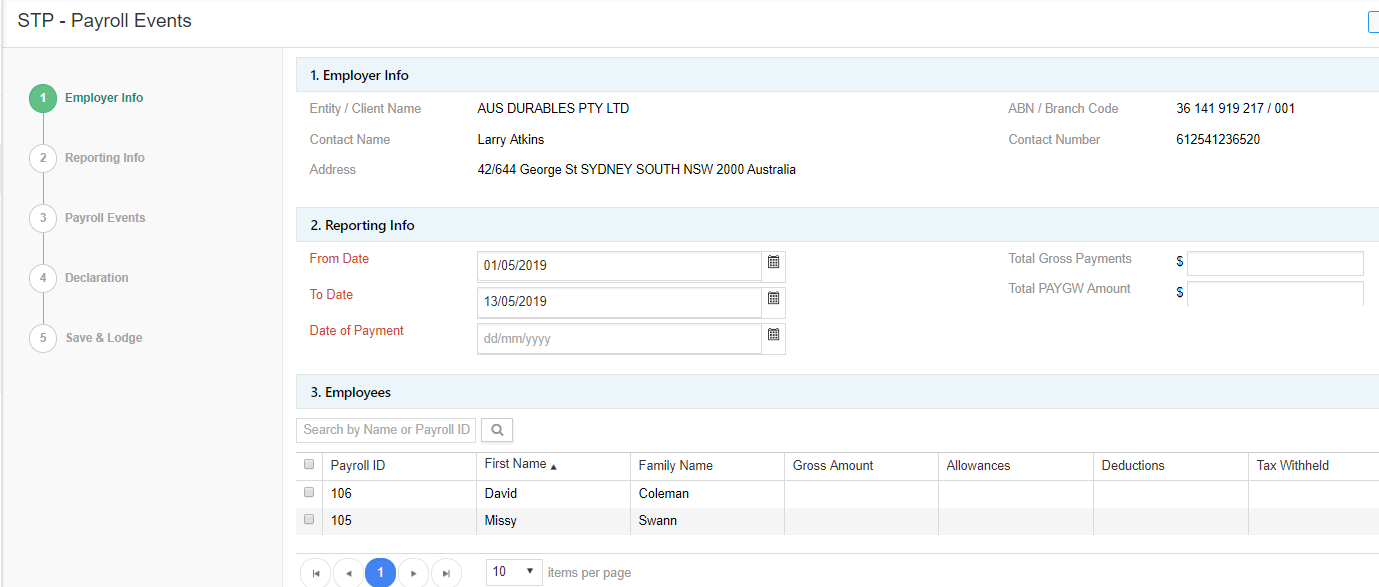
The STP - Payroll Events screen will load.
Check that the prefilled employer information is correct.
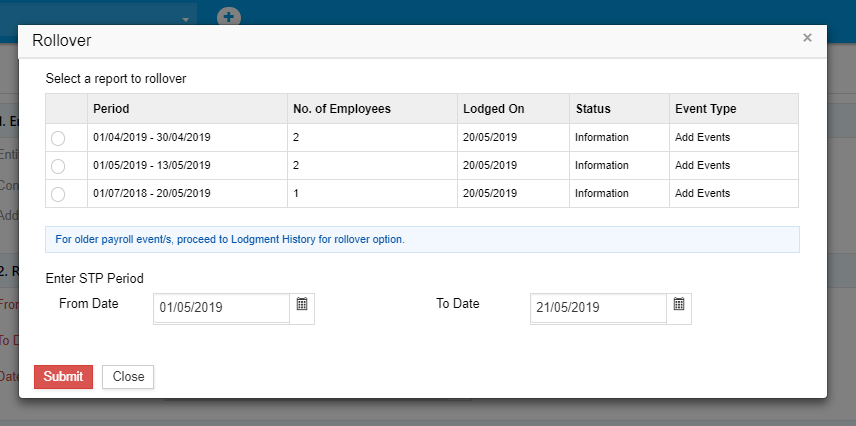
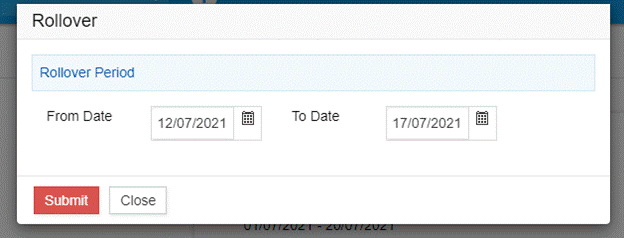
In the Employees section, select Roll Over.

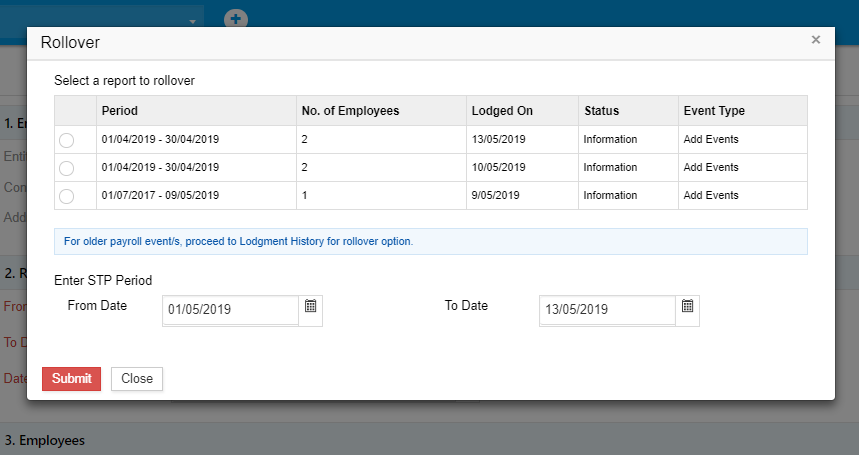
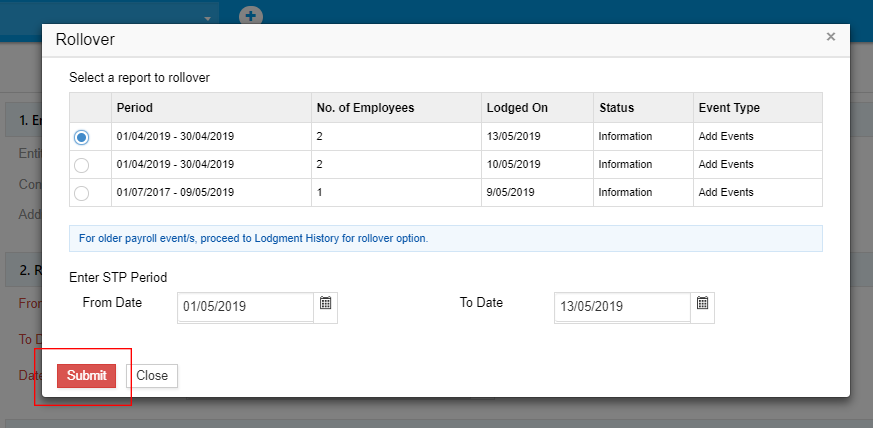
The rollover window opens. From the list of lodged reports, select the report to roll over. From each report, you can see the number of employees included in the report.
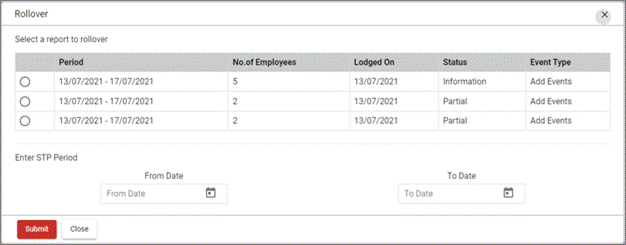
Select the required report to rollover and select Submit.
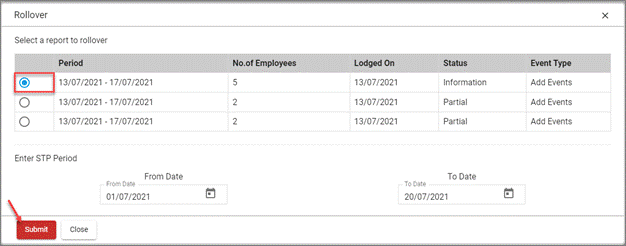
Enter the dates of the new or current STP pay period then select Submit.

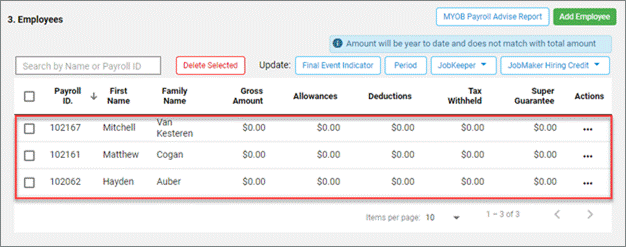
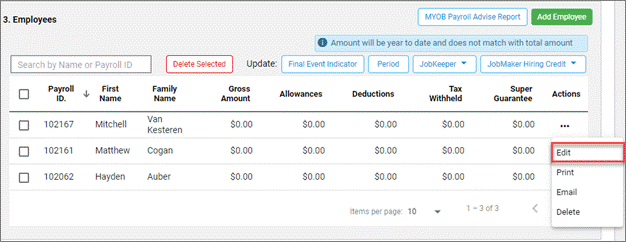
In the Employees section, review the employee records being rolled over to the current reporting period.
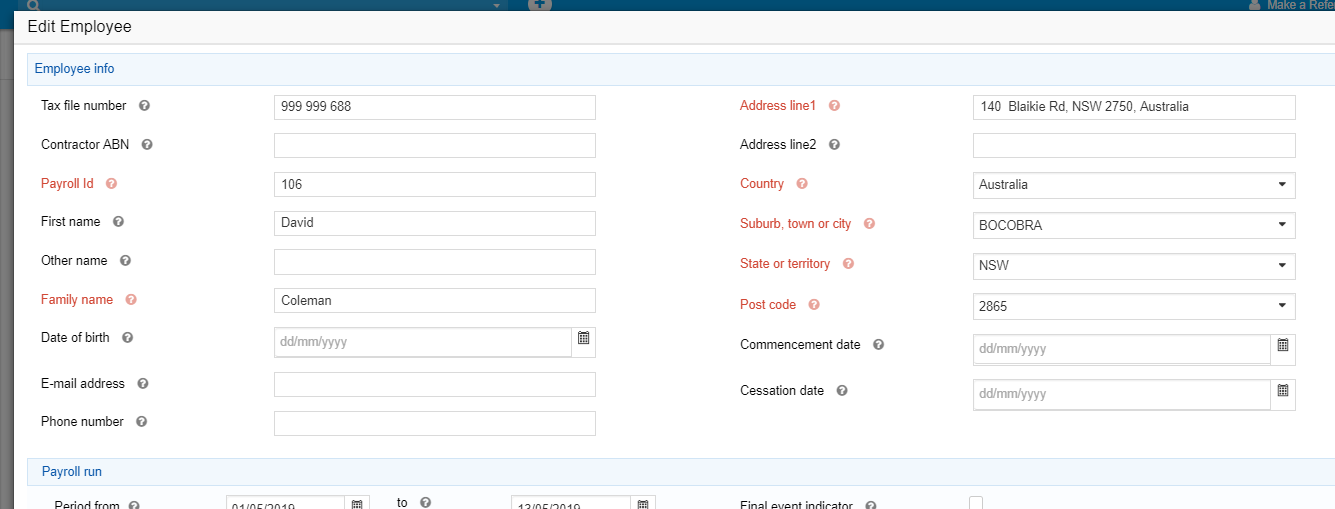
From the Actions menu, select Edit.
The employee’s basic details are prefilled from the previous payroll event that was rolled over.
The period start and end dates have been populated from the STP Payroll Event information. Check these are correct or edit.

If there are any additional payroll categories for this payroll event, add amounts at relevant fields.
Return to the Reporting info for specified pay period section. Enter the gross payments, PAYGW and superannuation amounts.
Before making a declaration, check for errors .
Correct any errors by selecting Edit from the Actions menu, correct relevant details, then Save again.
Choose the required lodgment type option, complete the Declaration then select Submit.
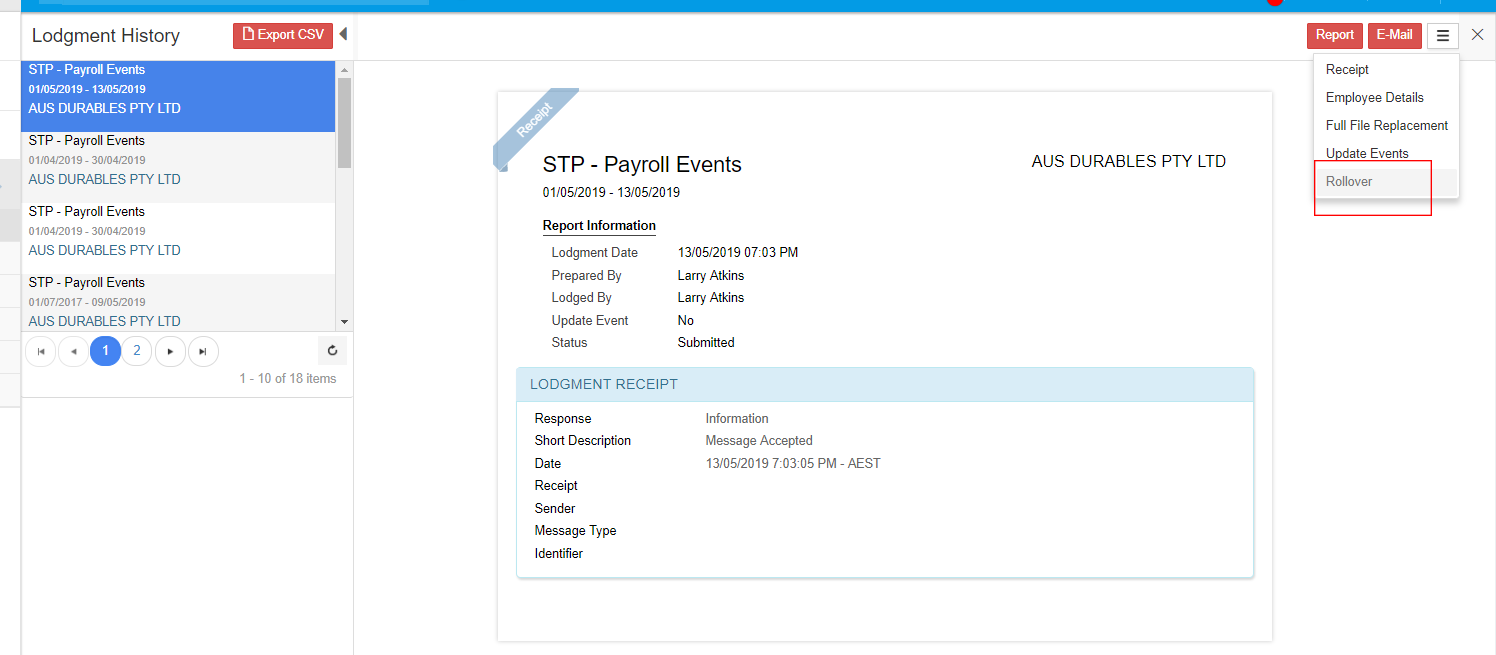
Alternatively, to roll over lodged reports, go to My Clients > select client > select lodged report and Open.
From the lodgment receipt screen, select Rollover from the overflow menu.

You can then proceed as per instructions above for rolling over previous payroll event details to a new payroll event.
At the end of each financial year, employers must provide payroll information to all employees. Using Single Touch payroll to finalise payroll information submits the data to the employees’ myGov account, where they will see their income statement for the year from each employer.
In GovReports STP V2, you will need to indicate the final pay run of the year. This declares that you have provided all required payroll information for the financial year through your STP reporting and submits it to the ATO.
You make a finalisation declaration by providing a final event indicator for each employee.
You can mark a pay run as a final event for an employee any time during the financial year. For example, for employees who have ceased employment in the middle of the financial year, you can submit the final event indicator upon their termination.
STP finalisation must be completed for all employees by 14 July each year.
To prepare the STP finalisation in GovReports, go to My Clients > select client.
Follow the instructions in Converting to STP V2 (New Version) to select the client and swap to STP V2 if this has not already been completed.
If STP has already been swapped to V2, go to My Clients > select client > Forms. Select STP – Payroll Events.
The STP - Payroll Events screen will load.
Check that the prefilled employer information is correct.
Complete the final pay run by manual data entry , importing a file from CSV, Reckon , Chris 21 or MYOB Payroll Advice Report or rolling over a previous pay run .
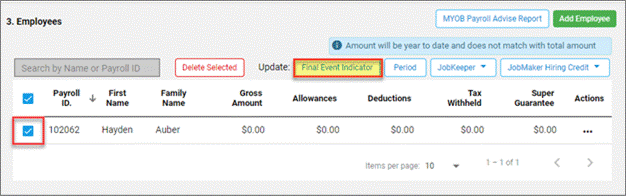
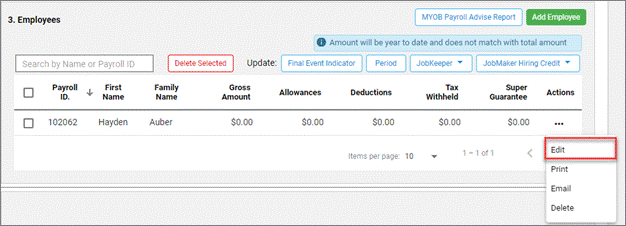
Records will be filled in the Employees section. Select all employees to be finalised for the year.
You can select one employee there is only one person to finalise in a particular pay run.
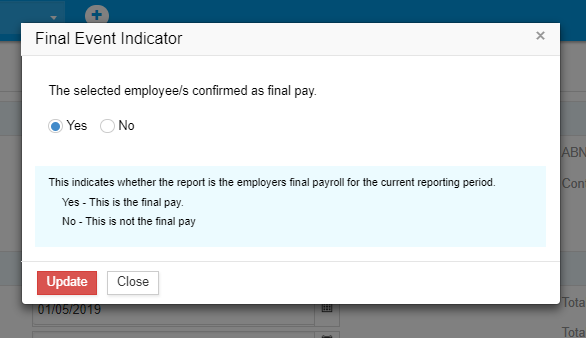
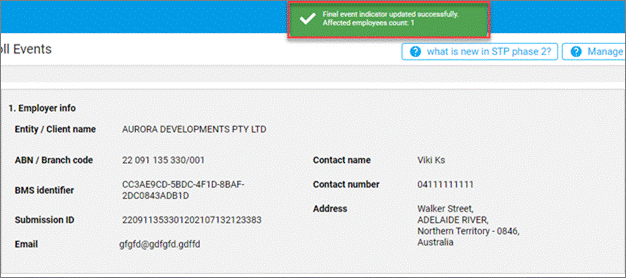
Select Final Event Indicator .
Confirm that this is a final pay for selected employees and select Update.
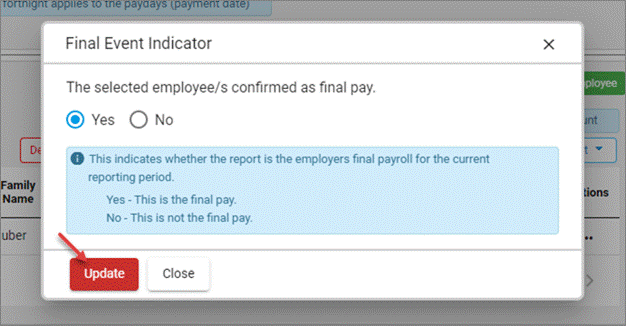
Final event indicator is updated successfully.
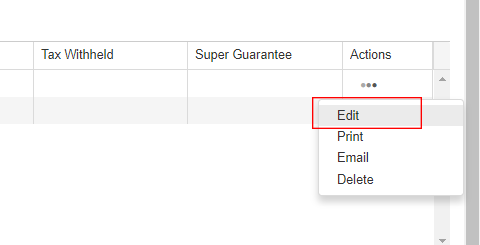
In the employee entry, under the Actions menu, select Edit.
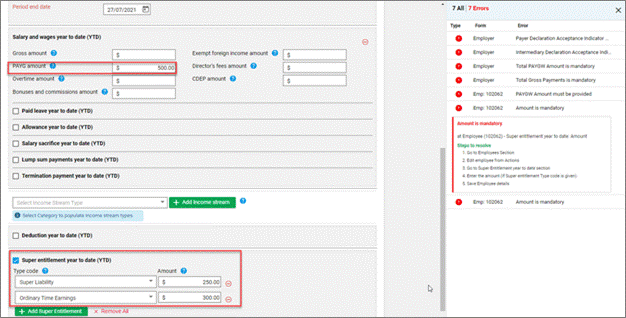
In the payrun section Final Event Indicator is checked.

If the report has not been saved or submitted, at this point you can still edit the report and deselect the final event indicator if this has been done in error.
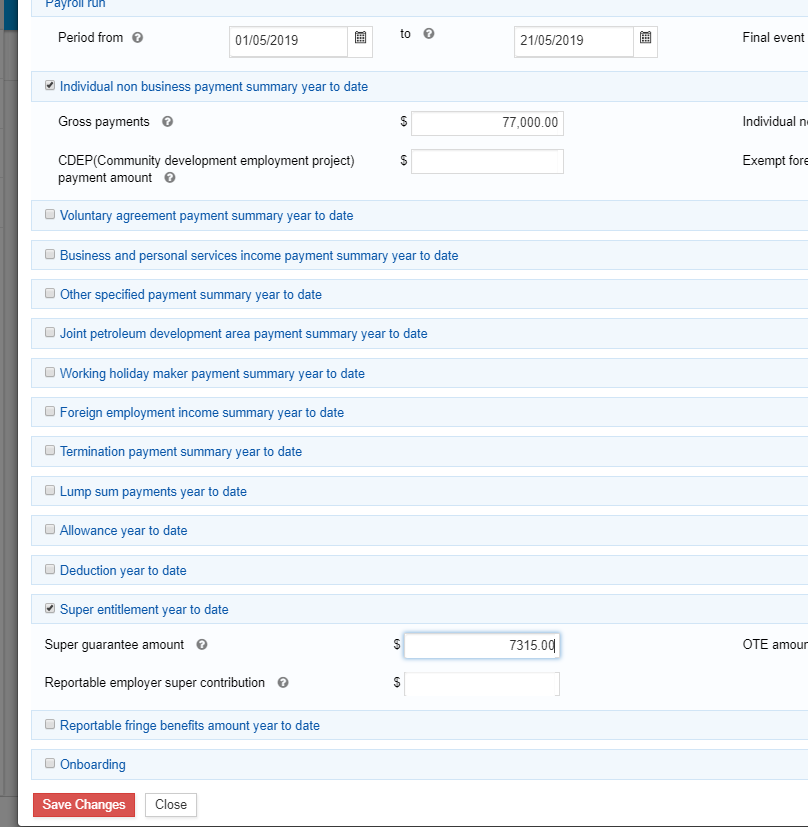
Enter the PAYG amount and superannuation entitlement amount.
Because you are entering the year to date amount for the entire financial year, this will override previous amounts submitted.
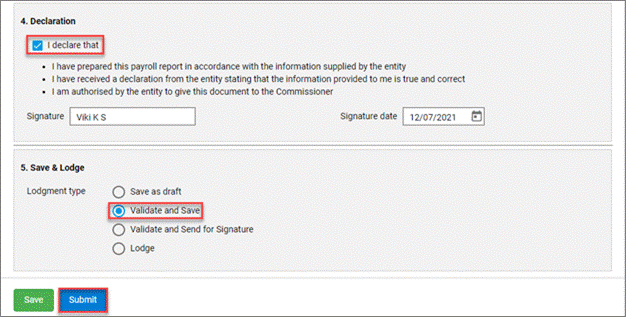
Choose the required lodgment type option, complete the Declaration then select Submit.
The validated payroll information will be available under Saved Reports and also in the client dashboard under the Valid/Draft tab.
Your final event is ready for lodgment. Select the report to be lodged, select Lodge Selected and Confirm.
Select that lodgment to view the receipt if required.

Once the report has been successfully submitted to the ATO, the report will display under My Lodgments > History and also in the client dashboard under the Lodged tab.
To access lodged reports, go to My Lodgments > History . From the Actions menu of the required report, select Open.

This will open the summary screen showing lodgment status. If the report has already been lodged, the status will show Receipt.
Select Report.
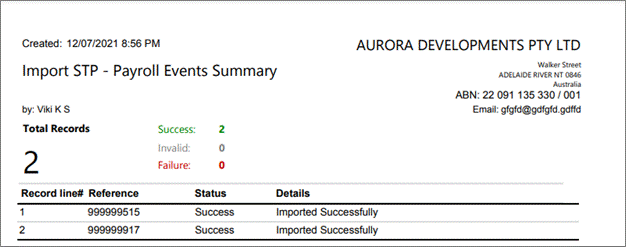
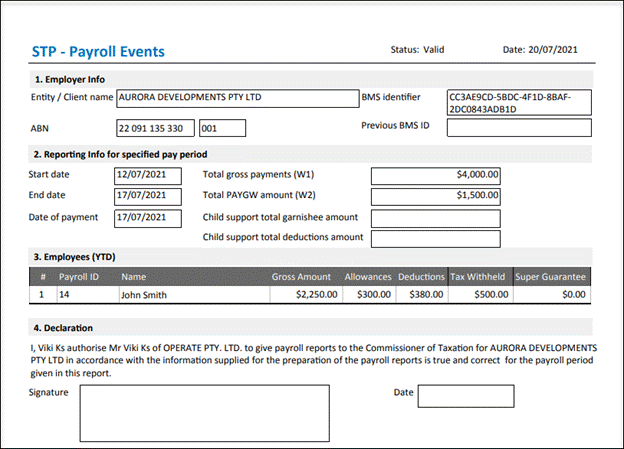
The payroll event report will open in PDF format, showing a summary of the payroll information submitted to the ATO. Save the report as desired
The PDF can be emailed to the client from the same screen.

Select E-Mail to open the Send E-Mail screen. Select Client button.
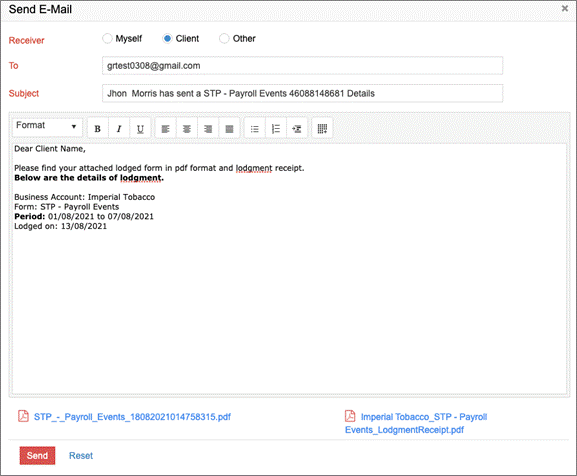
Check the email address and name of the client are correct, customise the message if required, then Send. Both the payroll event report and the lodgment receipt are automatically attached to the email.
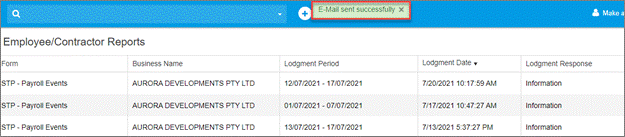
Alternatively, go to My Lodgments > Employee/Contractor Reports .
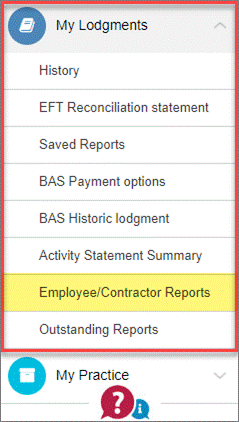
Select E-Mail icon from employees list.
The same Send E-Mail screen appears. Select the receiver: Myself, Client or Other.
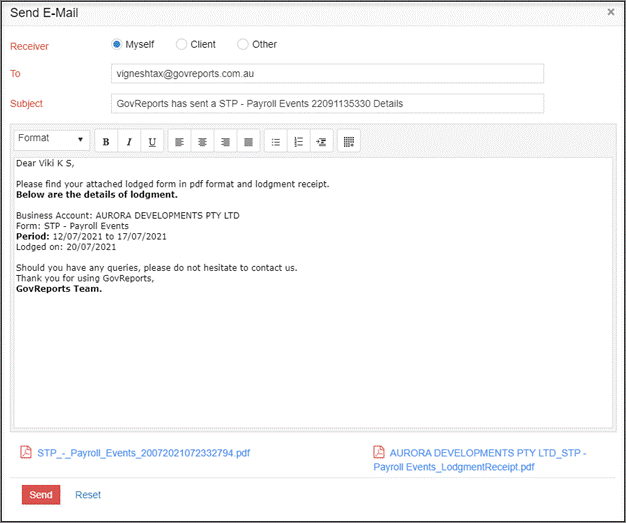
Once the email has been sent, the success message displays.
Single Touch payroll pay events require authorisation for every electronic lodgment.
The ATO allows an annual authorisation agreement between registered agents and eligible businesses. To check if you and your client are eligible for an annual authorisation, go to ATO STP engagement authority for details.
If the business is not eligible for an annual STP authority, the employer must authorise each STP payroll event before a registered agent can lodge on their behalf.
GovReports includes an integrated digital signature function to enable quick and easy authorisation of each payroll event.
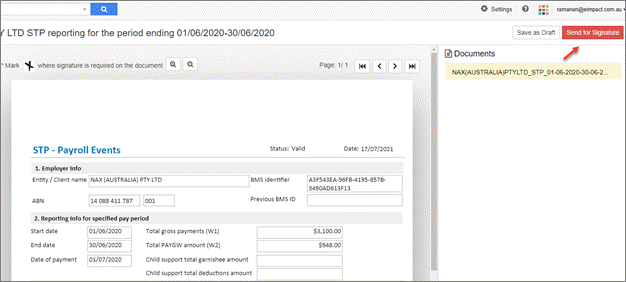
Once an STP report is ready for lodgment, you can send the report to your client for their digital signature.
In the Save & Lodge section of a payroll event, select Validate and Send for Signature, then Submit.
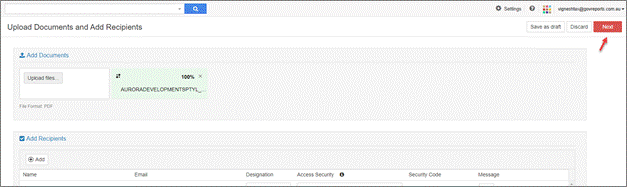
This takes you to GovReports Digital Authentication in a separate browser tab. Check the email address and name of the client are correct. The payroll event report will automatically be attached to the email. Customise the message if required.
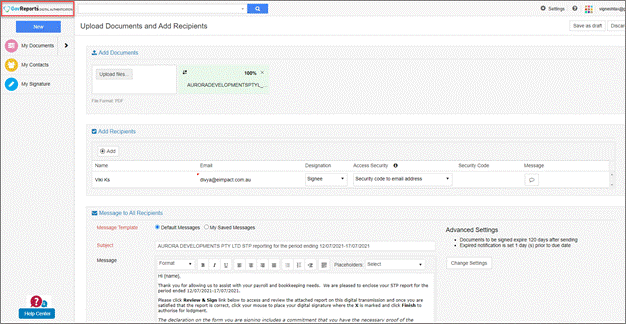
Select Next.
Mark the signature location on the document.
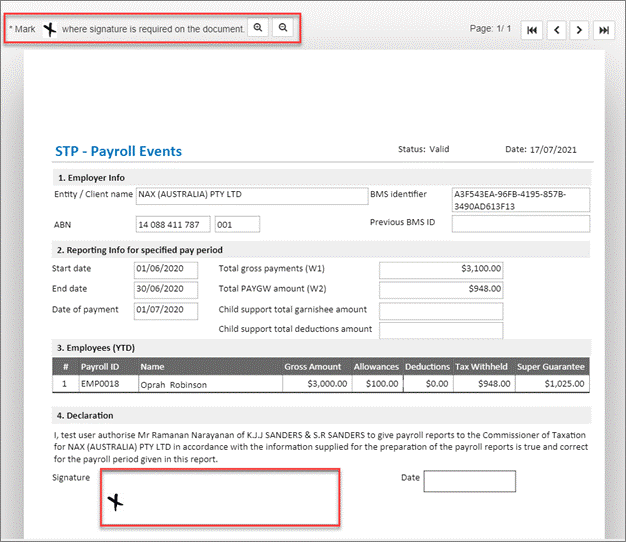
Select Send for Signature.
You will be taken to the Digital Authentication summary screen where you can see the status and audit log of the digital signature form.
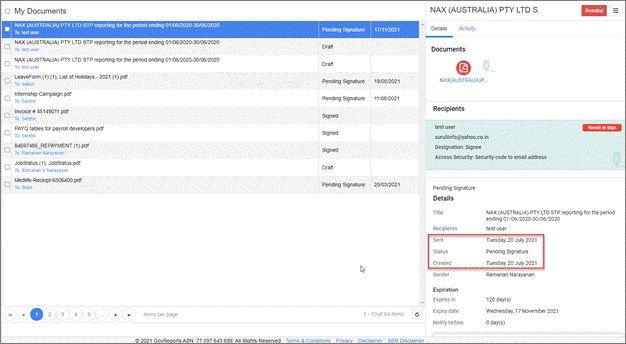
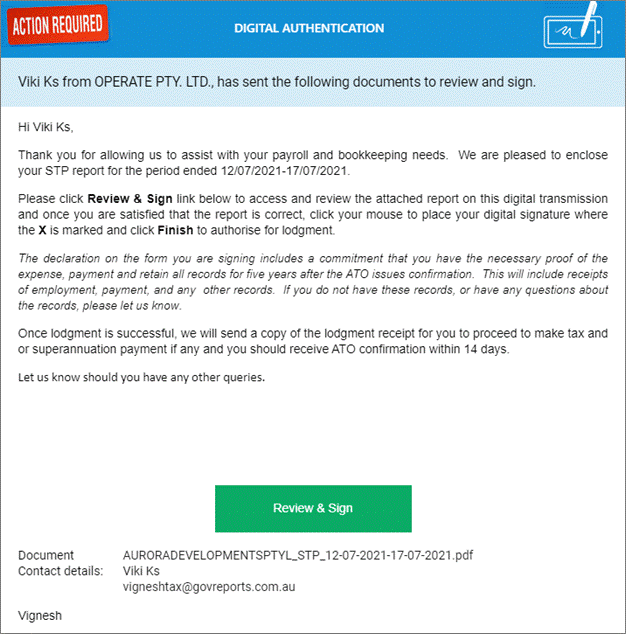
An email will be sent to your client where they can review and sign the report digitally.
You will be notified by email once the client has signed. Once authorised by the client, you can proceed to lodge the report from My Lodgments > Saved Reports.
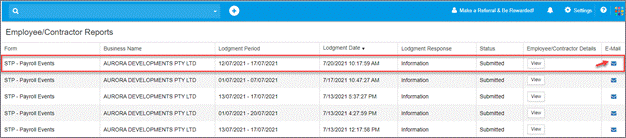
Employee details within all lodged STP reports can be viewed under My Lodgments > Employee/Contractor Reports.

Select View for the required report. You can now see the list of all employees contained in that lodgment period.
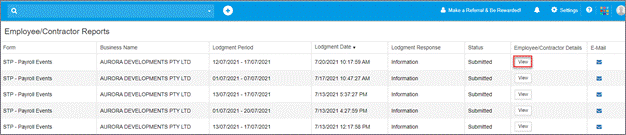
Under the Actions menu, select Print or E-Mail.

Save or send as required.
The Response option shows the status of that lodgment.

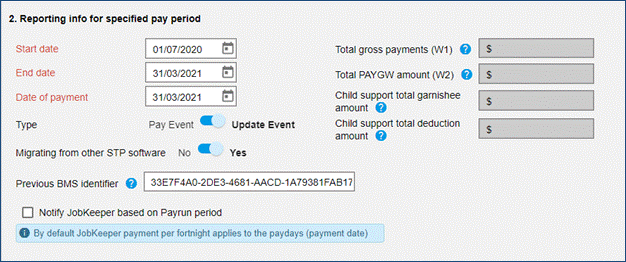
If you are migrating from other STP software to GovReports, first you will need to submit an updated event. This notifies the ATO that the reporting software has been changed from another software to GovReports.
Although the year to date figures are not being adjusted, the BMS is being updated.
To prepare the first STP update event, go to My Clients > select client.
Follow the instructions in Converting to STP V2 (New Version) to select the client and swap to STP V2 if this has not already been completed.
The STP - Payroll Events screen will load.
Check that the prefilled employer information is correct.
In Reporting info for specified pay period, enter pay run start date, end date and date of payment.
Make sure these details are correct before proceeding.
Select Update Event in the Reporting info for specified pay period section.
Select Yes for Migrating From other STP software . Enter Previous BMS Identifier. You will need to retrieve this from the software previously used to lodge STP or from the ATO online services STP reporting history.
Previous BMS identifier is a unique number which identifies the previous Business Management System (BMS) software used by the payer.
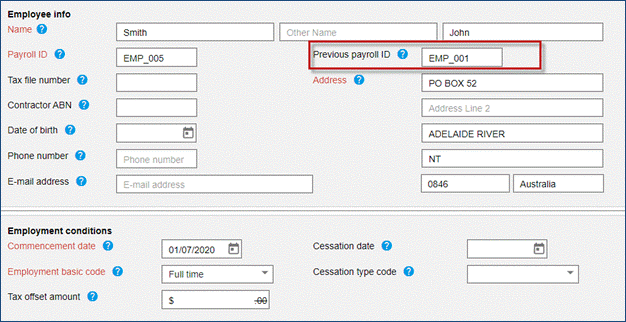
Manually enter or import the employees and enter the year to date figures for all employees.
Edit the Employee info and enter the Previous payroll ID . The previous payroll ID is used to transfer payee YTD values from an old payroll ID to the new payroll ID for the payee. This is required for ATO matching of employee data already submitted via other software.
Check the employee amounts are correct.
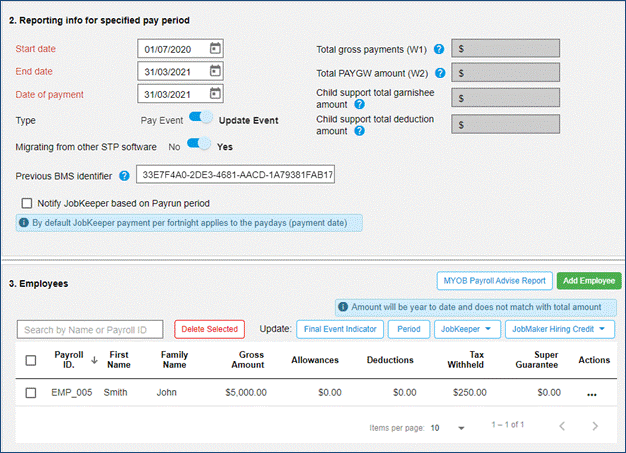
Choose the required lodgment type option, complete the Declaration then select Submit.
You can then proceed with entering new payroll events once the BMS update has been submitted and successfully lodged with the ATO.
The Help Centre is available from the main menu and any screen.
The GovReports Help Centre provides further resources and links to videos, email support and phone support.