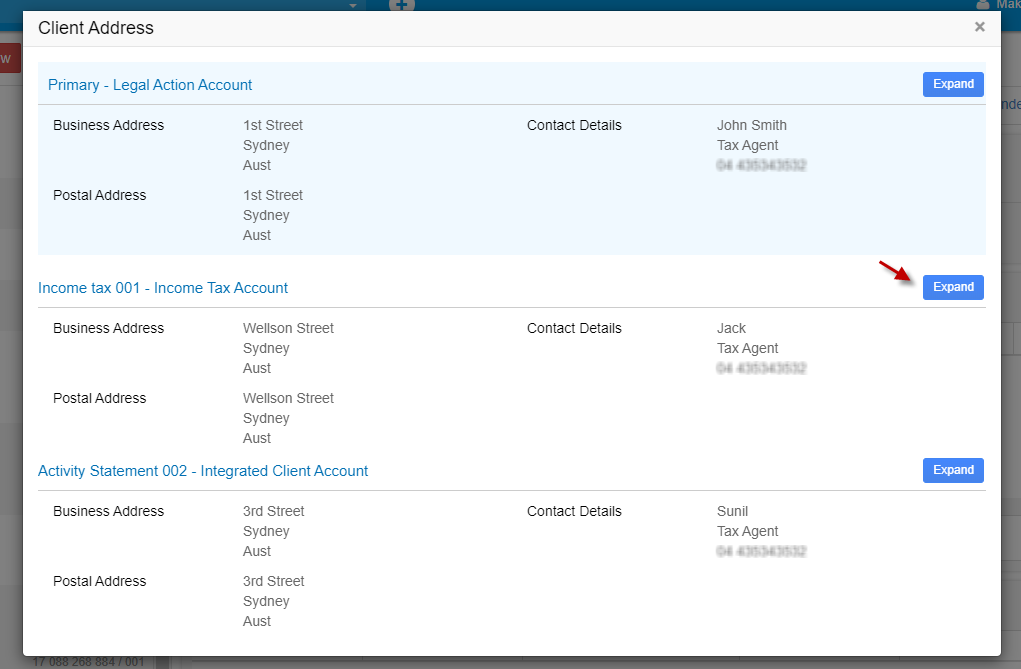
Help Center

My Clients

Add Client
  • There are 2 options to add client from My Clients
    • 1) Adding one by one
    • 2) Import client list from other software or from ATO portals
    Adding client one at the time by clicking to populate and access the New Client profile template

    After click on below screen will be appear and all Mandatory fields are in red and must be completed

    • 1. GovReports classifies 2 types of clients:
      a.Individual:as individual tax payer and may include sole traders
      b.Non-Individual:tax payer entities other than individual tax payers ie business structure such as company, trust, Self Managed Super Fund,…etc

    • 2. If you have selected Individual, then TFN must be added for personal tax return preparation purposes. GovReports has inbuilt TFN validation so only correct TFN can be added otherwise, you will be flagged with Invalid TFN and the system won’t allow you to save the client record.

      If you do not have the correct TFN for the Individual client at the time of preparing the tax return, you cannot go further to add the client into GovReports until a valid TFN is added.
      Individual tax payer can also be a business ie Sole Trader and may also have ABN which can be added for tax return purposes.

      Mandatory fields in red must be completed.

      Rules:
      For BAS lodgment purposes, the fields required are ABN and entity’s name.
      For PAYG Annual Reports, TFND, TPAR and tax returns, contact address and mailing address and or Tax file number are required.
      Tax returns specifically will also require banking details for refunds or deduction.

      Address Details includes Postal Address and Residential Address fields to be completed depending on the type of reports you prepare for lodgment. GovReports will autofills some address fields as data is entered into the system.

      Bank Details
      This is required for tax return and or ATO deposits or refunds.

      User Allocation
      If you have additional authorised user/s on your account and want to allocate the client to them to Prepare and or Lodge the tax return, option is available from the Adding Client section.

    • 3. Non Individual
      Non Individual refers to all other tax payer types including company, trust partnership, …etc which would normally have an ABN and is the first field required to be completed.

      As GovReports has inbuilt ABN Look Up and cross-checks the validity of the ABN when adding an entity into GovReports, if an incorrect ABN is entered, you will be prompted that the ABN is invalid and or not matching with the trading name or name of the organisation. In which case you will not be able to proceed further or be able to prepare reports and lodge to ATO. This is incorporated to minimise error when lodging by the tax practitioner and for ATO in receiving the correct information for the right tax payer.

      For tax Return purposes, TFN is also required for Non-Individual tax payer type
      If the business entity does not have an ABN or a valid TFN, they may have the WPN to enter the system for validation with ATO
    Adding Clients in bulk:
    To add clients in bulk, client list from existing software or from the ATO Portal can be imported or uploaded into GovReports. GovReports accepts exported client list from other software or ATO in Comma Delimited (CSV) file format.
    • Step 1: Click on Import Clients to populate the template

    • Step 2: Record type implies the type of data option you want to import

    • Step 3: Map the required columns. The best match to each field on the selected file has been auto – selected.

      Click Save mapping as to set by entering template field name and click Save.

    • Step 4: Map the data from the file and Import.

      To view the details of the import client summary, select click here to view the imported clients.

      Go To My Clients – is the quick access to My Clients to view the imported clients.
    Export Clients
    To export Clients’ data, Go to My Clients and click action and select either Export to CSV or Export to XML.
    • 1. Export to XML – Allows exporting clients data in XML format.
    • 2. Export to CSV – Allows exporting clients data in CSV format.
    • 3.Shows Clients on Load – which will hide your client list to ensure client information are maintained confidential. On choosing this option, client list will not be shown but can find the client information only by searching client details like Name, CRN, TFN and ABN.

Client’s Profile
To access to client’s profile page, there are 3 options:
    • 1. Type the client name/ABN on the Search Field from Dashboard, then click on their name

    • 2. Go to My Clients and click on their name

    • 3. Go to My Clients and click on action and select Open

    • 4. Once you click on Open, you will be re directed to the Client’s Profile

    Client’s Profile has the following features:
    • • WIP
    • • Overview
      • Contact Details
      • Secondary Contact Details
      • Bank detail
    • • Saved/Draft
    • • Lodged
    • • Access Permission
    • • Forms
    • • Edit
    • • Payee Reports
    • • Client Update
    • • Action Tab
      • Manage Users
      • Outstanding Reports
      • Create Job
      • Archive
    WIP
    This is the work in progress for this specific client and is the service feature of GovReports Office Manager, this page will show all the current jobs and or tasks planned, scheduled and assigned by the author and designated authorized users with easy access to open for full view or editing status of the job or task.


    Overview
    Overview of the client is the overall profile of the client includes Client details, Secondary Contact Details and Bank details..etc.

    To make changes to the client profile, click Edit icon which is next to Current status and make changes to the appropriate fields and click Save to apply the changes.

    Contact Details
    What you have initially entered as current contact details of the client are displayed here and enable for correction to be made if applicable.
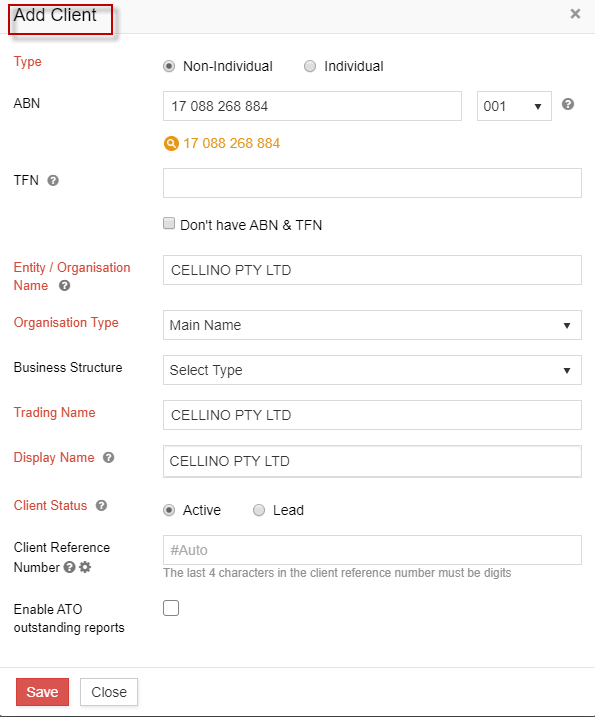
    If you have selected to edit the client details, you will be prompted with all the red Mandatory fields to be completed. And depending on the type of reports you prepare within GovReports, Address Details both Postal Address and Residential Address fields maybe required. GovReports will auto fills some address fields as you enter data into the system.

    To add Secondary contact details .Just click on the Add icon next to Secondary contact detail.

    If you select to add secondary contact details, you will be prompted to complete the red mandatory fields in the pop up template.
    Note: GovReports implements throughout our system the TFN validation and ABN Look Up so whenever an ABN is entered as a client or a contractor within the TPAR report, or a TFN for PAYG Annual Reports or TFND forms, system cross checks with ATO as part of the validation and alerts the users if the number entered if it is invalid.


    Bank Account Details
    This is required for tax return and or ATO deposits or refunds. From Overview of the client profile, changes can be made if required.

    The Edit icon is visibly for making changes where applicable and pop up window with details to be corrected and to save changes.

    Saved/Draft
    This optionshows the list of all reports prepared and saved for this specific client only


    Lodged
    Lodgedshows the list of all lodged reports for this specific client only


    Access Permission
    This function shows the list of all authorized users to the selected client profile and their role in the GovReports reporting process


    Job & Invoices
    This function shows the list of jobs and invoices created for the client over time or to date.
    On the jobs, you can expand the job to view the tasks or status of the job and will enable updates to be made to the job.

    Invoice list shows the list of invoices in draft or completed and with action functions to progress the invoice.


    To update the job or view the job in details, click 
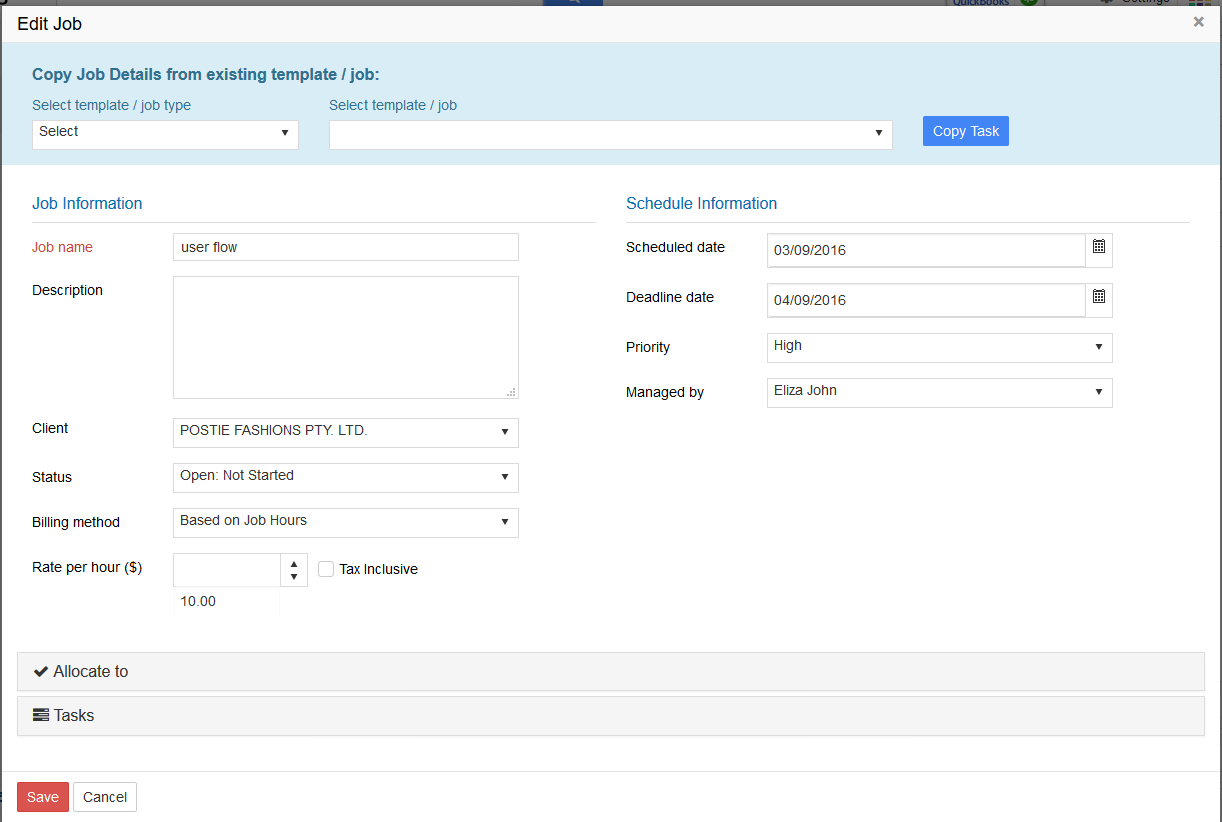
icon to populate the job details and enable for fields to be seen and corrected

    Invoice list shows the list of invoices in draft or completed and with action functions to progress the invoice.


Forms
  • Lists all subscribed and authorized accessible reporting forms


Employee/Payee Reports
  • If you have prepared and lodged PAYG Payment Summaries, TFND and TPAR for this client by data entry or via CSV file upload, the details of their employees will be recorded here for easy viewing access, printing, email and or download.


ATO Services
  • ATO Services provides the ability to view ATO accounts and its related transactions. It also provides an option to maintain relationships and client demographic information. The Agents can make use of the following services:
    • ATO Accounts
    • Maintain Client Authorisation
    • Remove Clients
    • Client Address
    • Client Authorised Contacts
    • Client Associates
    • Sync from ATO
    • Financial Institutions Details
    It is available to Tax Practitioners acting on behalf of Individuals and Non-Individuals, Businesses and Business Intermediaries. It is an enhanced functionality on top of the existing client update option.

    1. ATO Accounts

    For a business or an individual client, ATO accounts can be viewed from My Clients. Choose a client, select ATO Accounts” under the “ ATO services” button. Click on “Synchronise Accounts.

    It will show the list of ATO account information available including the balance and payable amount..In this case, the account types available for this business are Income Tax Account and Integrated Client Account. Click on “View” to view the transactions.

    Shows the complete list of financial transactions based on the statement of account view.in this case the transactions will be displayed for Income Tax Account as shown.

    For Individual client, the ATO accounts are Income Tax Account, Superannuation, Higher Education Loan Programme (optional) and Integrated Client Account (optional).

    The Integrated Client Account transactions for an individual client is as follows:

    You can filter the transactions based on the period start date and end date. Select the calendar icon and select/enter the date. Click on “Go” to get the transactions for the period selected.

    You can export the transaction details to an Excel or PDF with the “Export to Excel” or “Export to PDF” option.

    You can navigate in between the pages to view the transactions. By default, the default items per page is set to 50 and it can be changed as per your preference.


    2. Maintain Authorisations

    Allows registered agents (including Payroll providers) to add Client Agent Relationship links at the client level, account level and/or specific role level.

    Custom access includes Activity Statements and Payroll accounts.

    Full access includes Tax returns, Activity Statements and Payroll accounts. For example, if a Tax agent is authorised at the income tax level, he/she is also authorised for all client accounts.

    Please note that BAS agents “Full Access” means both Activity Statements and Payroll.

    To view and update the accounts you are authorised to act on behalf of:

    1. Go to My Clients -> Select client. Under Actions, click on “Open”

    2. On the top right corner, under “ATO Services, select “Maintain Authorisation”.

    3. The system will connect to the ATO

    4. If there is an Existing agent in the account, a checkbox with a tick appears under “Other Agent Link”. If there is no existing agent for that client account, it will be prefilled as “Not Linked”.

    5. You can tick the checkbox under “My Link” to associate your Agent details with the client’s Tax Returns or Activity Statements or Payroll accounts

    6. If you have authorisation for the account, you will need to tick the checkbox under “My Link”. Select or deselect the relevant authorisations and any additional accounts you are authorised for.

    7. Make a Declaration by ticking the checkbox and click on “Submit”


    3. Remove Clients:

    If you would like to remove a client from your existing clients list and update to ATO that you are no longer associated with that client, you can use “Remove Clients” option

    1. Go to My Clients -> Select client. Under Actions, click on “Open”

    2. On the top right corner, under “ATO Services”, select “Remove Clients”.

    3. The system will connect to the ATO

    4. You can review the Client Relation and Financial Account Details.

    Remove or Archive from GovReports:
    5. If you have made any lodgments to this client in GovReports, the client details can only be archived in GovReports. If you have not made any lodgments in GovReports, you can simply remove the client from GovReports and this removes your authorisation with that client in the ATO

    6. Please note that archiving the client details is the only possibility if you have already made lodgments to the client in GovReports. The client details cannot be removed.

    7. You can either select “Yes” to remove the client

    8. Make a Declaration by ticking the checkbox and click on “Remove”


    4. Client Address:

    This function lets you to view and update your client's addresses at client or account level. .

    1. Go to My Clients -> Select client. Under Actions, click on “Open”

    2. On the top right corner, under “ATO Services”, select “Client Address”.

    3. The system will connect to the ATO and fetch the pre-existing address details of the client. The primary addresses and addresses for accounts related to the client will be displayed.

    4. To edit the address details, click on “Expand”

    5. You can view the Address and contact details of that account. Click on “Edit” to update the details

    6. If the client is an “Individual”, you can update the following:

    • Postal Address
    • Residential Address
    • Business Hours Telephonic Details
    • Mobile Telephonic Details
    • Business After Hours Telephonic Details
    • Facsimile Details
    • Email Address Details
    • Electronic Service Address Alias Details
    • Internet Address Details

    7. If the client is a Business or a Company, you can update the following:

    • Postal Address
    • Business Address
    • Business Hours Telephonic Details
    • Mobile Telephonic Details
    • Business After Hours Telephonic Details
    • Facsimile Details
    • Email Address Details
    • Electronic Service Address Alias Details
    • Internet Address Details

    8. You will see the Business address, Postal address and contact details. Click on “Edit” on the top right corner

    9. If you want any section of the address details to be filled with your Business details (Agent’s Practice Details), you can click on “Fill My Practice Details” button on the right. If you wish to fill the details with the client details you have added in your GovReports account, click on “Fill Client Details”. Or you can also choose to enter the address details manually.


    10. Make the necessary changes, tick the declaration and click on “Submit”


    5. Authorised Contacts

    You can view authorised contacts for all of your clients' accounts and roles, as well as update or add contact details relevant to your authorisation.

    Primary contact details will only be displayed if you are authorised for all accounts. If you are only authorised for a specific account you won't see the primary contact details.

    To view, add and update primary and account authorised contact details:

    1. Go to My Clients -> Select client. Under Actions, click on “Open”

    2. On the top right corner, under “ATO Services”, select “Authorised Contacts”.

    3. The system will connect to the ATO and fetch the authorised contact details of the client.

    4. Click on “Edit” next to Primary details or edit next to each account you wish to edit

    5. If you want any section of the authorised contact details to be filled with your Business details (Agent’s Practice Details), you can click on “Fill My Practice Details” button on the right. If you wish to fill the details with the client details you have added in your GovReports account, click on “Fill Client Details”. Or you can also choose to enter the details manually.

    6. Make the necessary changes, tick the declaration and click on “Submit”


    6. Associates:

    The client associates service provides a view of the individuals or organisations that are associated with a particular entity. It will provide the ability to view a range of client relationships at the client level, where the ATO has been informed of the relationship and the associated entity has a valid record with the ATO (for example ABN and/or TFN).

    In ATO systems associates are stored as a link between the two parties. The link information shows the type of relationship, and the duration (start and end dates) of the relationship between clients. It includes formal relationships (such as between a company and its Directors) and administrative relationships (such as between the Group head and members of a tax related Grouping such as IT Consolidation & GST Grouping).

    To view details of your client's Associates, including the associate's name and position held:

    1. Go to My Clients -> Select client. Under Actions, click on “Open”

    2. On the top right corner, under “ATO Services”, select “Associates”.

    3. The system will connect to the ATO and fetch the Associates of the client.

    4. Select the “Associates Relationships” under Relationship Group, Relationship Type and “Current and historical data” under Record Status from the drop-down and click on “Get Details”

    5. You can view the ABN, Name, Start Date, End Date and Relation type of the associates

    7. Sync from ATO:

    This option can be used to ensure whether the client details recorded in ATO is the same as the details the Agents added in GovReports

    Whenever a new client is added in GovReports by the Agent using “Import” option, only the ABN, TFN and Name is imported. Hence, to update the client details in GovReports, “Sync from ATO” option can be used.

    To sync client details from ATO:

    1. Go to My Clients -> Select client. Under Actions, click on “Open”

    2. On the top right corner, under “ATO Services”, select “Sync from ATO”.

    3. The system will connect to the ATO and fetch the the client information.

    4. The Sync Client Details screen opens

    5. If you wish to update the above details in GovReports, click on “Update”

    6. The details will be updated in GovReports.


    8. Financial Institutions Details:

    Financial Institution Details can be simultaneously maintained in both GovReports and ATO. The Financial Institution belonging to the client can be added and deleted in GovReports which will be updated in ATO portal directly. The details of existing financial institutions can also be edited thereby updating in the ATO portal.

    1. To add, delete or edit the financial institution details, go to My Clients.

    2. You will see the list of clients. Select the client and click on “Open” under the “Actions” (3 dots)


    3. On the top right corner, under “ATO Services”, select “Financial Institution Details”


    4. GovReports system will connect to ATO and fetch the client’s details of financial institution


    5. The Financial Institutions Details screen will display the list of institutions


    6. You can add the client’s new Financial Institution if it is not in the list. Click on “Add” on the top right corner


    7. You must enter the Account Name, BSB and Account Number. Choose “FIA Usage” from the drop-down, select whether the account is held by the client or any third party.


    8. The option “Fill Client Details” will automatically fill the client account details if you have previously recorded the client account details in GovReports. The “Update GovReports Details” check box will be ticked by default. It means that the details entered or edited in GovReports will be automatically updated in the ATO portal


    9. Make a declaration for adding the client details and click on “Submit”


    10. The details will be added in ATO portal


    11. You can also edit the client’s existing Financial Institution Detail by clicking on “Edit” next to it.


    12. The “Update Financial Institution” window opens with an option to edit the Account name, Account Number, BSB, FIA Usage and Account Held by information


    13. After making appropriate changes, tick the declaration and click on “Submit”


    14. The information edited will be updated in the ATO portal

    15. The client’s financial institution details can also be deleted from GovReports. Click on “Delete” next to the Financial institution in the list


    16. A window with the Account Name appears


    17. Make a declaration and click on “Delete”


    18. The Financial Institution detail will be deleted in GovReports and as well as ATO portal


    Import clients from ATO

    Asynchronously download all your clients from ATO portal to GovReports.

    Step 1: Go to My Clients -> Import -> Click on the drop down and select ‘From ATO’


    ATO Services provides the ability to view ATO accounts and its related transactions. It also provides an option to maintain relationships and client demographic information.

    The Agents can make use of the following services:

    • Client Name, Type & Identifiers
    • Contact Name and Phone numbers
    • Address
    • Financial Institutions Details

    Estimate time to fetch the Record will be depends on the volume of clients and server response from ATO.

    It is asynchronous process which system can automatically pull all details and notify after process completion

    Overwrite the existing client information, Tick the overwrite option and Click ‘Imports & Close’ button to start the importing client information from ATO


    Importing Status:
    When client import is in progress then My Clients page will have a status on top right corner.

    After the successful import process, Client detail will display in the client list and success email will send to the GovReports registered email.

Engagement Letter
  • Setting up the Services:

    It is important to outline the list of services that can be provided to the clients.
    You can update the services list periodically whenever you wish to add a new service or remove a service from the list.
    Click on Settings -> My Practice Settings.


    1. Select “New Client Services”
    2. You will see “New Client Services”. You can click on “Customize” on the top right corner to delete or edit the existing items in the services list.
    3. You can add, edit or delete the sections, title and items in the services to customize exactly to your needs
    4. For example, you can click on “plus” icon next to the title to add a new item under the title
    5. Enter the item name and whether you need it as a checkbox or question. Save the item and it will appear in the services list.
    6. The new item added will appear in the services list.
    7. Thus, you can customize the default services list.
    Sending the engagement letter to the clients:
    1. The engagement letter is important to be sent to the clients and it must be signed by them for successful engagement. This will ensure the credibility and resolves any expectation gaps in the level of service provided.
    2. Go to My Clients -> Click on the client name to whom you want to send the engagement letter.
    3. On the top right corner, click on “More” button ie, 3 horizontal lines and click on “Engagement letter"
    4. The first section is “Services”. To list the agreed services to provide for the client
    5. Tick the services you wish to provide and click on “Save"
    6. The services will be saved. The next section is “Templates”. Click on “Templates”
    7. Under “Templates”, you can see the default templates. Use existing default templates or create new template to send the Engagement letter. You can also copy the template and customise it for the clients
    8. When you click on “Add New Template”, you can create a new template from scratch
    9. This will open up the space for creating the template as shown below:
    10. Or you can simply click on “Start” to use the default template, make appropriate changes and send it to the client for Authorisation:
    11. After you click on “Start”, the document opens up. You can enter the Commencement date, End date and Fiscal End date. The Commencement date and End date is the Engagement duration. Fiscal End date is the end date of the Financial Year.
    12. After entering the date, click on “Save”. Now, you can preview, or send for eSignature or email the Engagement letter to your client
    13. If you click on “Preview”, you can see the appropriate format and placeholders in the letter,
    14. If you click on “Email to client”, “Send Authorisation” window opens. Select the recipient either you or the client. The Engagement letter will be automatically attached and will be sent as an email from you to your client.

    15. If you click on “Send for eSignature”, the digital authentication screen opens

      You can see the “Engagement letter” attached as a PDF and you can see your client added under “Add Recipients” section. You can set the “Access Security” as either “No security” or with security code.
    16. You can type any message contents if you would like or you can simply click on “Next”.
    17. You can see a preview of the Engagement letter. Your signature style on the top left corner
    18. There are options to place the signature location for your client (“Set Signature Location”) and for the agent to place his/her signature (“Place My Signature”). You can select the appropriate option and place it on the document
    19. You can navigate between the pages and place the signature or set the signature location for the client.
      Navigate through the pages:

      Set the Signature Location for the client:

      Place the signature (Agent):
    20. You can either “Save as Draft” or “Send for Signature”
    21. The Engagement letter sent will be in “Pending Signature” status.
    22. You can go to My Clients -> Select “Client Name”. On top right corner under “More” option click on Engagement letter.

      You can also view the status under “Documents” tab